App Development
How to build an Angular App with Authentication in 30 Minutes
Angular version 2.0 or later is a handy and yet powerful tool for creating single-page apps. There are many fascinating examples of web apps built on Angular. The most adorable feature of Angular is building reusable components, that allow you to separate different concerns of an app. Let’s take an example of authentication that we are going to create. Though it might be tough to build at the very beginning, once it’s ready, the authentication logic can be used again and again in any component of your app.
How to Build a simple Web App using Angular CLI
Now we are going to build a simple web app using Angular CLI (Command line tools). This tool allows to easily scaffold the components and even complete projects. We’ll develop an app containing search, edit and authentication features.
When it comes to custom web application development, Angular is an essential tool that saves your time, as you can reuse your code across all the platforms.
Angular App Creation Process
This task requires:
- not more than 30 minutes
- any text editor you prefer or any IDE, for example VS Code
- Node.js installed
- npm installed
- Angular CLI installed. If you don’t have one, here is a tip:
npm install -g @angular/cli
Now create a new ng-demo project and run npm install in it. Usually this task doesn’t take much time, but depends on your connection speed. Here is a command:
ng new ng-demo

[mraible:~/dev] $ ng new ng-demo
installing ng
create .editorconfig
create README.md
create src/app/app.component.css
create src/app/app.component.html
create src/app/app.component.spec.ts
create src/app/app.component.ts
create src/app/app.module.ts
create src/assets/.gitkeep
create src/environments/environment.prod.ts
create src/environments/environment.ts
create src/favicon.ico
create src/index.html
create src/main.ts
create src/polyfills.ts
create src/styles.css
create src/test.ts
create src/tsconfig.app.json
create src/tsconfig.spec.json
create src/typings.d.ts
create .angular-cli.json
create e2e/app.e2e-spec.ts
create e2e/app.po.ts
create e2e/tsconfig.e2e.json
create .gitignore
create karma.conf.js
create package.json
create protractor.conf.js
create tsconfig.json
create tslint.json
Successfully initialized git.
Installing packages for tooling via npm.
Installed packages for tooling via npm.
You can 'ng set --global packageManager=yarn'.
Project 'ng-demo' successfully created.
[mraible:~] 46s
Now when the project is created, let’s move to the next step.
Run your App
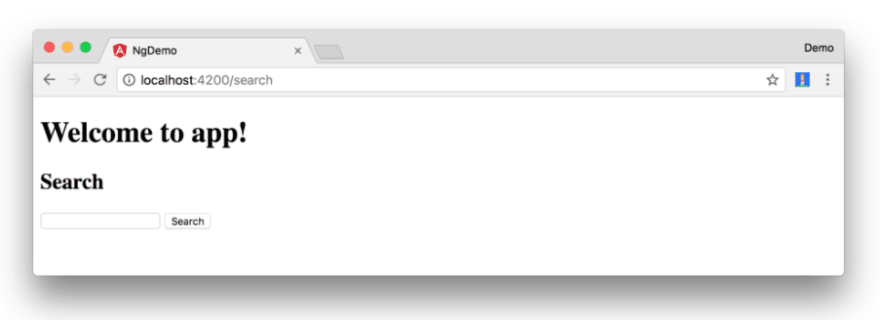
The project is served via webpack dev server. Open the ng-demo directory and run the ng serve.
You’ll see a http://localhost:4200 screen like this:
To ensure your project passed the test, run:
$ ng test
...
Chrome 60.0.3112 (Mac OS X 10.12.6): Executed 3 of 3 SUCCESS (0.239 secs / 0.213 secs)
Adding a search feature
Now let’s add an easy search feature. To do it, open the IDE, you’ve chosen or a simple text editor. If you are using IntelliJ IDEA like we do, open File > New Project > Static Web and point to the ng-demo directory.
Change directory into your project’s one and run the next command that will create a search component we are looking for:
$ ng g component search
installing component
  create src/app/search/search.component.css
  create src/app/search/search.component.html
  create src/app/search/search.component.spec.ts
  create src/app/search/search.component.ts
  update src/app/app.module.ts
Find the src/app/search/search.component.html and replace the default HTML with the following piece:
<h2>Search</h2>
<form>
  <input type="search" name="query" [(ngModel)]="query" (keyup.enter)="search()">
  <button type="button" (click)="search()">Search</button>
</form>
<pre>{{searchResults | json}}</pre>
To make your Search component work properly, you need to add the appRoutes constant into src/app/app.module.ts and import it in @NgModule:
import { Routes, RouterModule } from '@angular/router';

const appRoutes: Routes = [
  {path: 'search', component: SearchComponent},
  {path: '', redirectTo: '/search', pathMatch: 'full'}
];

@NgModule({
  ...
  imports: [
    ...
    RouterModule.forRoot(appRoutes)
  ]
  ...
})
export class AppModule { }
In order to have the route setup, find the src/app/app.component.html, adjust the placeholder content. Then add a <router-outlet> tag to have the routes displayed.
<h1>Welcome to {{title}}!</h1>
<!-- Routed views go here -->
<router-outlet></router-outlet>
The result will look like this:
Now when you know how to create a new component in a basic Angular app using Angular CLI, let’s move to creating a localStorage to build a fake API.
To make your app get the search results, you have to create a SearchService, which is making HTTP requests to a JSON file. Begin with creating a new service:
$ ng g service search
installing service
  create src/app/search.service.spec.ts
  create src/app/search.service.ts
WARNING Service is generated but not provided, it must be provided to be used
After the service is created, you have to test how it works. That means you need to make a new directory:
mkdir -p src/app/shared/search
mv src/app/search.service.* src/app/shared/search/.
Than build src/assets/data/people.json to store your data.
[
  {
    "id": 1,
    "name": "Peyton Manning",
    "phone": "(303) 567-8910",
    "address": {
      "street": "1234 Main Street",
      "city": "Greenwood Village",
      "state": "CO",
      "zip": "80111"
    }
  },
  {
    "id": 2,
    "name": "Demaryius Thomas",
    "phone": "(720) 213-9876",
    "address": {
      "street": "5555 Marion Street",
      "city": "Denver",
      "state": "CO",
      "zip": "80202"
    }
  },
  {
    "id": 3,
    "name": "Von Miller",
    "phone": "(917) 323-2333",
    "address": {
      "street": "14 Mountain Way",
      "city": "Vail",
      "state": "CO",
      "zip": "81657"
    }
  }
]
Change the src/app/shared/search/search.service.ts and add Httpt to be a dependency in its constructor. Then create a getAll() method to collect all the people and don’t forget to determine Person and Address methods because JSON will be ranged to them.
import { Injectable } from '@angular/core';
import { Http, Response } from '@angular/http';
import 'rxjs/add/operator/map';

@Injectable()
export class SearchService {
  constructor(private http: Http) {}

  getAll() {
    return this.http.get('assets/data/people.json')
        .map((res: Response) => res.json());
  }
}

export class Address {
  street: string;
  city: string;
  state: string;
  zip: string;

  constructor(obj?: any) {
    this.street = obj && obj.street || null;
    this.city = obj && obj.city || null;
    this.state = obj && obj.state || null;
    this.zip = obj && obj.zip || null;
  }
}

export class Person {
  id: number;
  name: string;
  phone: string;
  address: Address;

  constructor(obj?: any) {
    this.id = obj && Number(obj.id) || null;
    this.name = obj && obj.name || null;
    this.phone = obj && obj.phone || null;
    this.address = obj && obj.address || null;
  }
}
The next step will be editing src/app/shared/index.ts in order to make those classes usable for our components.
export * from './search/search.service';
Creating this file allows you to import multiple classes on a single line instead of importing each individual class on a separate line.
Find the src/app/search/search.component.ts and import the classes:
import { Person, SearchService } from '../shared';
Here you can add query and searchResults and inject the SearchService into the constructor.
export class SearchComponent implements OnInit {
  query: string;
  searchResults: Array<Person>;

  constructor(private searchService: SearchService) {}
Now implement a search() method to call the getAll() one.
search(): void {
  this.searchService.getAll().subscribe(
    data => { this.searchResults = data; },
    error => console.log(error)
  );
}
After adding the needed methods, your browser will show you the notification that you lack the provider for SearchService. To get rid of this error, you need to update the app.module.ts and import the SearchService. Don’t forget to add this service to the list of providers and import the HttpModule.
import { SearchService } from './shared';
import { HttpModule } from '@angular/http';

@NgModule({
  ...
  imports: [
    ...
    HttpModule
  ],
  providers: [SearchService],
  bootstrap: [AppComponent]
})
Now the search button works! Congratulations!
Now let’s make our results look better. To do it, open the src/app/search/search.component.html and remove the <pre> tag to replace it with a <table>.
<table *ngIf="searchResults">
  <thead>
  <tr>
    <th>Name</th>
    <th>Phone</th>
    <th>Address</th>
  </tr>
  </thead>
  <tbody>
  <tr *ngFor="let person of searchResults; let i=index">
    <td>{{person.name}}</td>
    <td>{{person.phone}}</td>
    <td>{{person.address.street}}<br/>
      {{person.address.city}}, {{person.address.state}} {{person.address.zip}}
    </td>
  </tr>
  </tbody>
</table>
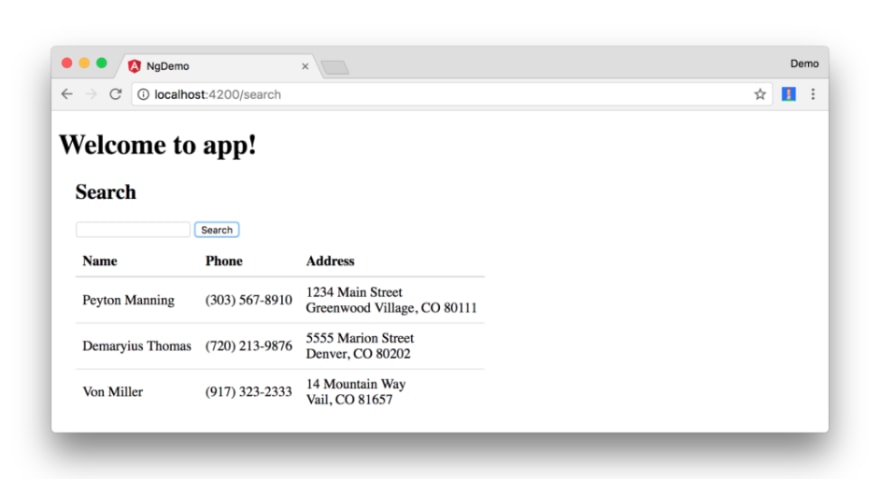
Now let’s add some CSS in src/app/search/search.component.css.
table {
  margin-top: 10px;
  border-collapse: collapse;
}

th {
  text-align: left;
  border-bottom: 2px solid #ddd;
  padding: 8px;
}

td {
  border-top: 1px solid #ddd;
  padding: 8px;
}
The result we got looks much better now:
Thought it looks fine, we are still missing the search functionality! To fix it, just add the search() method to SearchService.
import { Observable } from 'rxjs';

search(q: string): Observable<any> {
  if (!q || q === '*') {
    q = '';
  } else {
    q = q.toLowerCase();
  }
  return this.getAll().map(data => data.filter(item => JSON.stringify(item).toLowerCase().includes(q)));
}
You also need to refactor SearchComponent to make it call this method with its query variable.
search(): void {
  this.searchService.search(this.query).subscribe(
    data => { this.searchResults = data; },
    error => console.log(error)
  );
}
After refactoring the new search result will be filtered depending on the query value you set.
And now let’s move to the next section where we’ll learn how to edit and save the records.
Add an Edit Feature
Open the src/app/search/search.component.html and add the possibility to edit the person:<td><a [routerLink]="['/edit', person.id]">{{person.name}}</a></td>
Next, generate an Edit Components by running the following command and add the route for it in src/app/app.module.ts:
$ ng g component edit
installing component
  create src/app/edit/edit.component.css
  create src/app/edit/edit.component.html
  create src/app/edit/edit.component.spec.ts
  create src/app/edit/edit.component.ts
  update src/app/app.module.ts


const appRoutes: Routes = [
  {path: 'search', component: SearchComponent},
  {path: 'edit/:id', component: EditComponent},
  {path: '', redirectTo: '/search', pathMatch: 'full'}
];
Now, to display an editable form, you need to update src/app/edit/edit.component.html. You can also add the id attributes to most of the elements to simplify the integration tests later.
<div *ngIf="person">
  <h3>{{editName}}</h3>
  <div>
    <label>Id:</label>
    {{person.id}}
  </div>
  <div>
    <label>Name:</label>
    <input [(ngModel)]="editName" name="name" id="name" placeholder="name"/>
  </div>
  <div>
    <label>Phone:</label>
    <input [(ngModel)]="editPhone" name="phone" id="phone" placeholder="Phone"/>
  </div>
  <fieldset>
    <legend>Address:</legend>
    <address>
      <input [(ngModel)]="editAddress.street" id="street"><br/>
      <input [(ngModel)]="editAddress.city" id="city">,
      <input [(ngModel)]="editAddress.state" id="state" size="2">
      <input [(ngModel)]="editAddress.zip" id="zip" size="5">
    </address>
  </fieldset>
  <button (click)="save()" id="save">Save</button>
  <button (click)="cancel()" id="cancel">Cancel</button>
</div>
Now, import model and service classes by modifying EditComponent. This allows you to use SearchService to get data.
import { Component, OnInit, OnDestroy } from '@angular/core';
import { Address, Person, SearchService } from '../shared';
import { Subscription } from 'rxjs';
import { ActivatedRoute, Router } from '@angular/router';

@Component({
  selector: 'app-edit',
  templateUrl: './edit.component.html',
  styleUrls: ['./edit.component.css']
})
export class EditComponent implements OnInit, OnDestroy {
  person: Person;
  editName: string;
  editPhone: string;
  editAddress: Address;

  sub: Subscription;

  constructor(private route: ActivatedRoute,
              private router: Router,
              private service: SearchService) {
  }

  ngOnInit() {
    this.sub = this.route.params.subscribe(params => {
      const id = + params['id']; // (+) converts string 'id' to a number
      this.service.get(id).subscribe(person => {
        if (person) {
          this.editName = person.name;
          this.editPhone = person.phone;
          this.editAddress = person.address;
          this.person = person;
        } else {
          this.gotoList();
        }
      });
    });
  }

  ngOnDestroy() {
    this.sub.unsubscribe();
  }

  cancel() {
    this.router.navigate(['/search']);
  }

  save() {
    this.person.name = this.editName;
    this.person.phone = this.editPhone;
    this.person.address = this.editAddress;
    this.service.save(this.person);
    this.gotoList();
  }

  gotoList() {
    if (this.person) {
      this.router.navigate(['/search', {term: this.person.name} ]);
    } else {
      this.router.navigate(['/search']);
    }
  }
}
To add the possibility to find people by their ID we need to modify the search service. In order to be aware of any updated objects in local storage, you need to modify the search method.
search(q: string): Observable<any> {
  if (!q || q === '*') {
    q = '';
  } else {
    q = q.toLowerCase();
  }
  return this.getAll().map(data => {
    const results: any = [];
    data.map(item => {
      // check for item in localStorage
      if (localStorage['person' + item.id]) {
        item = JSON.parse(localStorage['person' + item.id]);
      }
      if (JSON.stringify(item).toLowerCase().includes(q)) {
        results.push(item);
      }
    });
    return results;
  });
}

get(id: number) {
  return this.getAll().map(all => {
    if (localStorage['person' + id]) {
      return JSON.parse(localStorage['person' + id]);
    }
    return all.find(e => e.id === id);
  });
}

save(person: Person) {
  localStorage['person' + person.id] = JSON.stringify(person);
}
After all the manipulations you get the search feature and the possibility to update the user’s information.
Updating the person’s data depends on the save function in src/app/edit/edit.component.html. This function calls a gotoList() and adds the person’s name to the URL, when users goes back to the search screen.
gotoList() {
  if (this.person) {
    this.router.navigate(['/search', {term: this.person.name} ]);
  } else {
    this.router.navigate(['/search']);
  }
}
To make the Search Component execute the search automatically, we need to add this logic to our constructor:
import { ActivatedRoute } from '@angular/router';
import { Subscription } from 'rxjs';
...

sub: Subscription;

constructor(private searchService: SearchService, private route: ActivatedRoute) {
  this.sub = this.route.params.subscribe(params => {
    if (params['term']) {
      this.query = decodeURIComponent(params['term']);
      this.search();
    }
  });
}
If you need to clean up the subscription, add the OnDestroy and define the ngOnDestroy method.
import { Component, OnInit, OnDestroy } from '@angular/core';

export class SearchComponent implements OnInit, OnDestroy {
...
  ngOnDestroy() {
    this.sub.unsubscribe();
  }
}
One more step complete and you have the search, edit and update functionality within your app.
Validation Form
When creating any form, the main goal is to collect any sort of information and that’s why we need to make some of the fields to be required. If you miss this step, there would be nothing to search. In our case, let’s make the Name field required. To do that we need to modify the edit.component.html by adding the required attribute to the name <input>.<input [(ngModel)]="editName" name="name" id="name" placeholder="name" required/>
Another required action is to cover everything in a <form> element by adding <form> after the <h3> tag and before the last </div>. Then add the (ngSubmit) handler to your form, that will turn the save button into a regular submit button.
<h3>{{editName}}</h3>
<form (ngSubmit)="save()" ngNativeValidate>
  ...
  <button type="submit" id="save">Save</button>
  <button (click)="cancel()" id="cancel">Cancel</button>
</form>
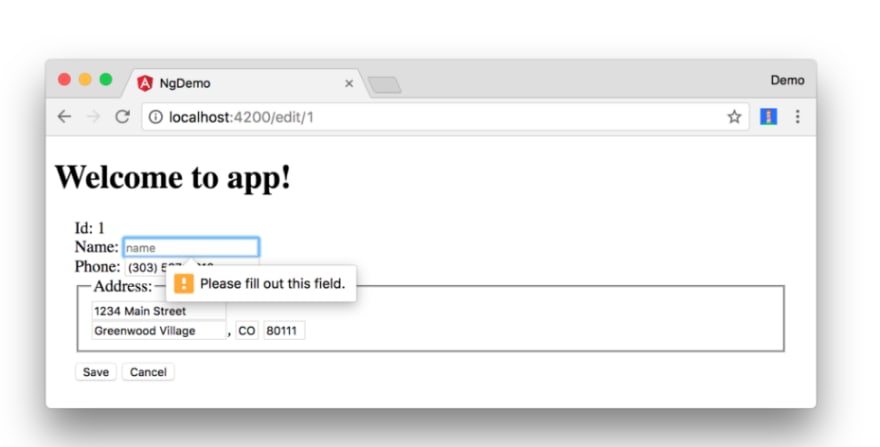
Now, wherever you put the required attribute, the field becomes required.
Now the name field id required but we face another error when the address fields are blank.
If ngModel is used within a form tag, either the name attribute must be set or the form control must be defined as standalone in ngModelOptions.
Example 1: <input [(ngModel)]="person.firstName" name="first">
Example 2: <input [(ngModel)]="person.firstName" [ngModelOptions]="{standalone: true}">
Fix this error by simple adding a name attribute to all the blank fields.
  <input [(ngModel)]="editAddress.street" name="street" id="street"><br/>
  <input [(ngModel)]="editAddress.city" name="city" id="city">,
  <input [(ngModel)]="editAddress.state" name="state" id="state" size="2">
  <input [(ngModel)]="editAddress.zip" name="zip" id="zip" size="5">
</address>
Create an OpenID Connect App in Okta
Now we are going to use OpenID Connect (OIDC) to verify the identity of users and to get their basic profile information. Than we’ll integrate the user authentication function to our app using Okta.
The first step is registration and creation of an OIDC application.
Then, login or create a new Okta account. Click on Applications – Add application – SPA – Next.
On the last page set http://localhost:4200 as a base URI, login redirect URI and logout redirect URI. Click DONE.
Your page should look like this:
Next, add OAuth 2 and OpenID Connect using npm: npm install --save angular-oauth2-oidc
Import OAuthService into src/app/app.component.ts and make your app use the settings of your Okta app.
import { OAuthService, JwksValidationHandler } from 'angular-oauth2-oidc';

...

  constructor(private oauthService: OAuthService) {
    this.oauthService.redirectUri = window.location.origin;
    this.oauthService.clientId = '{client-id}';
    this.oauthService.scope = 'openid profile email';
    this.oauthService.issuer = 'https://dev-{dev-id}.oktapreview.com';
    this.oauthService.tokenValidationHandler = new JwksValidationHandler();

    // Load Discovery Document and then try to login the user
    this.oauthService.loadDiscoveryDocument().then(() => {
      this.oauthService.tryLogin();
    });
  }
...
Create src/app/home/home.component.ts and add the Login and Logout buttons.
import { Component } from '@angular/core';
import { OAuthService } from 'angular-oauth2-oidc';

@Component({
  template: `
    <div *ngIf="givenName">
      <h2>Welcome, {{givenName}}!</h2>
      <button (click)="logout()">Logout</button>
      <p><a routerLink="/search" routerLinkActive="active">Search</a></p>
    </div>

    <div *ngIf="!givenName">
      <button (click)="login()">Login</button>
    </div>`
})
export class HomeComponent {

  constructor(private oauthService: OAuthService) {
  }

  login() {
    this.oauthService.initImplicitFlow();
  }

  logout() {
    this.oauthService.logOut();
  }

  get givenName() {
    const claims = this.oauthService.getIdentityClaims();
    if (!claims) {
      return null;
    }
    return claims['name'];
  }
}
Create src/app/shared/auth/auth.guard.service.ts so the users who are not authenticated can navigate to the HomeComponent.
import { Injectable } from '@angular/core';
import { ActivatedRouteSnapshot, CanActivate, Router, RouterStateSnapshot } from '@angular/router';
import { OAuthService } from 'angular-oauth2-oidc';

@Injectable()
export class AuthGuard implements CanActivate {

  constructor(private oauthService: OAuthService, private router: Router) {}

  canActivate(route: ActivatedRouteSnapshot, state: RouterStateSnapshot): boolean {
    if (this.oauthService.hasValidIdToken()) {
      return true;
    }

    this.router.navigate(['/home']);
    return false;
  }
}
In src/shared/index.ts export the AuthGuard: export * from ./auth/auth.guard.service;
Then insert the OAuthModule into src/app/app.module.ts, configure the new HomeComponent, and lock the search and edit routes down using AuthGuard.
import { OAuthModule } from 'angular-oauth2-oidc';
import { HomeComponent } from './home/home.component';
import { SearchService, AuthGuard } from './shared';

const appRoutes: Routes = [
  {path: 'search', component: SearchComponent, canActivate: [AuthGuard]},
  {path: 'edit/:id', component: EditComponent, canActivate: [AuthGuard]},
  {path: 'home', component: HomeComponent},
  {path: '', redirectTo: 'home', pathMatch: 'full'},
  {path: '**', redirectTo: 'home'}
];

@NgModule({
  declarations: [
    ...
    HomeComponent
  ],
  imports: [
    ...
    OAuthModule.forRoot()
  ],
  providers: [
    AuthGuard,
    SearchService
  ],
  bootstrap: [AppComponent]
})
export class AppModule { }
These manipulations will let you to run the ng serve and see the new login button.
You can log in using some of the user’s information of your Okta App.
Authentication with the Okta Auth SDK
Finally we pass to the last milestone of our tiny app!
We’ll use the Okta’s authentication API and OAuth 2.0 API. Use npm to install:
npm install @okta/okta-auth-js –save
You also need to add a reference to this library’s main JavaScript file in .angular-cli.json:
"scripts": [
  "../node_modules/@okta/okta-auth-js/dist/okta-auth-js.min.js"
],
Now install Bootstrap 4 by: npm install [email protected] --save
Add a reference to Bootstrap’s CSS file (src/styles.css ):@import "~bootstrap/dist/css/bootstrap.css";
Use the Bootstrap classes for navigation bar and grid system in a src/app/app.component.html.
<nav class="navbar navbar-light bg-secondary">
  <a class="navbar-brand text-light" href="#">Welcome to {{title}}!</a>
</nav>
<div class="container-fluid">
  <router-outlet></router-outlet>
</div>
Let’s wrap the Okta Auth SDK by creating src/app/shared/auth/okta.auth.wrapper.ts and integrating it with OAuth Service.
import { OAuthService } from 'angular-oauth2-oidc';
import { Injectable } from '@angular/core';

declare const OktaAuth: any;

@Injectable()
export class OktaAuthWrapper {

  private authClient: any;

  constructor(private oauthService: OAuthService) {
    this.authClient = new OktaAuth({
      url: this.oauthService.issuer
    });
  }

  login(username: string, password: string): Promise<any> {
    return this.oauthService.createAndSaveNonce().then(nonce => {
      return this.authClient.signIn({
        username: username,
        password: password
      }).then((response) => {
        if (response.status === 'SUCCESS') {
          return this.authClient.token.getWithoutPrompt({
            clientId: this.oauthService.clientId,
            responseType: ['id_token', 'token'],
            scopes: ['openid', 'profile', 'email'],
            sessionToken: response.sessionToken,
            nonce: nonce,
            redirectUri: window.location.origin
          })
            .then((tokens) => {
              const idToken = tokens[0].idToken;
              const accessToken = tokens[1].accessToken;
              const keyValuePair = '#id_token=${encodeURIComponent(idToken)}&access_token=${encodeURIComponent(accessToken)}';
              return this.oauthService.tryLogin({ <1>
                customHashFragment: keyValuePair,
                disableOAuth2StateCheck: true
              });
            });
        } else {
          return Promise.reject('We cannot handle the ' + response.status + ' status');
        }
      });
    });
  }
}
We also need to export OktaAuthWrapper in src/shared/index.ts:export * from './auth/okta.auth.wrapper';
And later add OktaAuthWrapper as a provider in app.module.ts.:
import {SearchService, AuthGuard, OktaAuthWrapper} from './shared';

@NgModule({
  ...
  providers: [
    ...
    OktaAuthWrapper
  ],
  bootstrap: [AppComponent]
})
In a HomeComponent modify the template of OktaAuth to have both login and sign-in buttons.
@Component({
  template: `
    <div *ngIf="givenName" class="col-12 mt-2">
      <button (click)="logout()" class="btn btn-sm btn-outline-primary float-right">Logout</button>
      <h2>Welcome, {{givenName}}!</h2>
      <p><a routerLink="/search" routerLinkActive="active">Search</a></p>
    </div>

    <div class="card mt-2" *ngIf="!givenName">
      <div class="card-body">
        <h4 class="card-title">Login with Authorization Server</h4>
        <button class="btn btn-primary" (click)="login()">Login</button>
      </div>
    </div>

    <div class="card mt-2" *ngIf="!givenName">
      <div class="card-body">
        <h4 class="card-title">Login with Username/Password</h4>

        <p class="alert alert-error" *ngIf="loginFailed">
          Login wasn't successful.
        </p>

        <div class="form-group">
          <label>Username</label>
          <input class="form-control" [(ngModel)]="username">
        </div>
        <div class="form-group">
          <label>Password</label>
          <input class="form-control" type="password" [(ngModel)]="password">
        </div>
        <div class="form-group">
          <button class="btn btn-primary" (click)="loginWithPassword()">Login</button>
        </div>
      </div>
    </div>`
})
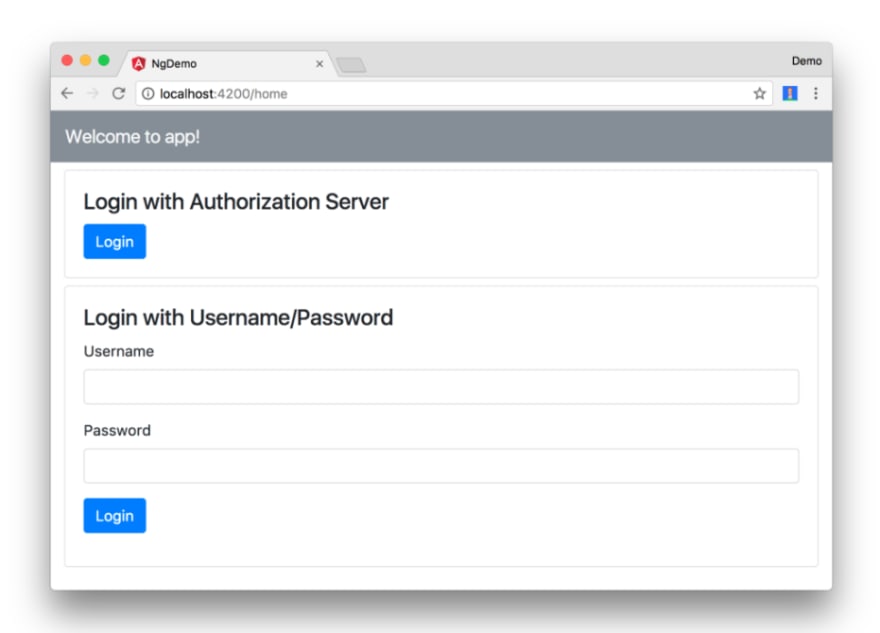
That’s how the HomeComponent should look like:
Then comes adding the local variables for both username and password fields, importing OktaAuthWrapper, and then implementing a loginWithPassword() method in HomeComponent.
import { OktaAuthWrapper } from '../shared';
...

username;
password;

constructor(private oauthService: OAuthService,
            private oktaAuthWrapper: OktaAuthWrapper) {
}

loginWithPassword() {
  this.oktaAuthWrapper.login(this.username, this.password)
    .then(_ => console.debug('logged in'))
    .catch(err => console.error('error logging in', err));
}
Now your app has not only a sign-in form but also the possibility to search and view user’s information! Congrats!
So, guys, did you track the time for creating your small apps? How long did it take to build an Angular App with authentication?


Open-Source GPT-3/4 LLM Alternatives to Try in 2026

Top Facebook Apps and Companies

Can Universities detect ChatGPT content? Yes!

Best Conferences like SXSW in 2026-2027
How to Build Own LLM and What Team do You Need in 2026
Open-Source GPT-3/4 LLM Alternatives to Try in 2026
Top Facebook Apps and Companies
How to Build Own LLM and What Team do You Need in 2026
How to find Best Wix Corvid Developers in 2026