News
How to install and Set Up Google Site Kit in WordPress?
Meet Google Site Kit is the latest analytics/SEO plug-in developed by Google for WordPress web development.

Google Site Kit is the latest analytics/SEO plug-in developed by Google for WordPress web development. It allows you to connect Google’s online marketing services such as Google Analytics, Search Console, Google AdSense, PageSpeed Insights, Google Tag Manager and Google Optimize– directly to your WordPress website.
Once connected, you will have the ability to view search, PageSpeed performance, analytics, and other data, directly in your WordPress dashboard, and separately in pages and posts. This is really very helpful in obtaining page-level insights straight in your WordPress dashboard.
This guide shows you how to install and set up Google Site Kit in WordPress and connect the 2 most famous Google services to your WordPress dashboard – i.e. Google Search Console and Google Analytics for your domain or subdomain.
Overview of Google Site Kit in WordPress
It’s very important to recognize that the Google Site Kit’s primary job is to connect your WordPress website to the corresponding Google services like Search Console and Google Analytics.
Ideally, you need to have previously configured both Google Analytics and Search Console in your WordPress website. Otherwise, then we recommend you to setup both Search Console and Google Analytics before installing Google Site Kit.
While Google Site Kit can build a new account for a number of properties like Search Console, you need to refrain from doing this. I recommend you manually set up both Google Analytics and Google Search Console, since the manual process provides you a better understanding of how marketing analytics works.
Here is a quick summary of what you will be doing:
- Manually install the Google Site Kit plug-in
- Create and connect a new client configuration: A very easy click-and-copy-paste job, at which Google does many of the heavy lifting for you.
- Link properties like Search Console and Analytics to Site Kit.
Let us get started with this tutorial!
Way to manually Install the Google Site Kit WordPress plug-in
Google declared Site Kit for WordPress in WordCamp US 2018, and a year later, they released the developer preview. You can download the plug-in from the announcement post and give feedback on Github.
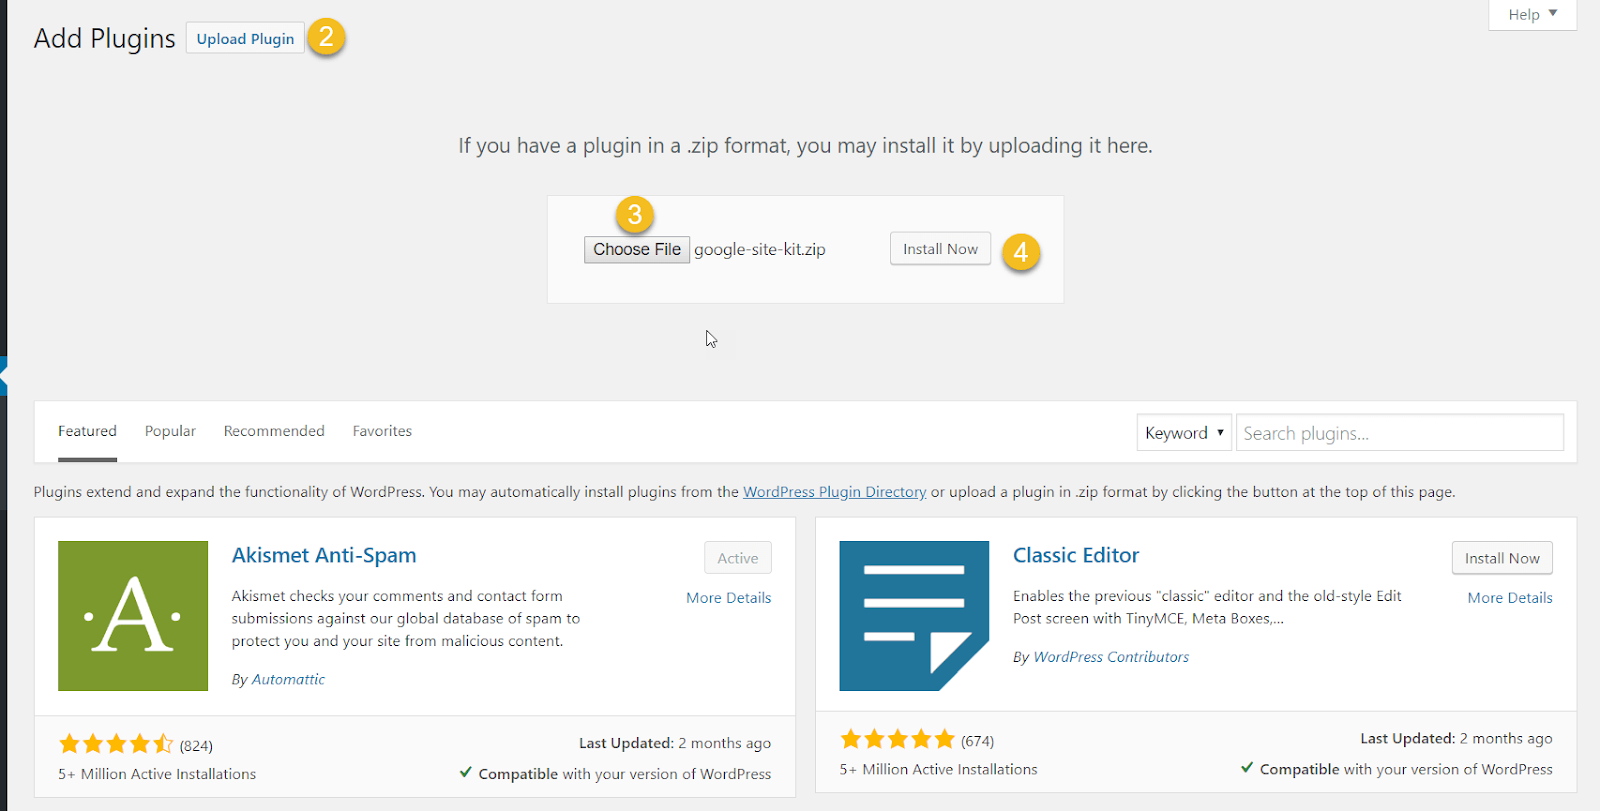
- Once downloaded, login to the WordPress dashboard and proceed to Plugins → Add New and click on Upload Plugin.
- Upload the google-site-kit.zip file and then click Install Now.
- Activate the plug-in in the next step.

Once done, you should see a display screen shown above.
Configuring Google Site Kit in WordPress
In this, we will configure the Google Site Kit plug-in in WordPress. Think about this step as creating a highway between your WordPress website and the Google services. After you create the highway, you can connect Site Kit into each of supported properties like google Search Console and Google Analytics. By default option, when you make the client configuration, your Google Search Console information will be connected to Site Kit.
Understanding the OAuth Client Configuration
Technically speaking, we will be building a client configuration in the Developer Console. To build a client configuration, you will be making a new set of OAuth Credentials with your Google Cloud account.
The best section – the whole procedure is automated. You do not require to manually build a Google Cloud account, add a payment process or manage with any advanced configuration. It automatically takes care of this for you.
We have confirmed this automated procedure each with a new Google account and also an existing primary Google account.
This OAuth client will be the highway on which you will get Google’s services. And in order to do so, you will need to log into the freshly created client with your primary Google account. This account should have accessibility to Google Analytics and Google Search Console data that you would wish to connect to Google Site Kit.
How to link Google Search Console to WordPress using Site Kit
As Ihave assured at the beginning of this guide, building the client configuration in Google Site Kit plug-in is a click-and-copy-paste matter. This procedure will automatically link your Search Console data to your WordPress website. If you don’t have your website added to the Google Search Console, Site Kit will create one for you.
Here’s how to do it:
Step 1: First, sign in to your Google account in the same web browser. Because of some restrictions on Google’s end, you require to disable your ad blocker for the rest of this tutorial.
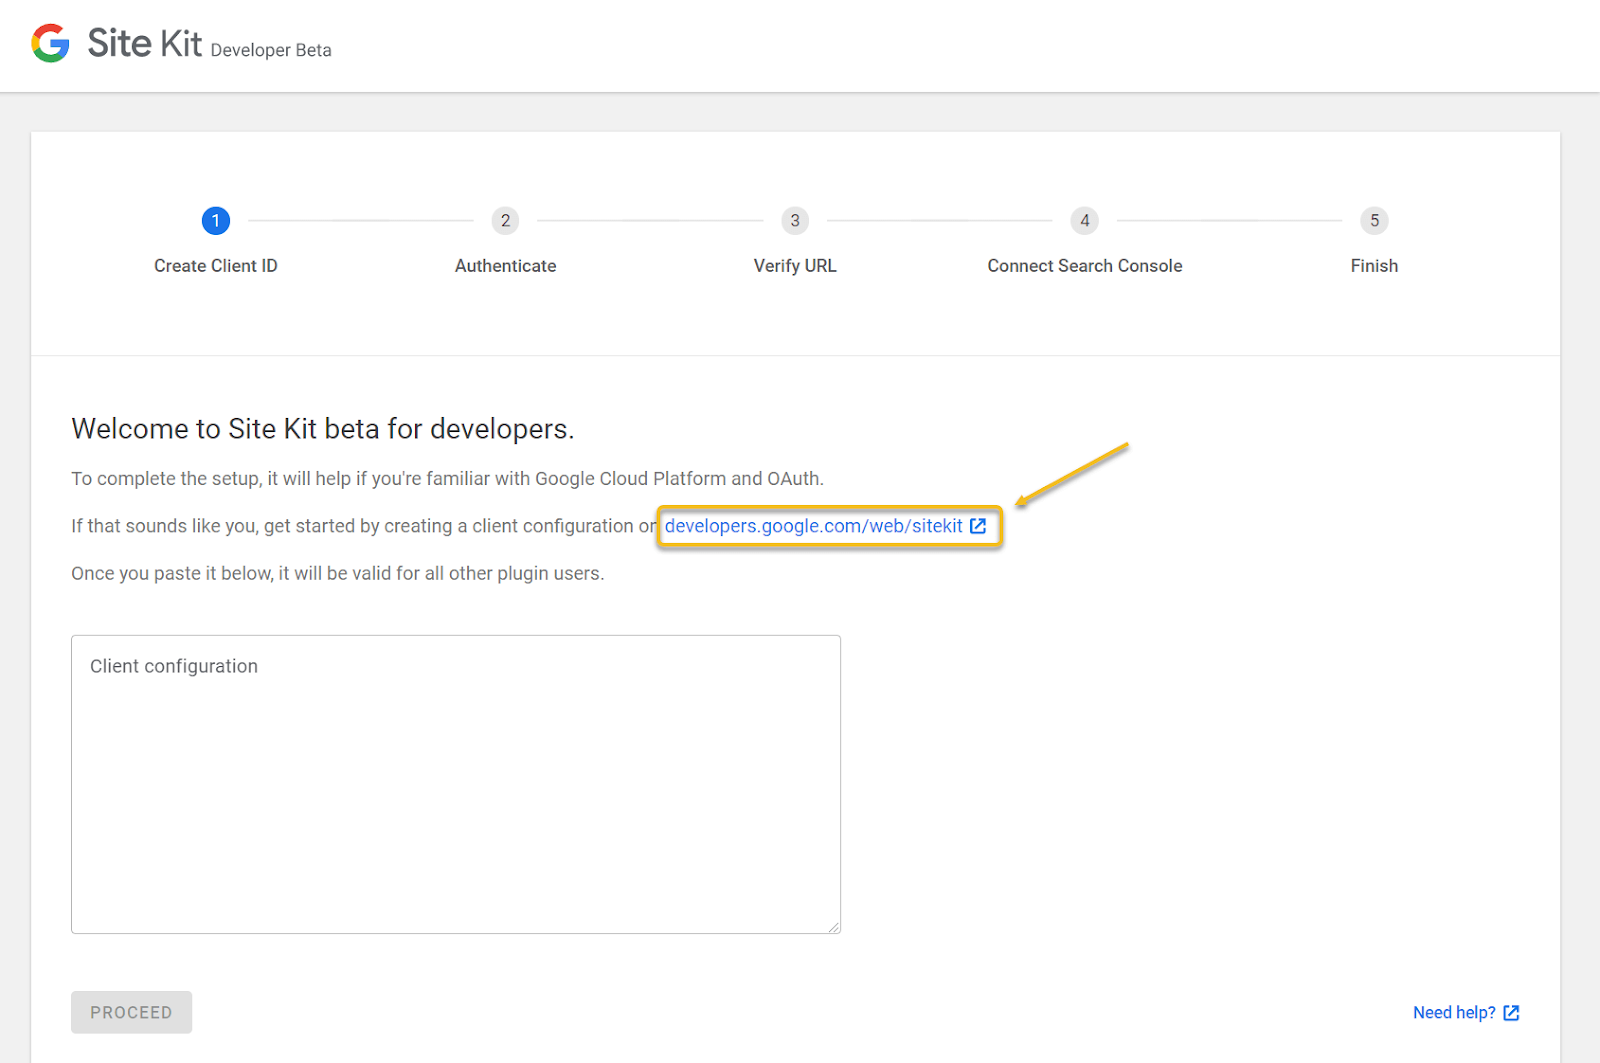
Step 2: Next, go over to your Site Kit page in WordPress dashboard and then click on the highlighted link.

Step 3: The Site Kit plug-in will automatically fetch your WordPress website data and move it on to the client configuration page in the Google Developer Console dashboard. As an example, the configuration information in the image above is gathered from my blog.
Click on Get OAuth Credentials to proceed.
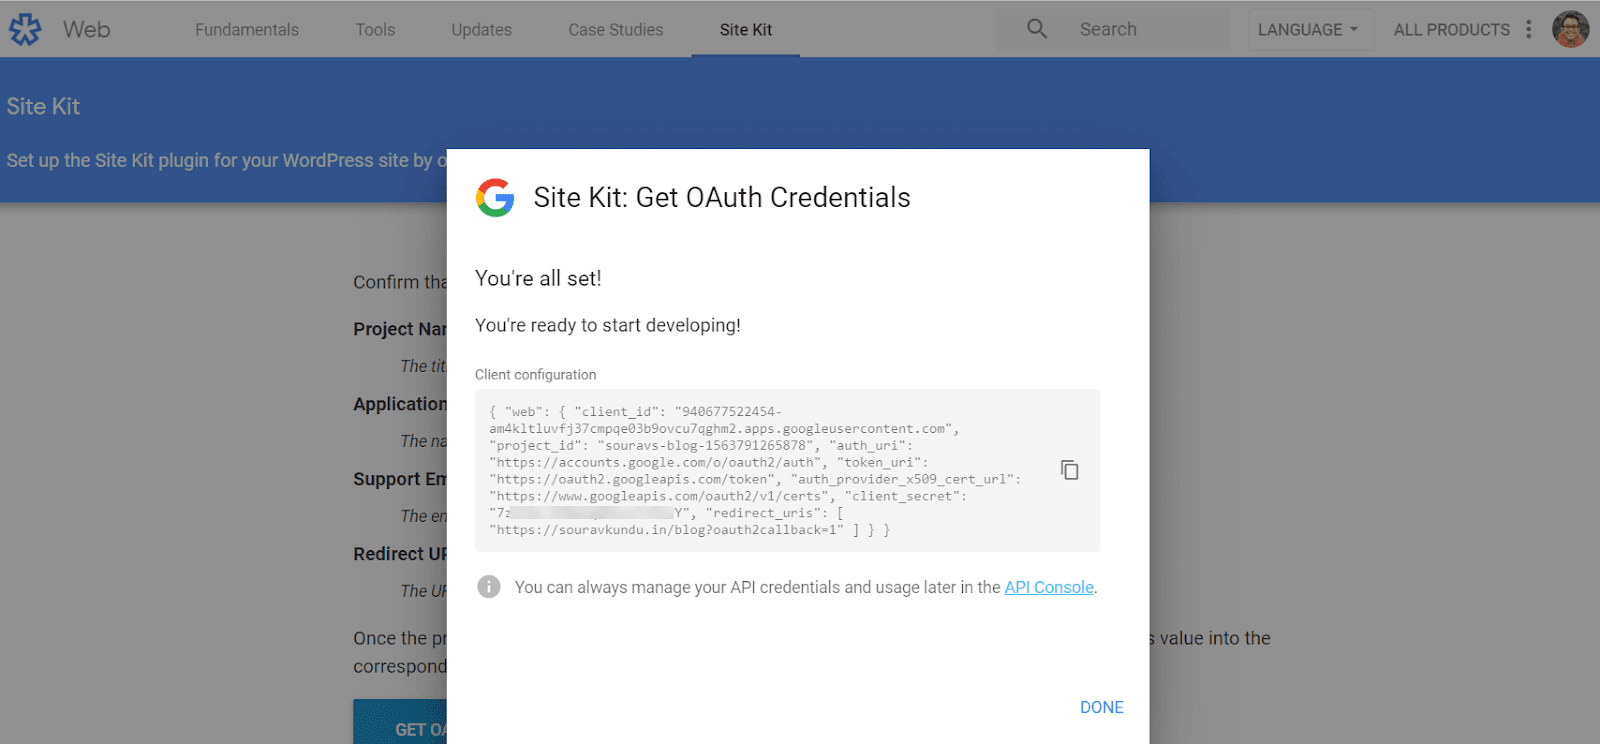
Step 4: Site Kit will now build a brand new project in your Google Cloud account, using the exact details from the WordPress website. Once finished, you’ll receive a client configuration code. Copy the code into the clipboard and click on Done.
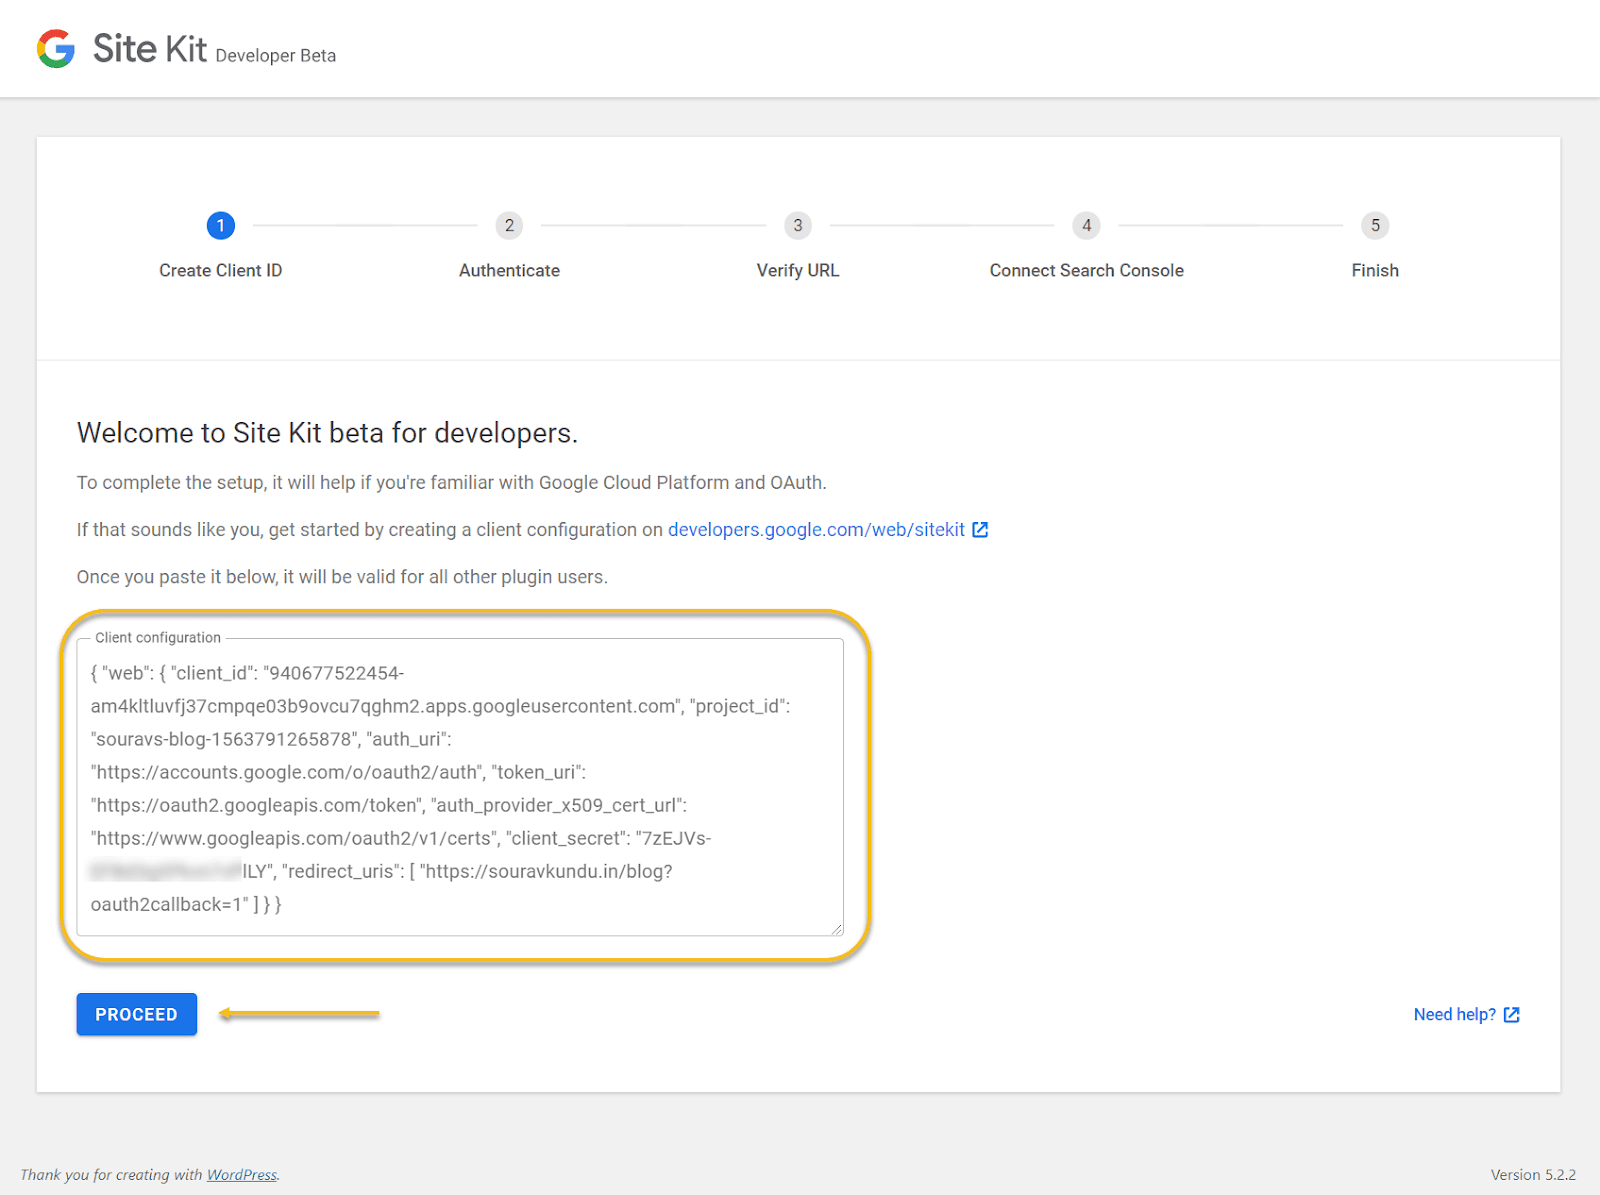
Step 5: Paste the code in the Client configuration text box in the WordPress dashboard and click on Proceed.

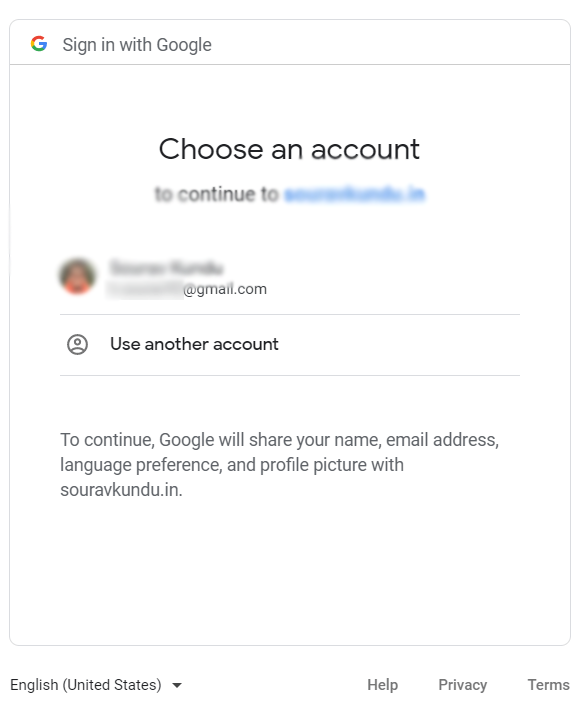
Step 6: Now, you’ll need to sign in with your Google account. Click Sign In With Google to continue.
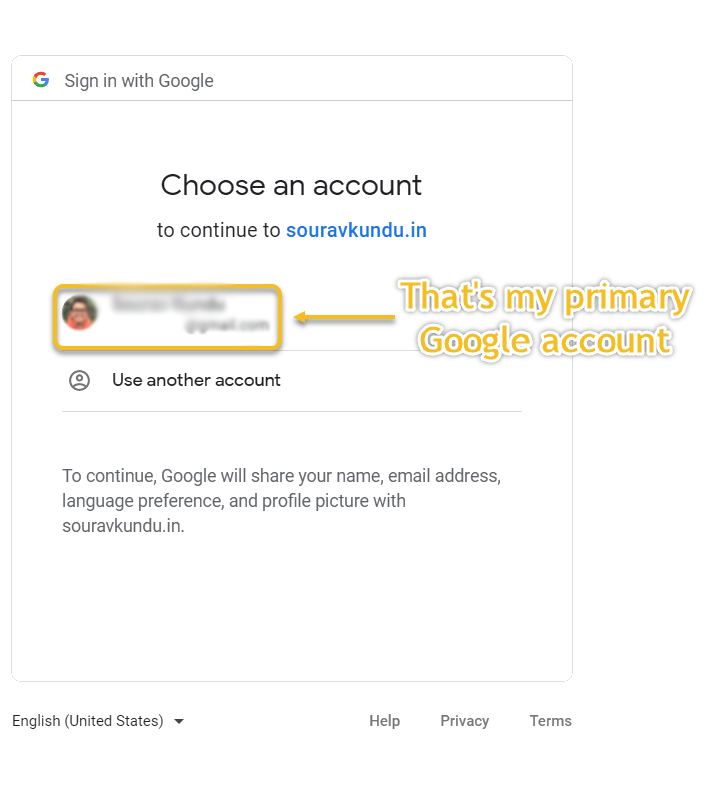
Step 7: Click your Google account and provide the required permissions.

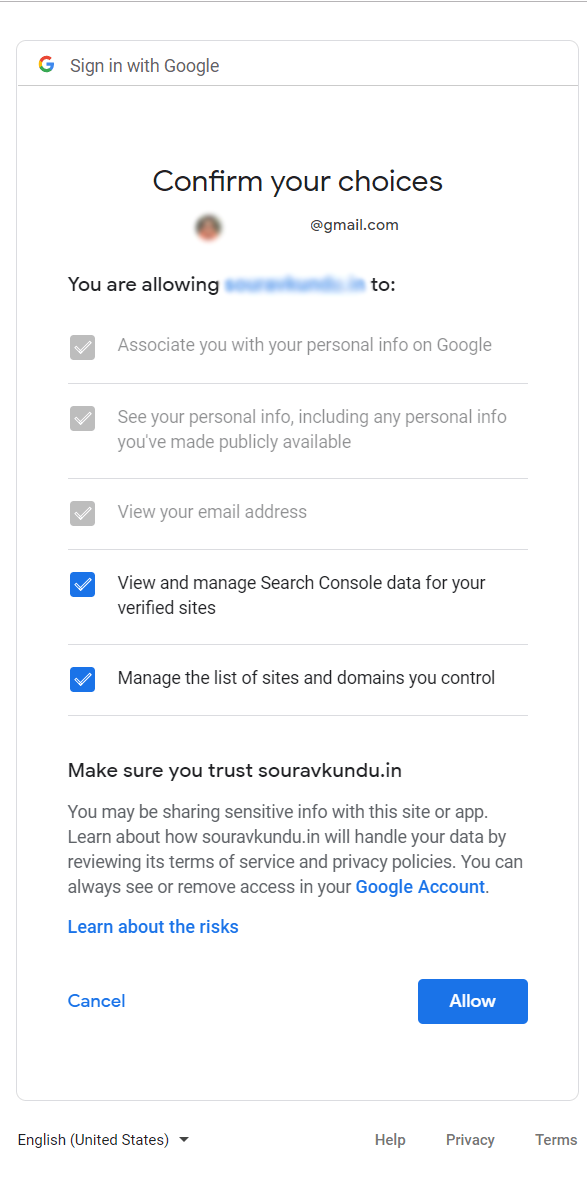
Step 8: Review the permissions and make sure that all checkboxes are enabled. Click on Allow to move to the last step.
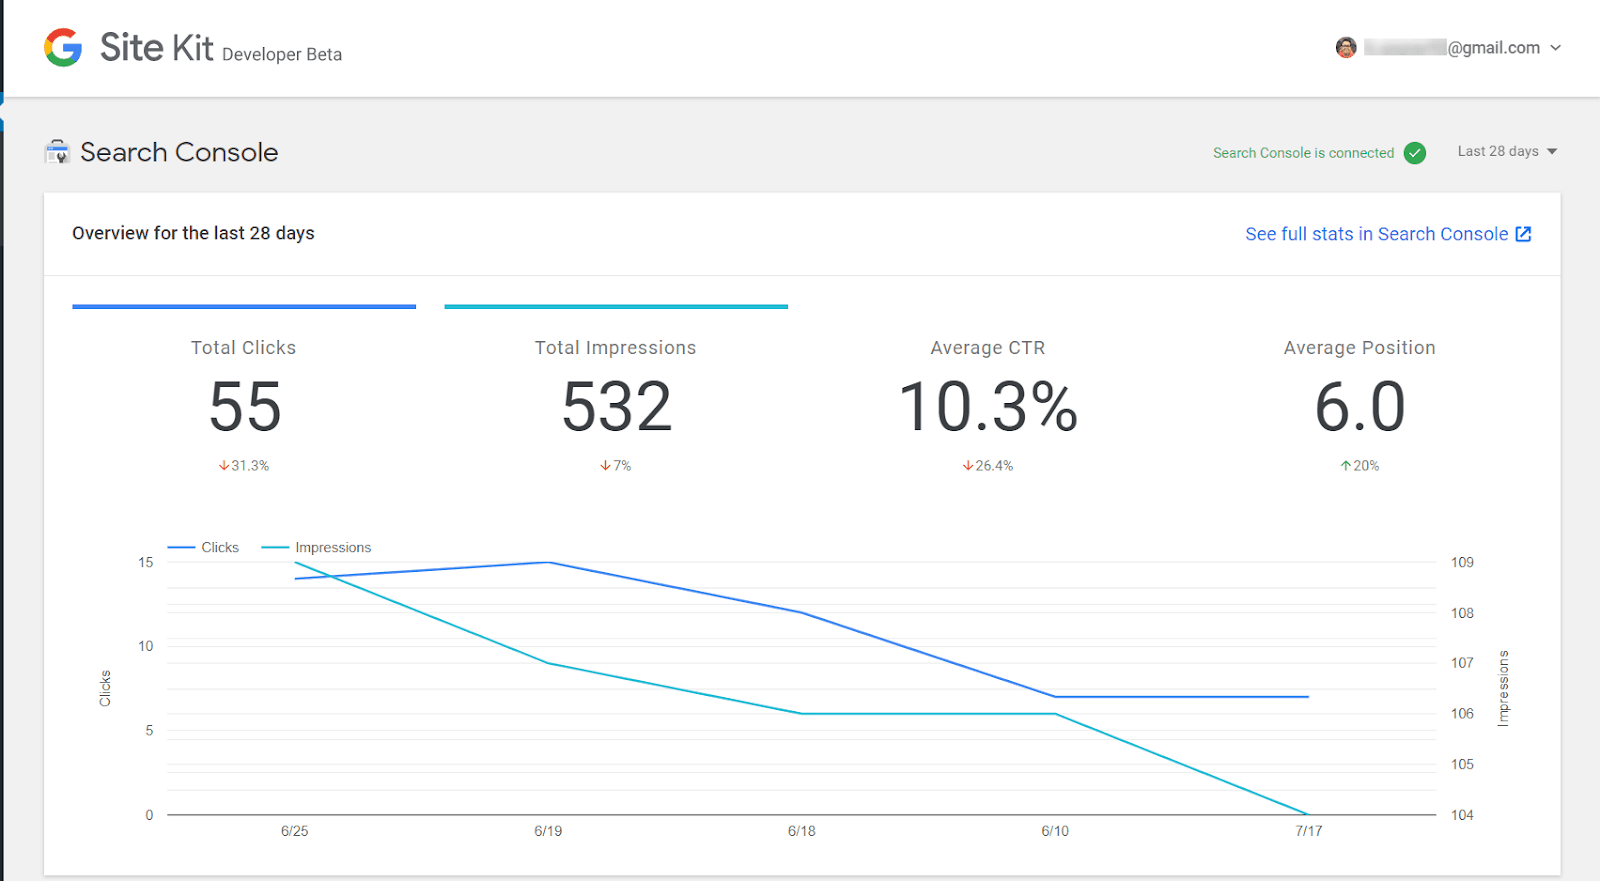
Step 9: Site Kit will automatically detect your linked site data in your Search Console account and link it to the WordPress blog.
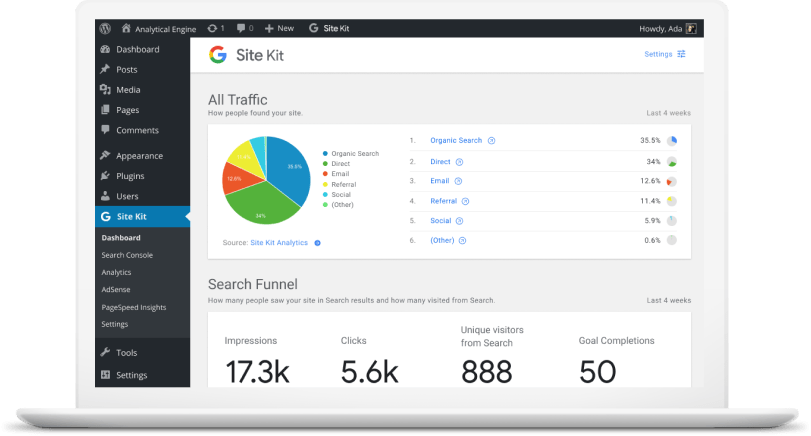
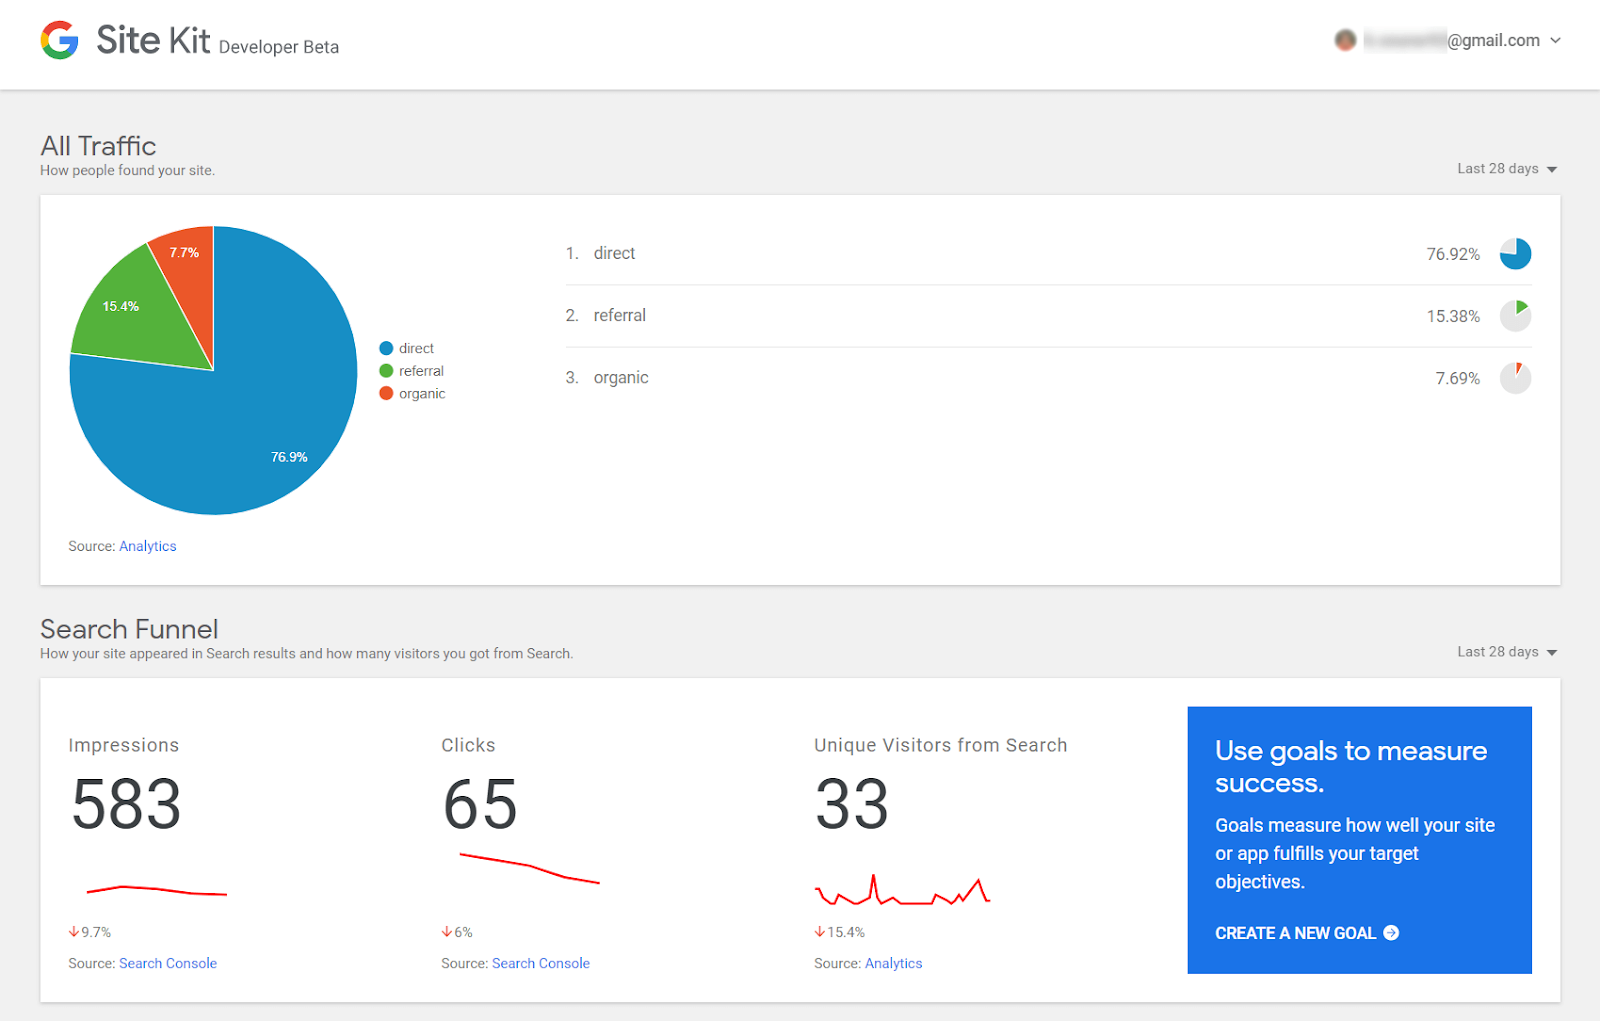
Now, you can view your Search Console information and data directly in your WordPress dashboard, thanks to Site Kit.
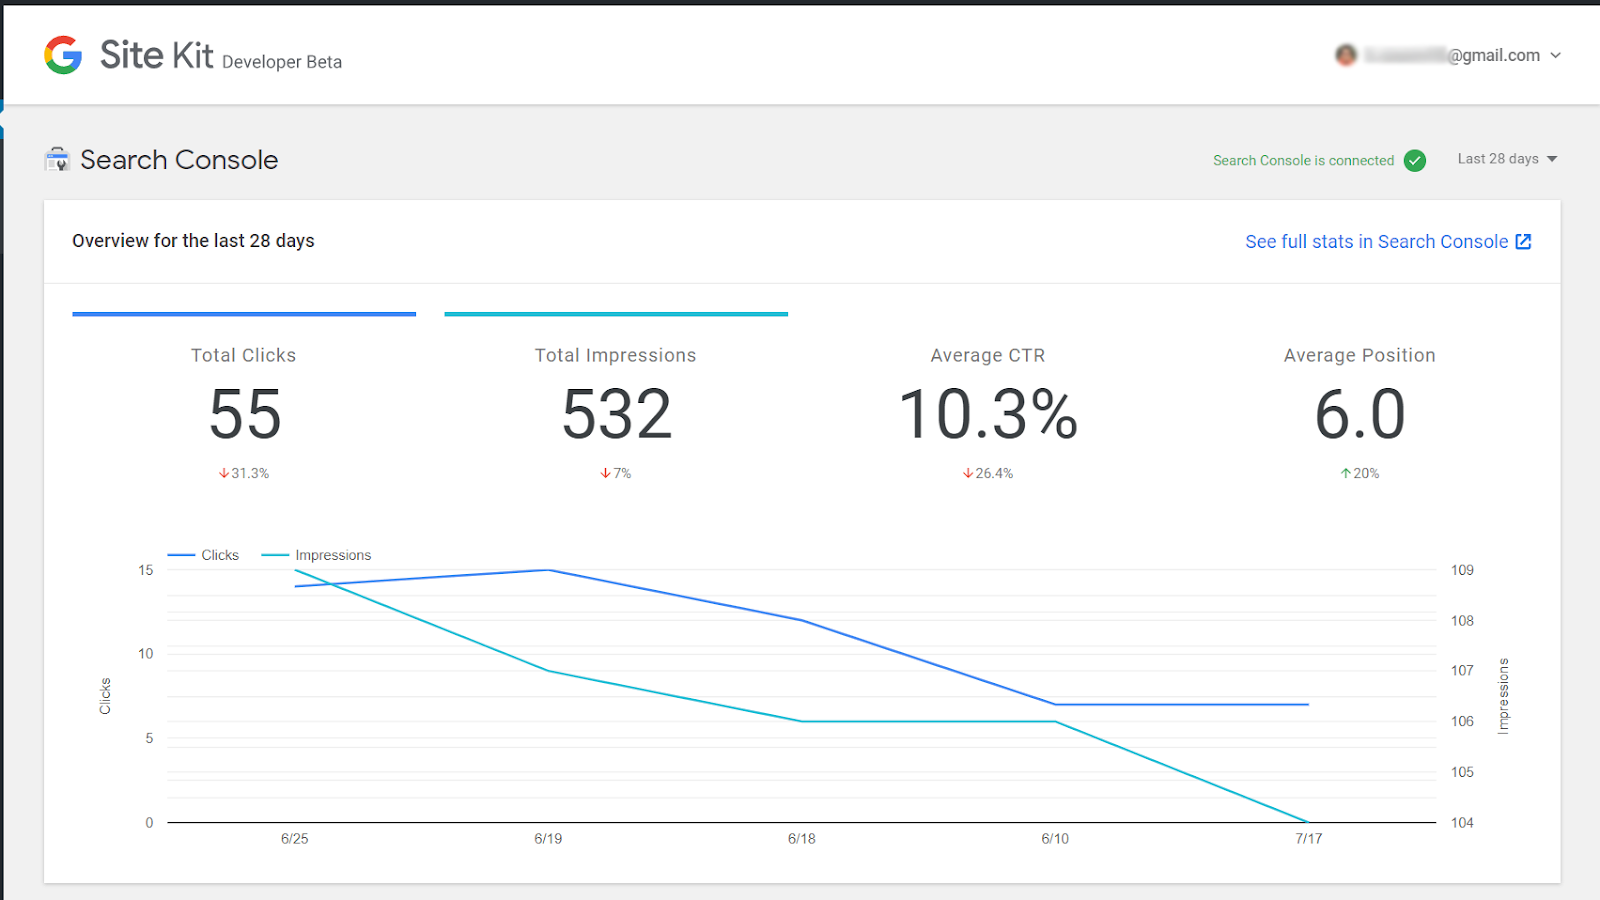
You are able to view specific post and page-level organic search visitor data with Site Kit.
And that is the way you are able to link your Search Console data to your WordPress website using the Site Kit plugin.
How to link Analytics to WordPress site using Site Kit?
Google Search Console is among those Google properties which Site Kit can link to your WordPress website. In this part, I will demonstrate how to view Analytics data to a WordPress dashboard using Site Kit.
Note that unlike Google Search Console, if you don’t have an Analytics account, you need to manually make one and insert the tracking code to your WordPress website. Site Kit can’t automatically build a new Analytics account for you.
Follow these few steps to link your Analytics account to Site Kit.

Step 1: Go to your WordPress dashboard → Site Kit → Settings page and choose the Connect More Services tab.

Step 2: This display tells you that you will get an “Unverified App” warning in case you try to login with your Google account.
Since this is just a Developer Preview version of the Site Kit plug-in, there’ll be several minor problems like the “unverified website” error during the setup process. There is absolutely no need to worry about this as I’ve shown you how to navigate those problems. Moreover, there aren’t any known security problems in the Site Kit plugin, and also – we are using it in our sites!
Click on Proceed to the next step.
Step 3: Select your Google account that’s access to Analytics. Ideally, this should be exactly the same Google account that you used in the Google Search Console configuration.

Step 4: This is actually the warning display screen we talked earlier. Click on Advanced to toggle the advanced options.

Step 5: Click on “Go to souravkundu.in (unsafe)” to proceed to the next step.

Step 6: Grant each of the permissions required by Site Kit to use access your Analytics account.
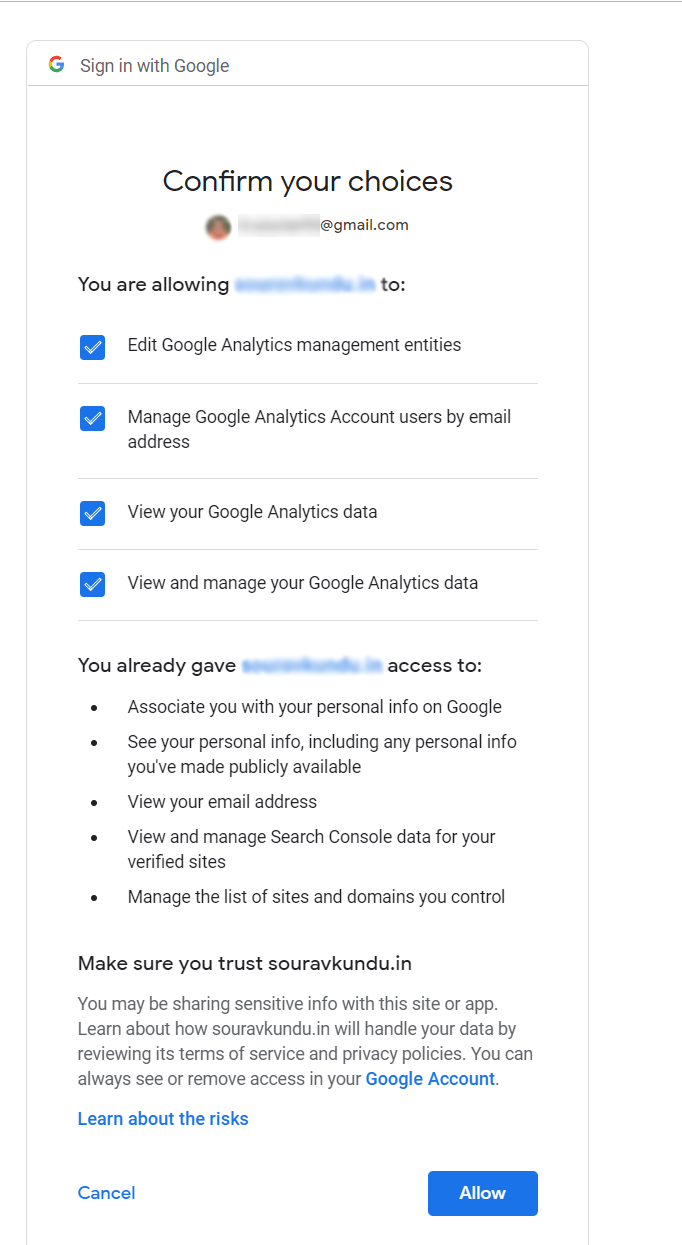
Step 7: Review the permissions and make sure that each of the checkboxes are enabled. Click on Allow to move to the next step.
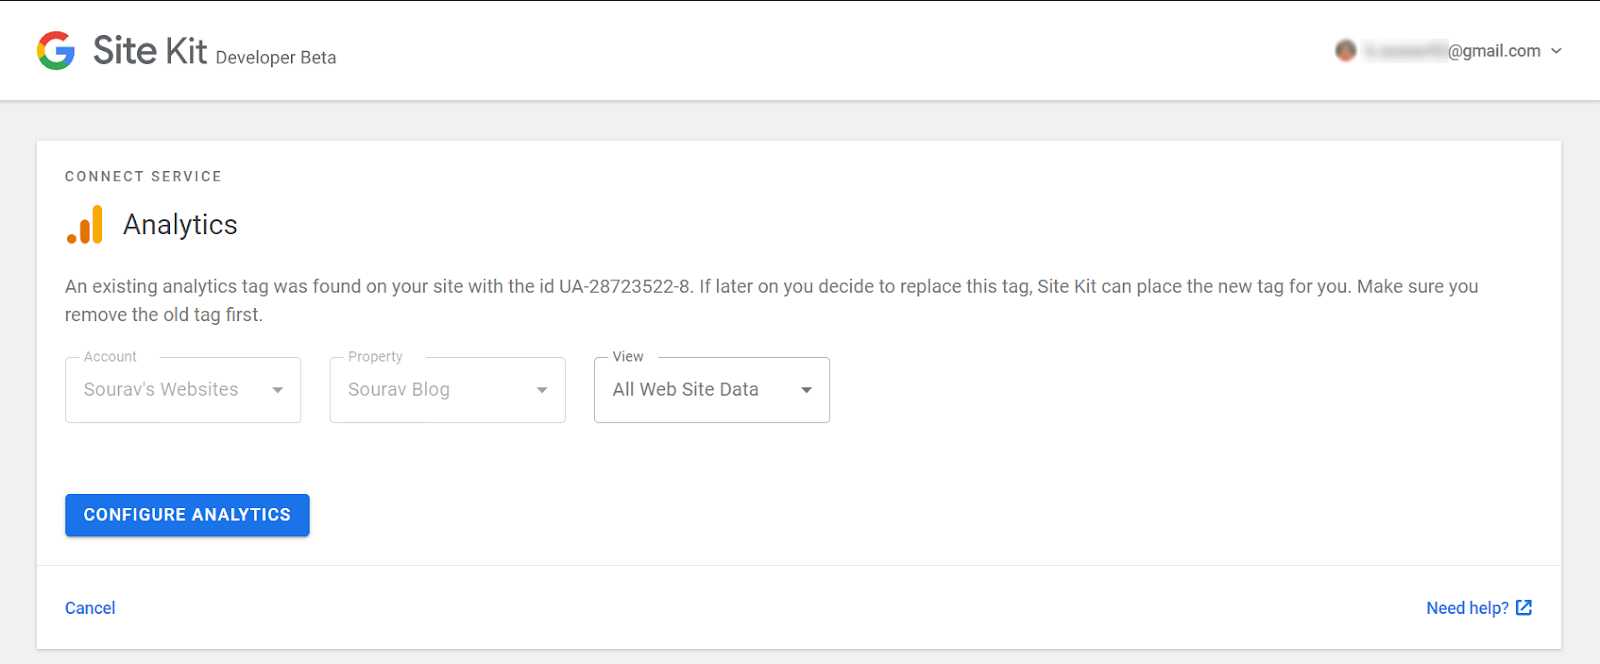
Step 8: Google Site Kit will return to the WordPress admin dashboard where you will be requested to link your Google Analytics property. Let’s assume that you have already set up Analytics during custom WP development, Site Kit will choose the proper Analytics property.
Click on Configure Analytics to move to the final step.
Analytics is now successfully connected to Google Site Kit in WordPress. You are able to view your Google Analytics and Google Search Console data in the Site Kit dashboard.
Troubleshooting Google Site Kit for WordPress
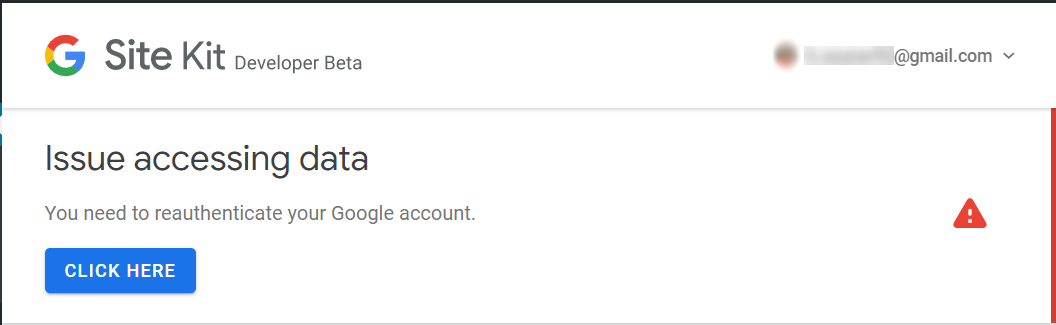
Some times Google Site Kit might show a warning message like “Issue Accessing Data” in your WordPress admin dashboard. You’d require to re-authenticate your account once again.
Note that I had struck this problem double in my blog when preparing this specific tutorial. However, Site Kit managed to pull all the Google Analytics and Google Search Console data and display it in my WordPress admin dashboard.
I would not worry too much about this problem since, after all, this is a Developer Preview variant of the Site Kit plugin.
When Google releases the official edition, these problems will be sorted, together with the chance of a simple setup process.


What is my Instagram URL? How to Find & Copy Address [Guide on Desktop or Mobile]

Best Instagram-like Apps and their Features
B2B Instagram Statistics in 2024

How to Unlist your Phone Number from GetContact

About Apple Employee and Friends&Family Discount in 2024
What is my Instagram URL? How to Find & Copy Address [Guide on Desktop or Mobile]

Applob.com Download APK – Tweak your device Safe
About Apple Employee and Friends&Family Discount in 2024
How to Translate more 5,000 characters limit by Google
How to Unlist your Phone Number from GetContact
-
Marketing Tips3 days ago
What is my Instagram URL? How to Find & Copy Address [Guide on Desktop or Mobile]
-
 Business Imprint4 days ago
About Apple Employee and Friends&Family Discount in 2024
-
 App Development4 days ago
How to Unlist your Phone Number from GetContact
-

 News5 days ago
Open-Source GPT-3/4 LLM Alternatives to Try in 2024
-
 Crawling and Scraping5 days ago
Comparison of Open Source Web Crawlers for Data Mining and Web Scraping: Pros&Cons
-
 Grow Your Business3 days ago
Best Instagram-like Apps and their Features
-

 Grow Your Business5 days ago
How to Become a Prompt Engineer in 2024
-
Marketing Tips3 days ago
B2B Instagram Statistics in 2024