Manage Your Business
7 Tips for Improving Your Architectural Visualization Skills in Rendering
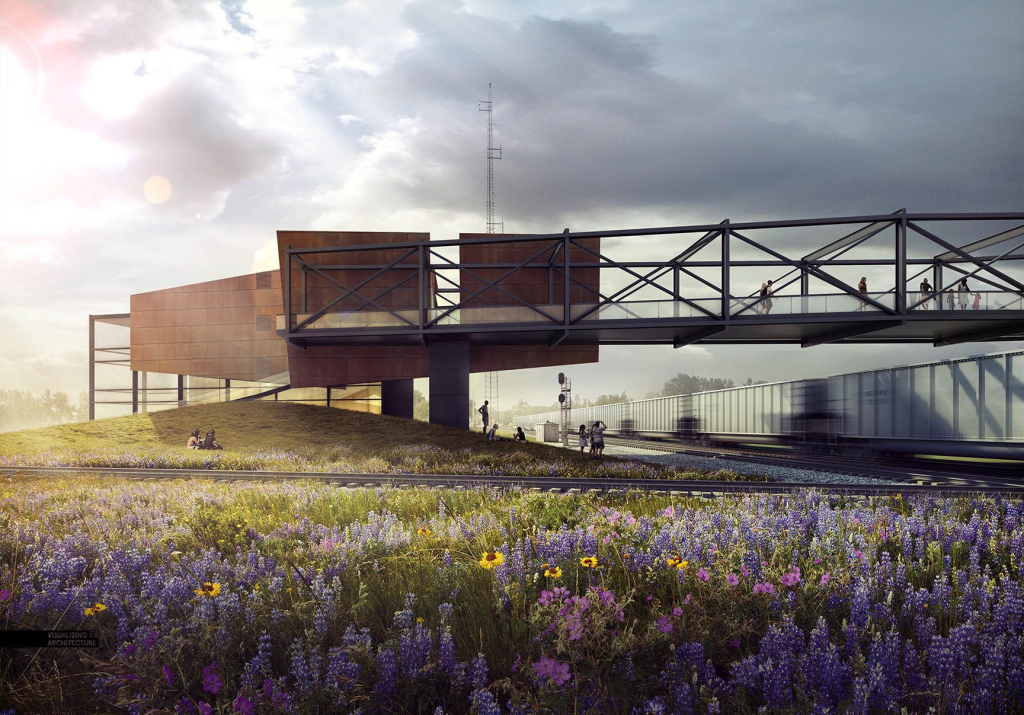
When you design your 3D render, you can turn it into an asset for a usable game (walking tour), a VR game, a video or an image. These are your end products. This article offers tips on the design process and offers tips on camera placement so that your end product looks a little more realistic.
My article can be helpful for individuals who are interested in improving their architectural visualization skills, particularly those who work in 3D rendering, game design, virtual reality, and photography. It can also be useful for architects, designers, and artists who want to enhance their understanding of real-world lighting, camera angles, atmosphere, and edge rounding in their visualizations.
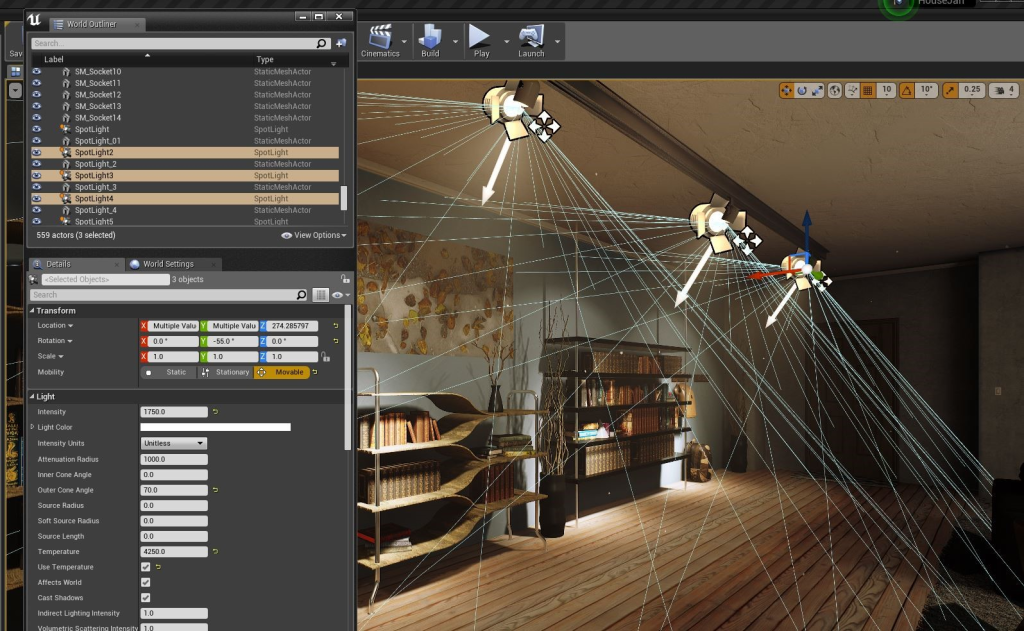
1 – Try to Recreate Real-World Lighting
This is a tough one to describe, but it all revolves around understanding how light works in real life. For example, in real life, smaller light sources may make certain areas appear darker than they are. Such as if you imagine a club with overhead lights.
Imagine you put lights along the forward-facing part of the nightclub bar. These lights would actually make the shadows under the bar much darker. If you put a candle in your garden while in the sunlight, it doesn’t create light on the surfaces around it. Digital renders will often add some sort of lighting effect around small light sources when in real life they wouldn’t create produce any light into the surrounding areas.
2 – Use a Realistic Camera Angle
This rule has changed a little bit now that drones allow people to see all sorts of weird angles in real life. Nevertheless, if you are trying to sell the idea of a realistic house or building, then only give fly-over shots. When you take other shots, position your camera at the sort of height and position you would expect if a human took the photo.
3 – Test and Re-Test
Have you ever seen those old Disney animators who used to do it all on paper? They would draw a little, pull up the first sheet to check their work, look at the previous frame, put down the paper and draw the next bit, check the last frame and so forth. They used to do it all very quickly so that all you heard was a room of people crinkling paper as they worked.
As a digital artist, you can get a preview of a single frame if you don’t mind waiting, but if you want to check your work, you need to use a rendering service like RebusFarm. Like the Disney artists, it is highly recommended that you keep checking your work (though not as often obviously). A brilliant way to improve is to send off a full render for processing at the end of your working day/shift. Don’t look at the render until you download it the next morning. That way, you can see your design’s perfections and flaws with fresh eyes when you start work again.
4 – Create a Believable Atmosphere
When most people think of this, they think of creating the sort of scary fog you see in horror games like Silent Hill 2, but that is not strictly the case. You can create atmosphere with the weather, such as throwing a few clouds in the sky, but you can also do it with lighting effects and even with the glare from reflections.
When an image looks clinical and sterile, it looks less realistic. Study a number of real photographs to see the subtle way that the atmosphere affects the end result.
5 – Don’t Use Lens Effects or Filters
This is more of a modern mistake. People think that lens flare makes a scene or photograph look more realistic, but it really doesn’t. Camera effects do not make a scene look realistic either. If your scene doesn’t look realistic to start with, then these effects and filters only change the flavor of unrealistic. Compare them side by side, and you may decide that the filters make it look better, but they don’t make it look more realistic. They just obscure the issue and make it more difficult to create a fair comparison.
6 – Use Imperfections Very Sparingly
This is another artistic nuance you need to understand. The imperfections you add, such as dirt, need to be super subtle. In real life, building brickworks don’t always have cracks in them, and windows don’t always have reflective imperfections. When you think about imperfections, consider the logic and then scale it down. For example, did the rain kick up a tiny bit of dirt onto the bottom of the building? If so, take how much dirt you would have added and lower it by about 55%.
7 – Understand Edge Rounding
The first point on this list, a recreating real-world lighting, was something you learn from years of experience and it includes a lot of artistic nuances. This point is the same. Buildings can have sharp edges, but you have to imagine that you are taking a photo with a real camera, and the further you walk away from a sharp edge, the duller (rounder) it appears. This is because our eyes cannot see very sharp edges from far away. That is why some 3D render designers will round edges a little so that their photos and videos look more realistic.
Closing
This article provides tips for improving architectural visualization skills, including recreating real-world lighting, using a realistic camera angle, testing and re-testing, creating a believable atmosphere, avoiding lens effects and filters, using imperfections sparingly, and understanding edge rounding. These tips can help make 3D renders look more realistic and improve their overall quality.
- The article provides tips for improving architectural visualization skills, including recreating real-world lighting, using a realistic camera angle, testing and retesting, creating a believable atmosphere, and understanding edge rounding.
- To make a 3D render look more realistic, it is important to understand how light works in real life and to try to recreate real-world lighting.
- Testing and retesting is important when creating architectural visualizations, and using a rendering service like RebusFarm can be helpful in checking your work.
- It’s important to create a believable atmosphere in your render, which can be achieved through weather effects, lighting effects, and reflections.
- Using imperfections and understanding edge rounding are artistic nuances that can help make architectural visualizations look more realistic. Imperfections should be used sparingly and rounded edges can make buildings look more natural.


PayPal Sports Betting Guide for Beginners

Open-Source GPT-3/4 LLM Alternatives to Try in 2026

Top Facebook Apps and Companies

Can Universities detect ChatGPT content? Yes!

Best Conferences like SXSW in 2026-2027
PayPal Sports Betting Guide for Beginners