Software Development
Convert a Database from Microsoft Access to MySQL
The current version of dbForge Studio for MySQL does not allow to import the whole Access database at once. Instead, there is an option to migrate separate Access tables in MySQL format.
The article below describes the entire process of converting Microsoft Access tables to MySQL.
Importing Data
1. Open dbForge Studio for MySQL.
2. On the Database menu click Import Data. The Data Import wizard opens.
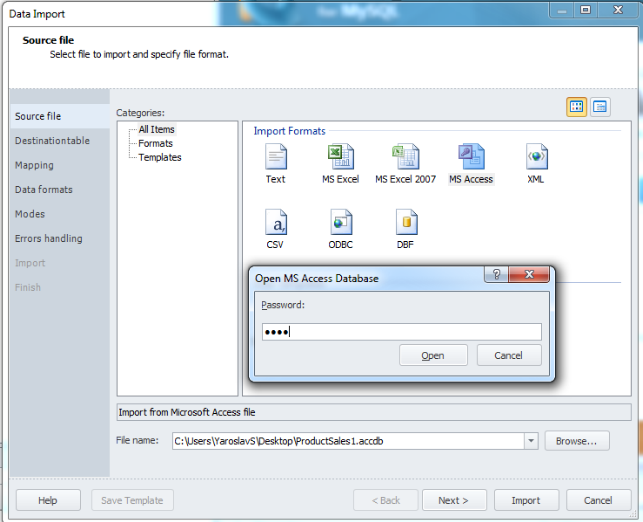
3. Select MS Access import format and specify a location of Source data. Click Next.
If the Source data is protected with a password, the Open MS Access Database dialog box appears where you should enter the password.
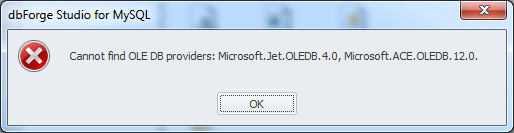
NOTE: To perform the transfer you should have Microsoft Access Database Engine installed. It will install components that can be used to facilitate transfer of data between Microsoft Access files and non-Microsoft Office applications. Otherwise, the Import wizard will show the following error:
Therefore, if you face the problem, download the missing components here.
Note, that the bit versions of your Windows OS and Microsoft Access Database Engine should coincide, that is, if you have the 64-bit system, you should use the 64-bit installer. However, there are cases when the 32-bit Microsoft Access is installed on the 64-bit Windows OS. In this case perform the following steps before installing.
- Click Start, click All Programs, and then click Accessories.
- Right-click Command prompt, and then click Run as Administrator.
- Type file path leading to installer and “/passive”. It should look like this:
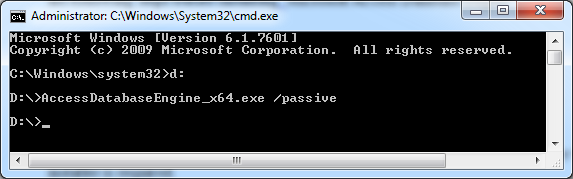
In the case above the Windows OS is 64-bit, but the installed version of Microsoft Access is 32-bit. That is why the 64-bit installer is required.
4. Select a source table. To quickly find a table in the list, enter characters of a required name into the Filter field. The list will be filtered to show only those that contain such characters in their names.
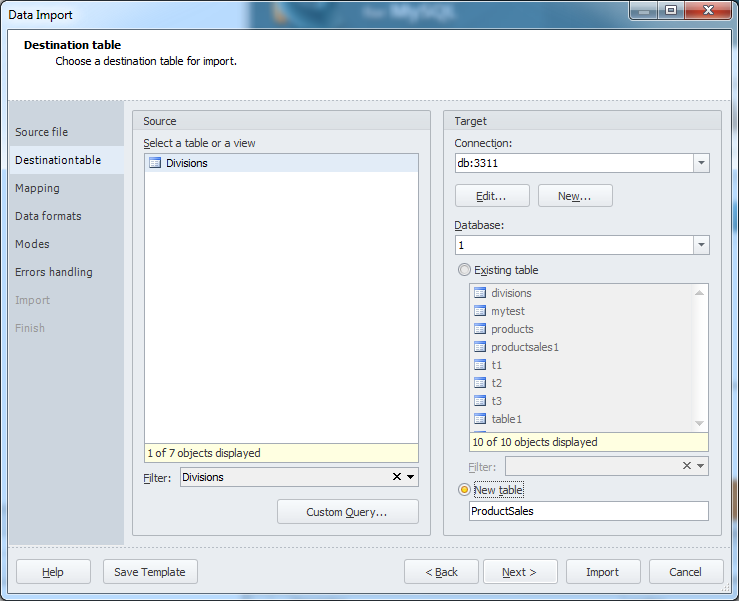
5. Specify a Target MySQL connection, and a database to convert the data to. Also, since we need to create a new table, select New table and specify its name. Click Next.
6. Map the Source columns to the Target ones. Since we create a new table in MySQL, dbForge Studio for MySQL will automatically create and map all the columns, as well as data types for each column. If the automatic match of columns’ data types is not correct, you may edit data types manually.
Target columns are located in the top and the Source columns at the bottom of the wizard page (see the screen-shot below). Click Source column fields and select required columns from the drop-down list.
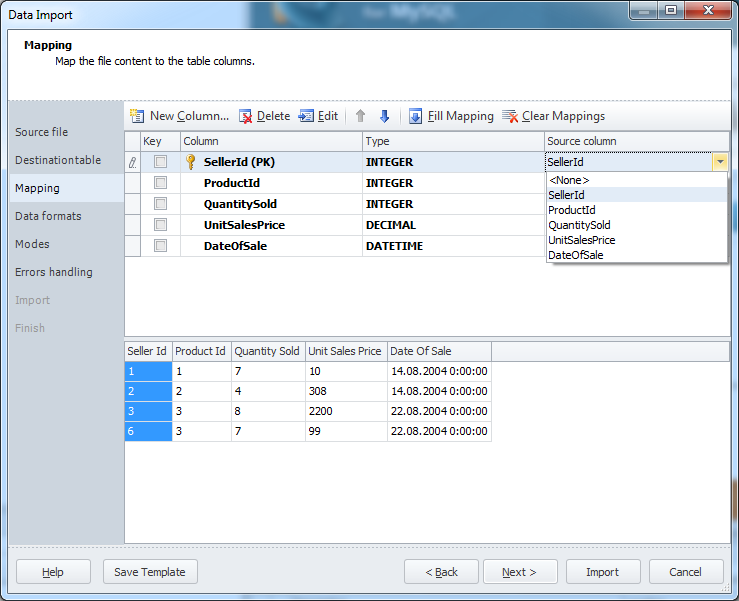
NOTE: To cancel mapping of all the columns, click Clear Mappings on the toolbar. To restore it, click Fill Mapping.
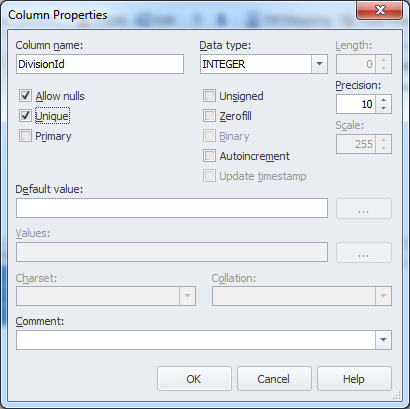
7. To edit the Column Properties, double-click a column or right-click a column and select Edit Column.
8. Click Import and see the import progress. dbForge Studio for MySQL will notify you whether the conversion completed successfully or failed. Click the Show log file button to open the log file.
9. Click Finish.
NOTE: You can save the import settings as a template for future uses. Click the Save Template button on any wizard page to save the selected settings. Next time you should only select a template and specify a location of the Source data – all the settings will be already set.
Setting Up Constraints
After importing all necessary tables you can to set up (or correct) relations between the converted tables by creating/editing foreign keys (if required).
Also, you may create primary keys, if you skipped this step during creation of a table.
Creating Foreign Key
- Open the table you need and choose New Foreign Key from the Table menu.
- Add required columns, select referenced table and referenced constraint, and click OK.
-or-
- Switch to the Constraints tab.
- Create a constraint from the context menu.
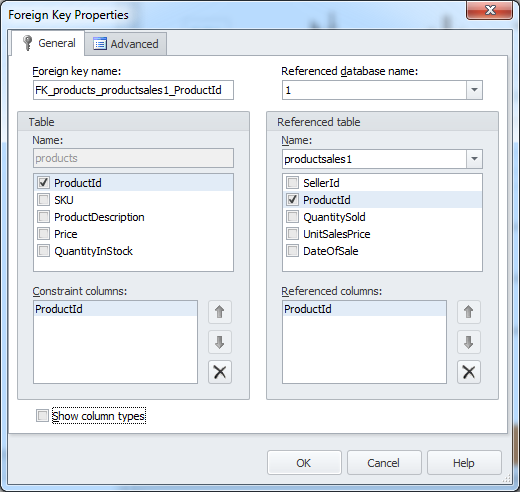
NOTE: To create a foreign key, the referenced table should have a unique index, otherwise dbForge Studio will prompt you to create it. Click Yes in the dialog and the unique index will be added.
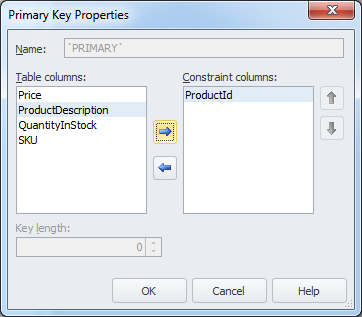
Creating Primary Key
- Right-click a table, select Edit Table, switch to Constraints tab. To create a key, right-click on the white area and select New Primary Key.
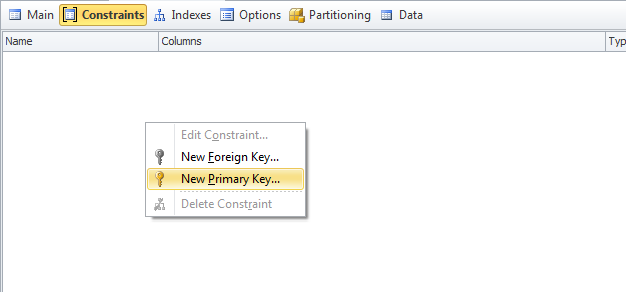
- Add required columns to the key and click OK. You can also switch to the Constraints tab and create the primary key within context menu.
Summary
In this article we reviewed the aspects of importing MS Access database to MySQL database by means of dbForge Studio for MySQL. Despite the fact, that the current version of the program does not include the tool to migrate a MS Access database at once, the described above importing mechanism allows to perform the import fast and easily.
dbForge Studio for MySQL supports the .accdb format.


PayPal Sports Betting Guide for Beginners

Open-Source GPT-3/4 LLM Alternatives to Try in 2026

Top Facebook Apps and Companies

Can Universities detect ChatGPT content? Yes!

Best Conferences like SXSW in 2026-2027
PayPal Sports Betting Guide for Beginners