How to Translate more 5,000 characters limit by Google

Google has added a 5000-character limit to Google Translate, which is very surprising. The popular service now lets users translate texts of only 5000 characters in one go, and the rest in multiple tries.

A small counter is now visible at the bottom right corner of the text box, which now counts and reveals the number of characters as you type them. It shows that the maximum number of characters now allowed in the service is just 5000.

The box of translation limit in Google search has also been set as 2,800 characters. It remains unclear why Google has set the new limits.

Google Translate has recently completed 10 years of its release. Last month the internet giant announced that the service will be getting the Neural Machine technique (ML/AI) which will make it even more powerful. The service currently supports eight languages including German, Spanish, English, French, Portuguese, Chinese, Japanese, Korean, and Turkish.

I don’t like this, so I did my homework and found some alternatives to get around this limitation.

How to Fix Text exceeds 3900 character limit?

The new limits will make it very tedious for people who wish to translate longer documents via Google Translate tool. The above limitation has not been set for web pages that will have a bigger number of characters. However, Google Translate’s API has the same limits of 3900 characters.

https://cloud.google.com/translate

Google may have its own reasons for limiting text translations, but the whole process of translating documents has become very difficult for users.

How to get past 5000 Characters Limit with Chrome Extension

Step #1 – Add Chrome Extension

Step #2 – On Chrome Extension and Setup:

Step #3 – Open your text with Chrome Explorer and use Google Translate Extension:

You can translate web pages or local files without a 5000 Limit. I am satisfied with the result.

You can open the following formats:

  • .pdf
  • .html
  • .csv
  • .txt

Unfortunately, files are translated in this way with errors. Try it, but there are no guarantees.

Large Text Translation

Google has developed a large text translation technology for the million+ words in their database.

The Google Translate team is constantly improving the quality of its translations by using machine learning. The system is built on an artificial neural network that takes into account the whole sentence to find the best translation instead of just considering isolated words.

How work online Translate apps like Deepl?

Okay, imagine you have a friend who speaks a different language than you. Let’s say they speak French and you speak English. Sometimes you want to talk to your friend, but you don’t know how to speak French, so you don’t understand what they’re saying.

An online translation app like DeepL is like a really smart robot that helps you talk to your friend. You can type in what you want to say to your friend in English, and the robot will quickly change your words into French so that your friend can understand what you’re saying.

The robot knows a lot of different words and how to use them in different ways to make sentences, so it can understand what you’re trying to say and make sure it makes sense in French. It’s like having a really helpful friend who knows lots of languages and can help you talk to anyone you want, no matter what language they speak!

How to use ChatGPT to Translate

ChatGPT itself isn’t explicitly trained for translation tasks like a dedicated translation model would be. However, you can still use ChatGPT to perform basic translations for many common phrases or sentences. The quality of the translation might vary based on the complexity of the text and the languages involved.

Here’s how you can use ChatGPT for translation:

  1. Directly Ask for Translation:
    • Example: “Translate ‘hello’ from English to Spanish.”
  2. Specify Context:
    • If the translation involves a specific context or domain (e.g., medical, technical, etc.), specify that in your request.
    • Example: “Translate ‘drive’ from English to Spanish in the context of computers.”
  3. Check and Cross-Reference:
    • Always cross-reference the translation provided by ChatGPT with a dedicated translation tool or service, especially for important or official documents.
  4. Limitations:
    • 8192 characters
    • ChatGPT might not handle long paragraphs or complex sentences as effectively as dedicated translation services.
    • It might not have full coverage of less common languages or dialects.
  5. Use ChatGPT Code Interpreter Plugin to translate a document up to 512MB.

Note! But I haven’t tested the last point yet to be able to recommend it to you!

Why do services have a limit for one-time translation?

To ensure that the translations provided by the app are as accurate as possible, there are limits placed on how much text can be translated at once. This allows the app to focus on smaller chunks of text and provide more accurate translations. Additionally, some translation apps may charge a fee for more extensive or specialized translations, which require more advanced technology or human translators.

FAQ:

How Many Words Are 5,000 Characters?

The number of words represented by 5,000 characters depends on the average word length and the spaces/punctuation used in the text. In English, the average word length is typically around 4.7 to 5.1 characters. However, this number can vary based on the specific text.

Let’s make some assumptions for an estimate:

  1. Average word length: 5 characters
  2. One space between each word

Given these assumptions, each word (including its following space) would be 5+1=65+1=6 characters long.

Using this, we can estimate the number of words in 5,000 characters:

Let’s calculate it!

Given the assumptions, 5,000 characters would be approximately equivalent to 833 words. However, keep in mind that this is just an estimate. The actual number of words can vary depending on the specific text, the inclusion of punctuation, and other factors.

How Many Characters are in 5000 Words?

Approximately 35,000 characters are in 5000 words, assuming an average of 7 characters per word. However, this can vary depending on the length of words and the font used.

How Google Indexing a very Large Websites

How Fast Crawling and Indexing Site with Millions of Pages?

Recently, I often hear questions about the rapid embedding in the index of large sites. And today in the chat they threw a link to the fresh millionaire — people-ua.biz.

people-ua.biz — database of citizens of Ukraine (population of about 42.5 million). The card page contains a Name, date of birth and residence address. Search can be made on any of this parameter.

We will review the site and analyze how they managed to break into the Google SE index.

To check the response of the server, I recommend using this service.


The domain is registered on October 20, 2016 whois#people-ua.biz:


The sitemap directory contains more than 800 sub-lists for 50,000 URLs each. Total on the site people-ua.biz more than 42,000,000 pages. That is close to the documented number of the population of Ukraine.


https://en.wikipedia.org/wiki/Ukraine#Population_decline

So how many pages were able to push to google index for the month of existence?

According to Google SERP, on request site:people-ua.biz issues only slightly more than 4 million pages, approximately 700k per week:


On my projects recorded a 6-fold increase in the number of crawled pages by the google-bot in comparison with the average value after adding a sitemap:


Of these, the index hit up to 98% of the pages in about two weeks.

Your record? How much pages did you get crawled & index by Google-bot? Or, maybe you know other cases?

Bonus tip: One of the tools that will help get your website indexed faster is Page Counter by Sitechecker. This tool will find all the website pages, check their indexing status and detect any technical problems that may be affecting the indexing.

How to install and Set Up Google Site Kit in WordPress?

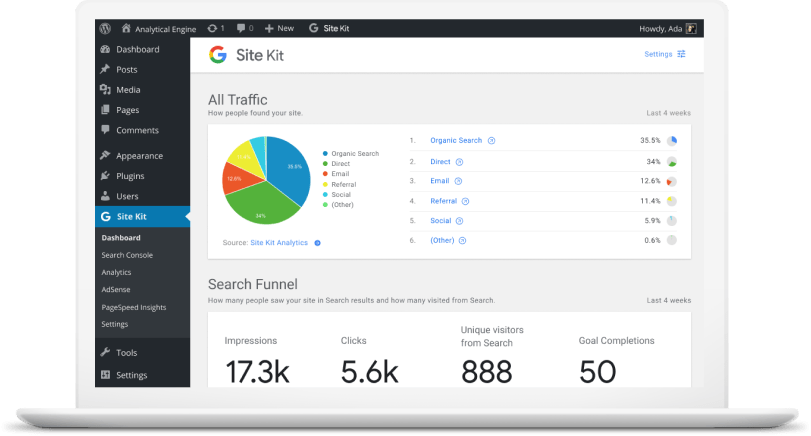
Meet Google Site Kit is the latest analytics/SEO plug-in developed by Google for WordPress web development.

Google Site Kit is the latest analytics/SEO plug-in developed by Google for WordPress web development. It allows you to connect Google’s online marketing services such as Google Analytics, Search Console, Google AdSense, PageSpeed Insights, Google Tag Manager and Google Optimize– directly to your WordPress website. 

Once connected, you will have the ability to view search, PageSpeed performance, analytics, and other data, directly in your WordPress dashboard, and separately in pages and posts. This is really very helpful in obtaining page-level insights straight in your WordPress dashboard. 

This guide shows you how to install and set up Google Site Kit in WordPress and connect the 2 most famous Google services to your WordPress dashboard – i.e. Google Search Console and Google Analytics for your domain or subdomain.

Overview of Google Site Kit in WordPress 

It’s very important to recognize that the Google Site Kit’s primary job is to connect your WordPress website to the corresponding Google services like Search Console and Google Analytics. 

Ideally, you need to have previously configured both Google Analytics and Search Console in your WordPress website. Otherwise, then we recommend you to setup both Search Console and Google Analytics before installing Google Site Kit. 

While Google Site Kit can build a new account for a number of properties like Search Console, you need to refrain from doing this. I recommend you manually set up both Google Analytics and Google Search Console, since the manual process provides you a better understanding of how marketing analytics works. 

Here is a quick summary of what you will be doing: 

  1. Manually install the Google Site Kit plug-in
  1. Create and connect a new client configuration: A very easy click-and-copy-paste job, at which Google does many of the heavy lifting for you. 
  1. Link properties like Search Console and Analytics to Site Kit. 

Let us get started with this tutorial! 

Way to manually Install the Google Site Kit WordPress plug-in 

Google declared Site Kit for WordPress in WordCamp US 2018, and a year later, they released the developer preview. You can download the plug-in from the announcement post and give feedback on Github.

  • Once downloaded, login to the WordPress dashboard and proceed to Plugins → Add New and click on Upload Plugin. 
  • Upload the google-site-kit.zip file and then click Install Now. 
  • Activate the plug-in in the next step. 

Once done, you should see a display screen shown above. 

Configuring Google Site Kit in WordPress

In this, we will configure the Google Site Kit plug-in in WordPress. Think about this step as creating a highway between your WordPress website and the Google services. After you create the highway, you can connect Site Kit into each of supported properties like google Search Console and Google Analytics. By default option, when you make the client configuration, your Google Search Console information will be connected to Site Kit.

Understanding the OAuth Client Configuration 

Technically speaking, we will be building a client configuration in the Developer Console. To build a client configuration, you will be making a new set of OAuth Credentials with your Google Cloud account. 

The best section – the whole procedure is automated. You do not require to manually build a Google Cloud account, add a payment process or manage with any advanced configuration. It automatically takes care of this for you. 

We have confirmed this automated procedure each with a new Google account and also an existing primary Google account. 

This OAuth client will be the highway on which you will get Google’s services. And in order to do so, you will need to log into the freshly created client with your primary Google account. This account should have accessibility to Google Analytics and Google Search Console data that you would wish to connect to Google Site Kit.

How to link Google Search Console to WordPress using Site Kit 

As Ihave assured at the beginning of this guide, building the client configuration in Google Site Kit plug-in is a click-and-copy-paste matter. This procedure will automatically link your Search Console data to your WordPress website. If you don’t have your website added to the Google Search Console, Site Kit will create one for you. 

Here’s how to do it: 

Step 1: First, sign in to your Google account in the same web browser. Because of some restrictions on Google’s end, you require to disable your ad blocker for the rest of this tutorial. 

Step 2: Next, go over to your Site Kit page in WordPress dashboard and then click on the highlighted link. 

Step 3: The Site Kit plug-in will automatically fetch your WordPress website data and move it on to the client configuration page in the Google Developer Console dashboard. As an example, the configuration information in the image above is gathered from my blog. 

Click on Get OAuth Credentials to proceed. 

Step 4: Site Kit will now build a brand new project in your Google Cloud account, using the exact details from the WordPress website. Once finished, you’ll receive a client configuration code. Copy the code into the clipboard and click on Done. 

Step 5: Paste the code in the Client configuration text box in the WordPress dashboard and click on Proceed.

Step 6: Now, you’ll need to sign in with your Google account. Click Sign In With Google to continue. 

Step 7: Click your Google account and provide the required permissions. 

Step 8: Review the permissions and make sure that all checkboxes are enabled. Click on Allow to move to the last step. 

Step 9: Site Kit will automatically detect your linked site data in your Search Console account and link it to the WordPress blog. 

Now, you can view your Search Console information and data directly in your WordPress dashboard, thanks to Site Kit. 

You are able to view specific post and page-level organic search visitor data with Site Kit.

And that is the way you are able to link your Search Console data to your WordPress website using the Site Kit plugin. 

How to link Analytics to WordPress site using Site Kit?

Google Search Console is among those Google properties which Site Kit can link to your WordPress website. In this part, I will demonstrate how to view Analytics data to a WordPress dashboard using Site Kit. 

Note that unlike Google Search Console, if you don’t have an Analytics account, you need to manually make one and insert the tracking code to your WordPress website. Site Kit can’t automatically build a new Analytics account for you. 

Follow these few steps to link your Analytics account to Site Kit. 

Step 1: Go to your WordPress dashboard → Site Kit → Settings page and choose the Connect More Services tab. 

Step 2: This display tells you that you will get an “Unverified App” warning in case you try to login with your Google account. 

Since this is just a Developer Preview version of the Site Kit plug-in, there’ll be several minor problems like the “unverified website” error during the setup process. There is absolutely no need to worry about this as I’ve shown you how to navigate those problems. Moreover, there aren’t any known security problems in the Site Kit plugin, and also – we are using it in our sites! 

Click on Proceed to the next step. 

Step 3: Select your Google account that’s access to Analytics. Ideally, this should be exactly the same Google account that you used in the Google Search Console configuration.

Step 4: This is actually the warning display screen we talked earlier. Click on Advanced to toggle the advanced options. 

Step 5: Click on “Go to souravkundu.in (unsafe)” to proceed to the next step. 

Step 6: Grant each of the permissions required by Site Kit to use access your Analytics account.  

Step 7: Review the permissions and make sure that each of the checkboxes are enabled. Click on Allow to move to the next step.  

Step 8: Google Site Kit will return to the WordPress admin dashboard where you will be requested to link your Google Analytics property. Let’s assume that you have already set up Analytics during custom WP development, Site Kit will choose the proper Analytics property.  

Click on Configure Analytics to move to the final step.  

Analytics is now successfully connected to Google Site Kit in WordPress. You are able to view your Google Analytics and Google Search Console data in the Site Kit dashboard.  

Troubleshooting Google Site Kit for WordPress 

Some times Google Site Kit might show a warning message like “Issue Accessing Data” in your WordPress admin dashboard. You’d require to re-authenticate your account once again.  

Note that I had struck this problem double in my blog when preparing this specific tutorial. However, Site Kit managed to pull all the Google Analytics and Google Search Console data and display it in my WordPress admin dashboard.  

I would not worry too much about this problem since, after all, this is a Developer Preview variant of the Site Kit plugin. 

When Google releases the official edition, these problems will be sorted, together with the chance of a simple setup process.  

What is Googelecom?

Googelecom – Google’s web-based store is a cool place to buy products. By using the “find a store near me” feature, you can search according to state, zip code, or city. Google also analyses in-store inventory for you and will show the map and hours of operation on the web page. One of the best things about Google is its map-based search. Using this, you can find stores near to where you are by simply using the search engine. If you have a smartphone, there are also apps that allow you to access its whole catalog. You can save time and effort with these in many different ways! The site is very favorable for those people who want to search for items and services at a smaller amount. 

Website: https://googelecom.net/

Introduction: What is Googelecom and What are its Uses?

Googelecom is a search engine created by Google. It is the most popular search engine in the world. It was created in 1997, and it is one of the earliest internet search engines.

The goal of Googelecom is to provide users with quick and easy access to information on the internet.

Googelecom has many uses, but they are all related to searching for information on the internet.

YouTube videos about Googelecom

#googlecom – YouTube

Top Killer Google Ads Optimizations to Stretch Your Budget Further

In the ever-changing digital landscape of rising PPC costs and growing competition, maximizing the efficiency of your marketing budget has become more important than ever.

In this article, we’re going to go through how you could do so by using killer Google Ads Optimization tips that will help you boost your performance and stretch your budget even further.

It’s important to remember that relevance is key to Google Ads’ success. Ensure that you’re using the most relevant keywords and ad copy for your target audience. This will raise the quality score and lower your average cost per click. Furthermore, you’ll want to increase your landing page’s relevance to boost the CTR (cost-per-click) metric.

Viden is the only company that can optimize your Google Ads account for you with no setup time or high costs. A lot of big companies in Europe and USA trust these guys. And they also have a high rating as a Facebook Ad Agency in the Clutch catalog.

Main Tips

The first thing you should do is review your ad’s keywords. Relying on their historical performance, you could consider what match types you’re using, which of them bring in more value, and the most relevant search terms  – this way, you have a better understanding of which keywords you should be focusing on moving forward. Also, analyze how your keywords are organized within your ad groups and if the structure could be improved to adhere to Google Ads’ best practices. Building a strong account structure is a crucial element of maximizing your efficiency across the platform.

Alternatively, you could turn to the keyword optimization tool that Google offers, which can help you determine what type of keywords you should be targeting. Then, you’ll need to tweak your ad’s messaging and targeting, focusing on creating effective ads, tailored to your audiences and keywords. By doing this, you could significantly improve your efficiency at no additional cost.

Another way to improve your campaigns’ performance is to use and regularly update negative keywords. This will allow you to avoid showing ads on irrelevant search terms and help you focus your budget on more valuable clicks. As you learn about Google Ads’ best practices, eventually you’ll be able to spend more on profitable keywords with better results.

The next killer Google Ads Optimization tip is to optimize your ad’s position. Make sure you get a high ranking for your ad’s position. If you want to save more money, you should try to make it as effective and relevant as you can. Since the average ad position is no longer available, you might want to test this way of improving your ad’s visibility.

Campaign Management & Best Practices

Regular optimizations are as important as major changes in your Google Ads’ strategy. As previously mentioned, using negative keywords is a great way to maximize your ROAS (return on ad spend) and increase your conversion rate by filtering out the audiences that are a poor fit for your business. You should also make sure that your keyword list and ad copy are optimized for the language people use across search engines. This will make your ad more relevant to your audience and will help you boost your click-through rates. It’s important to note that you can easily improve your ad’s quality by widely using keywords or keyword insertion in headlines or descriptions.

Another good strategy is to use specific, high-intent, or long-tailed keywords to target specific segments of your audience that are most likely to convert. By adding more precise terms and creating tightly-knit ad groups, you could considerably increase your conversion rates.

When making optimizations, you should also consider the location of your customers. By using location-based bid adjustments, you could cut the spending on underperforming countries, cities or regions, and relocate your budgets to more profitable audiences. As a rule, your business’ location tends to influence your conversion rates, so keep it in mind when you work on your marketing strategy.

The cost per click is another crucial factor to consider when making day-to-day adjustments in your Google Ads’ campaigns. You want to focus on the keywords and ads that deliver results at the best cost.

Utilizing your extensions to the fullest is another tip that can deliver great visibility to your ad and improve your click-through rates. This way, you can engage your audience without additional costs. 

Bottom line

Some of the main impactful Google Ads optimization areas include campaigns’ ad groups’ structure, keywords, and ads’ efficiency. To make the most of your budget, you might want to run a full audit of your account, determining its weakest and strongest areas as well as opportunities for improvement and growth. Test different strategies and optimizations, and find the approach that works for you!

Google AI Hub: what, why, how

Artificial intelligence (AI) and machine learning (ML) increasingly seem to be indispensable tools that developers need to be able to handle. There are many ways these tools can be put to use, applied to applications and products. In research and academia, the subject has been around for 70 years or so — more or less the same time span which separates the birth of computers and information technology from the present day. However the popularity of this field has fluctuated considerably in the last few decades, experiencing dark times (the infamous ‘AI Winter’) and golden eras, such as the present (a phase that does not seem destined to end any time soon).

Why you may need artificial intelligence?

The immediate impact on everyday lives of Artificial Intelligence and similar technologies has never been as popular and widely (if not wildly) acknowledged as in the present day. Every CEO wants their company to use it, produce it, develop it — and every developer wants to join the party. Of course, there is nothing wrong with that: on the contrary, for an entrepreneur it is a natural impulse to exploit state of the art technologies in order to keep pace with competitors and to try to take a forward step before them. It is also perfectly natural for a developer to be intrigued, at the very least, by an impressive and pervasive technology that, although still rather intricate from the theoretical point of view, is largely accessible in terms of both tools and programming systems.

Even if you don’t want to learn Python, R or Scala (though you should!) and prefer to stick to the Java and C# you probably use in your daily work, ready to use libraries and frameworks will be found within your favourite computer language. If readers will permit a personal digression, my first experiences with AI were in BASIC(!) and my first professional project in the field (being paid to deliver an AI product) some twenty years ago was in C: at the time I had to do most of the work ‘by hand’, due to a lack of standardised libraries (or indeed any libraries at all) suited to my purpose.

Today, things are simpler for developers in this respect: one can learn a library or framework for an already-familiar language, or learn the foundations of an easier interactive language, such as Python or R, and start using de facto the standard libraries such as TensorFlow that are available for many mainstream languages (even for Javascript).

In short, it is a natural and healthy instinct for a developer to be interested in participating in and delivering AI projects. The easiest introduction involves finding tutorials, explanations, or introductions written by other developers, and downloading open source tools. Such tools (Jupyter notebooks, for example) are usually easy to install and easy to use for those who are just starting to code and to solve problems using AI methods.

Of course, where both CEOs and developers (whose salaries are paid by CEOs) want to work with AI, it is obvious that the team’s joint efforts will result in the delivery of AI products or solutions to sell to customers.

However, it is precisely at this point that things become difficult: while a single developer may create a Jupyter notebook that brilliantly solves some regression, prediction or generation problem, to transform that solitary effort into a standard delivery pipeline is very difficult — often, it may be better to restart from scratch.

On the one hand, projects — collective efforts performed by teams — are what leads to delivery; on the other hand, an enterprising solution needs to satisfy business requirements — the first goal of any profitable project. In other words, first the business case, next the technology required to efficiently satisfy that need.

Developers playing with Pytorch late at night may produce interesting prototypes, which may suggest ways to solve a problem or need experienced by the company but creating a new product on the strength of that idea alone is another matter entirely. A production pipeline with delivery of an AI-based product, made for a specific purpose as its goal is needed, and will need to be managed properly. Artificial Intelligence project management is another interesting issue but will be dealt with elsewhere.

What is Google AI Hub?

The time has now come to introduce our main character, Google AI Hub: at first glance, this is just a repository of tools able to provide the individual parts of the pipeline mentioned above. It is also an ecosystem of plugins and goes as far as supplying end-to-end pipelines to support the delivery of an AI product, at different levels of abstractions, according to the resources available to produce it.

In fact, AI Hub is more than a repository, providing different assets for different goals: for example, it can be used to learn ML algorithms, or to use built artefacts available either in the public domain via Google, or shared as plug-ins within your organisation. Alternatively, one can use AI Hub to share one’s own models, code and more with peers in the same organisation — a hub that facilitates collaboration on AI projects by means of reuse, sharing and factoring.Let’s begin by finding something useful just to play with — something ready to use. Visit the site homepage on which assets are classified in categories in a menu of the left hand side. Choose the ‘Notebook’ category for this example:

This offers a list of notebooks provided by Google. For our current purposes, we could open the first and start using it.

Once we access the asset — in this case a Notebook — we can open it in Colab to explore and exploit. This is a simple asset exploitation of course, but Google-provided notebooks are great; well documented and easy to use, they’re a good way to learn by doing.

Among the available assets we find datasets, services (API, for example, which may be called on by your application to use built-in functionalities, or to train your model via transfer learning, etc.), trained models, TensorFlow modules, virtual machine images, and Kubeflow pipelines. All these assets occur somewhere in the development process of an AI application. The importance of Kubeflow pipelines — an interesting way to embed AI models inside an application — should be particularly stressed, but more on that later.

How to benefit from Google AI Hub

In this introductory note we cannot give a general overview of all the tools available on the Google AI Hub dashboard (the platform itself provides several tutorials on how to start using each tool and resource it makes available). In place of this, we offer some hints on the task of deploying a scalable ML application through the hub.

An important initial note about using AI Hub for practice is that you will need a Google Cloud Platform account. Starter accounts that are essentially free of charge are available, but you’ll need to provide bank account details. It’s probably best to operate inside an organisation account instead — typically one belonging to your company: organisations have the ability to use and share assets via the Hub. For example, if you work in R&D you can share prototypes with your colleagues working on architecture, delivery or another aspect of the product.

The dashboard of the platform allows management of projects using assets from the hub. A project may start as a simple Jupyter notebook, for which you can choose not only the language (Python 2/3, R, …) but also the computational sizing (e.g. if you need some kind of GPU to properly run it, etc.) and other parameters. All of these factors determine the cost of the service needed to run the notebook.

Needless to say, you can edit and run your notebook on the cloud platform as you would in your local environment: you’ll find all the main tools already available for whichever language and framework you chose; for example, TensorFlow is already installed in the Python environments, and you can ‘Pip’ whatever additional packages you need.

It is also easy to pull and push your notebooks from and to Git repositories, or to containerize your notebook in order to install specific libraries and acquire the level of customization your code requires to run properly.

At a certain point (probably at the start!) you’ll need to handle a dataset, perhaps to train your model or to fine tune a pre-trained model. AI Hub provides a section on datasets that is not simply a bookmark or repository but allows for labelling data. This is a practical need in many projects, and the lack of a dataset appropriate for your supervised model is a frequent issue when trying to build a product based on ML models.

In this section of the hub you can add a dataset for which you can specify the kind of data and its source, upload data and specify a label set which provides the complete list (to the best of your knowledge) of labels of your data. This is not only for recording purposes: in fact you can also add a set of instructions and rules according to which human labellers may attach labels to the elements of your dataset. This feature allows you to specify the requirements of a labelling activity to be performed by someone paid to do it on your behalf.

However, labelling data is not an easy task and is subject to ambiguities (people do this task instead of a machine for some very good reasons!) so one may need to refine instructions and initially provide a limited trial dataset on which to assess both the quality of labelling and the level of description actually required in the instructions. Since this is a crucial step in training a ML model, real life projects will require people to manage this activity by collaborating closely with the developers to get a useful, and as unbiased as possible, dataset on which to train the ML model.

‘Jobs’ is another interesting feature from the AI platform. Used to train models, you may define these using standard built-in algorithms or your own algorithm, according to your model’s needs. In most cases algorithms built in the platform will suffice for training purposes.

Up to this point we have talked about models, datasets (and the interesting labelling feature) and training jobs: these tasks form the bulk of an AI developer’s day-to-day work, whether on their local systems or on the shared tools provided by their organisations.

A complete, end-to-end ML pipeline is somewhat more complicated, however, requiring at least the following steps

  • Data ingestion to encapsulate data sourcing and persistence: this should be an independent process for each dataset needed, and is a typical job;
  • Data preparation: to extract, transform and select features which increase efficiency and should not deteriorate performances;
  • Data segregation, to split datasets into the parts needed for different purposes, for example: training set and validation set, as required by different validation strategies.
  • Model training on training datasets, which may be parallelized using either datasets or models (most applications put different models to work).
  • Model assessment on validation datasets, when performance measurements are also taken.
  • Model deployment: the model could be programmed in a framework which is not the native framework of the application (e.g. R for modelling, C# for production code) so that deployment may demand containerization, service exposition, wrapping, etc.
  • Model use in the production environment with new data.
  • Model maintenance — mostly performance measurement and monitoring, to correct and recalibrate the model if needed.

In this ‘model lifecycle’, the final step, i.e., the integration with the application which needs the model, is typically not covered by AI frameworks and hence is the most problematic step for a developer team, yet the most important step for the business.

The ecosystem which AI Hub embraces to achieve these results is based on Kubeflow (in turn based on Kubernetes), which is essentially used as the infrastructure for deploying containerized models in different clusters, and as the basic tool to access scalable solutions.

A possible lifecycle could be as follows (for more information on this specific tool check this link).

  1. Set up the system in a development environment, for example on premises e.g., on your laptop.
  2. Use the same tools that work for large cloud infrastructures in the development environment, particularly in designs based on decoupled microservices etc.
  3. Deploy the same solution to a production environment (on premises or cloud cluster) and scale it according to real need.

Kubeflow began as the way Google ran Tensorflow internally, using a specific pipeline designed to let TensorFlow jobs run on Kubernetes.

A final word on sharing: as we have said, all these tasks cannot be accomplished by a single developer alone, unless they are experimenting by themselves: in production environments a team of developers, analysts and architects usually cooperate to deliver the project. Developers in particular cooperate, and sharing is an essential part of cooperation.

Assets uploaded or configured on AI Hub can be shared in different ways:

  • simply add a colleague by using their email address, much as in other Google tools when sharing documents, etc.
  • share with a Google group
  • share with the entire organisation to which one belongs.

Moreover, different profiles may be assigned to people we are sharing with, essentially a read only profile and an edit profile.

All in all, although it is not always easy to use and is subject to several constraints, Google AI Hub is a complex tool which may be used to deploy and scale ML applications or ML models to integrate into business applications, within a uniform framework. It is difficult to say if this will become the standard of ML deployment but it certainly traces a roadmap toward a flexible engineering of the ML model lifecycle.

Google vs Apple – The Smartphone History

Google launched a new phone . . . but that’s not the real news.

Let me explain.

Let’s be real. Unless Google built a physical rocket launcher into their new Pixel phone, nobody is really going to care. Apple won the smartphone wars a long time ago.

Google knows this. They also know the future of tech better than anyone in the world.

“Made by Google.”

This is what’s going to be on the phone. Google is now taking complete ownership of hardware and software on the phone. They basically copied Apple when it comes to hardware design. That’s not in dispute.

They knew they had no choice. They are preparing for the next war, and in order to win it, they can’t let it be run by their partners.

The war isn’t over who can create the next best smartphone.

Google and Apple are competing to create the “Smartest Phone.”

Source: Living with Google Assistant

The war is over who can create a smartphone that makes your life easier.

By all accounts, what they are creating is going to be the creepiest thing ever made.

It already tells you to leave 10 minutes early to get to your appointment that’s 5 miles away, and meanwhile you’re wondering “How in the world did Google know I have a birthday party to attend?”

So what exactly is Google trying to do, and how is the introduction of the new hardware going to help meet that goal? There are two components to it: what Google wants to do from a business point of view, and how Google can provide enough value to consumers to achieve their primary business goal.

Google is, has always been, and likely always will be, a search company. That was Google’s original mission and that’s where the company is getting most of its revenue even today. The holistic monetization business model – of using personalized data to serve relevant ads to relevant audiences – will likely not change any time in the immediate future. That’s why Google purchased Youtube: search for videos. That’s why they implemented and perfected Image search. That’s why they introduced voice search. You get my point – Google is all about optimizing their multifaceted search strategies to preserve its monopoly at a global level as the number-one search engine.

Source: Google Pixel offers cold comfort to silent partner

So how does this relate to Pixel? The Pixel phone is simply a drop in the ocean, where the ocean is defined as the end-to-end strategy for Google’s personalized search strategy. In order to take search to the next level (business goal), Google needs to take ownership over the hardware which can provide the ultimate amount of value to its user base on mobile phones. Google has attempted to achieve this goal in the past by purchasing the Android ecosystem and optimizing it.

Eventually, Google realized that controlling the software wasn’t enough. Google may have the most flexible development platform, but Apple’s better hardware made iPhones faster, more reliable, less prone to errors, easier to update and much more.

And this is where Pixel comes into play. The phone is an attempt for Google to level the field. To get the flexibility of controlling their own hardware, to innovate on both the software and the hardware side and to leverage the massive amount of data it’s already collecting from billions of users to create both the most convenient phone for its users and its best advertising platform for its business clients.

So how do Google and Apple compare (so far) in terms of their flagship phones:

Apple wins the hardware war on the surface, but it’s important to understand why Google has launched a smartphone, beyond the technical specs of the hardware.

Innovate freely

Readers may find it a bit ironic to list innovation as one of the biggest reasons for Google to invest into their own hardware. That’s because the Pixel phone is hardly innovative when comparing it to Apple’s iPhone 7 and Samsung 7th generation phones.

Source: iPhone 7 and 7 Plus: Our take on Apple’s latest and greatest

Let’s change our way of looking at Pixel for a second, though.

Google has been controlling the software for Android phones for many years now. But with each version released by Google, we’ve seen very few memorable upgrades or “wow” moments. That’s primarily because Google’s past innovation has been very limited by external factors it couldn’t control.

Google has been forced to operate within the boundaries of the technical specs of the smartphones built and released by other manufacturers. When Apple wanted to make iPhone 7+ all about taking the best possible pictures and uploading them smoothly across social channels and into the cloud, they simply changed the hardware and upgraded the software. Before the Pixel phone, Google wouldn’t have been able to control anything but the software. They operated within the confines of the technical limitations set forth by other smartphone manufacturers.

Simply by having the option to fully control the hardware and the software side, Google is positioning itself to think more holistically about what matters to its users and how to deliver a “wow” experience across the board.

Knowing where Google wants to go and what they want to achieve, how does this change the comparison between Google and Apple?

With these side-by-side comparisons in mind, let’s see how Google’s phone launch plays into its overall company strategy: how the Google hardware paired with Google software can help them win the final tech war against Apple.

Long-term smartphone strategy

Anyone working in software development knows that most digital strategies are created for the next 12 to 18 months and executed accordingly. You plan your features, then you start building software, and you change gears when needed, depending on various internal or external factors.

Source: Google

By controlling both the hardware and the software of a smartphone, a company can actually implement hardware changes early on and enable software changes over time. Tesla is a great example of a company who has been able to execute on long-term strategies using this model. The hardware to support autopilot was included in the first-generation Tesla cars. Yet the first Tesla cars have received 8 updates over the years, getting the cars closer and closer to a smart autopilot model, one iteration at a time. Same with Apple’s 5s phone, the most popular phone currently on the market across all iPhones. Despite being 5 years old, the iPhone 5s still works great even with the latest iOS version.

With Pixel, Google is now entering the same elite group of manufacturers that can produce real value for customers over time by executing on multi-year roadmaps, since they control both the software and the hardware. The company can both innovate in the short/medium term and set itself up for success simply by implementing hardware that can be leveraged incrementally over time.

Controlling operating system versions, releases and software upgrades

As we all know, the Android market has been incredibly fragmented in terms of both device specs and the operating system version running on them. Whereas Apple currently only supports 3 iOS versions with most iOS customers being on iOS 8 and 9, there are 7 different Android versions on the market.

Source: Video: Google Pixel and Pixel XL First Look and Tour!

One of the biggest reasons why there are comparatively more Android OS versions than iOS versions is because Google cannot control Android software updates. Instead, they have to work through manufacturers (Samsung, LG, Nokia, etc) and phone carriers (Verizon, Sprint, T-Mobile, etc) on when, where and how these updates are released to Android users across the world. Apple never had this problem, since they could simply push updates to all iPhone users’ devices directly without having to go through a middleman.

Being in charge of both the hardware and software gives Google 100% control over when their software upgrades are pushed out to their userbase and under what conditions. That means better platform stability, less maintenance and version control for older operating systems, better ability to manage OS defects and much more.

The road ahead towards IoT and VR enabled technologies

Smartphones are transitioning towards becoming the central hub for a variety of peripheral technologies that are already part of our everyday life. Smart devices – locks, thermostats, bulbs, cameras etc – and virtual reality-enabled glasses are gaining traction, pulling in new customers every day. And everyone is waiting to see how far and in what direction these technologies will go in the immediate future. Yet while their actual future is still open to imagination, one thing is clear: the importance of the smartphone as a connector between these technologies cannot be understated.

Source: Google

Google Pixel may not have any proprietary software for its first generation (read: unique features), putting it on par with other comparable smartphones. But as Google continues to iterate from both a hardware and software perspective, it can position its phones to better compete in the market. At the end of the day, Android users are already used to the idea of Google accessing and using their data to help them manage their time better.

Now that Google controls the hardware as well, the question becomes to what extent can Google create an enhanced experience connecting all other devices in the Google family (Chrome, Nest thermostat and Cameras, Google home) to produce the most personalized user experience out there.

Summary

There is a smartphone war happening as we speak, and it has been going on for almost a decade now. So far, it has been carried out between two unequal equals. Apple, the giant hardware manufacturer, and Google, the giant software producer. Before the Pixel phone, the biggest irony is that each company excelled where the other didn’t.


Let me explain.

For the last 9 years, Apple has been releasing one great phone after another. Their user experience is good, but their hardware has always been better. But Apple has always missed the cue on one critical piece: access to customer data. And that is what Google has always been successful at.

When you buy an Android phone you sign in to your Google account. Behind the scenes, Google starts recording a huge amount of data about you as a user, your preferences, your routine. Jokingly or not, oftentimes Google knows more about us than we do.

But Google never had real access to the hardware on which their software was installed. Not on a large scale, at least (the Nexus phone was the exception, of course).

Limited to work within the confines of phones created by various manufacturers and not able to control software updates for its Android platform, Google has always been like a bird trapped in a cage.

The Pixel phone is Google’s way of positioning itself to have full control of hardware, software, user experience, data points, integration points with their own variety of Internet of Things products and much more.

For the last ten years, Google and Apple have been like two cars racing each other on a highway at 130 miles an hour. Each in its lane, trying to race into the future. With Pixel, Google has just hit the gas pedal and veered into Apple’s lane.

It’ll be interesting to see how quickly Google will move and whether it will make Apple bite the dust in the long race towards the smartest phone. For now, Google is definitely better positioned to win.

Exit mobile version