Tag: JavaScript
Dominating Web Development Trends 2023
âFiguring out what the next big trend is, tells us what we should focus on.ââââMark Zuckerberg
Web development, over the years, has proved itself as an indispensable element in the success of any organization/business. It is a window to your business, which helps you grow it globally.
Now, the Web development world is constantly changing, so do the trends. Sometimes these trends change much faster than they can be used. To stay ahead, it is necessary to focus on the latest trends, updates, techniques, and approaches that are getting popular. Besides, knowing trends and keeping in check of what is happening around is highly essential for web development.
Here we have gathered some trends after analyzing tendencies across industries in this list of web development trends this year. Youâll get to know about the top web technology stacks worth your attention in the coming year.
We have made this list so that you can save your time and can help you grow your business in the upcoming era. So, letâs begin.
1. Single-page Apps
All in one place. No need to switch. No need to wait..!!
Well, it is a bit irritating when one click leads to one more web page downloaded from a server. It also consumes your time and leaves a bad impact on users as well. This situation has lead to a trend of SPA.
SPA is one of the trends of recent years that helps to avoid lengthy communication with the server. It offers better page performance and provides a high level of data protection.
So, A single-page application is an app that works inside a browser and does not require page reloading during use. You are using this type of applications every day. These are, for example, Gmail, Google Maps, Facebook, or GitHub.
As JavaScript frameworks in 2022 is going to actively rise, & SPA uses this language for content loading, this trend isnât going away soon. Besides, these apps donât require additional waiting time providing the users with instant feedback. Furthermore, it offers some amazing advantages.
Advantages:
- Great UX/UI in a native browser environment
- Saved bandwidth
- Easier set-up and debugging with Chrome tools
- The focus on APIs
- The efficiency of a caching process
Single-page app examples:
You can check Vuexy Admin Template, which is highly suitable for developing single-page apps.
It is an advanced admin template. It is highly responsive, clean, and well structured. Besides, it is laced with Vuejs, HTML, PHP, and React. Furthermore, this graphically enriched bootstrap template is highly recommended by developers over the world for its user-friendly experience and speed. In addition, it includes 100+cards, 50+ Components, and many more.
2. Progressive Web Apps (PWA)
Everything at your thumbâŠ!! We know this concept right? Easy navigation, smooth working, less loading, and fast. Yes, thatâs what PWA i.e Progressive Web App is about..!! Fast, Reliable, and smooth user-friendly experience.
No doubt, PWA is not that new. Although, it is the talk of the town since it arrived and it is going to dominate 2021 as well. Modern developers and investors are aiming for it because of its capability to perform a high-quality user experience. As they are highly mobile-friendly, there is no doubt demand for PWA is going to increase.
Well, Progressive Web Apps (PWA) are built and enhanced with modern APIs to deliver enhanced capabilities, reliability, and installability while reaching anyone, anywhere, on any device with a single codebase. Which makes it suitable for cross-device compatibility.
They not only are fast and load instantly, but they also allow users to use services offline, while performing all the functions of a native app.
Advantages
- PWA helps deliver a smooth and user-friendly web experience.
- Helps reducing bounce rates
- Works offline as it is connectivity independent
- Makes your app reliable, capable and installable
Some example of services using PWA :
3. Artificial Intelligence Development â Support
As per the report âThe artificial intelligence market to be valued at USD 39.9 billion in 2019 and is likely to reach USD 190.61 billion by 2025, at a CAGR of 42.2% during the forecast period.â Thatâs a pretty huge numberâŠ!! Isnât it?đź
Now, around 38% of people skip a website if the content or layout is unattractive. More than 75% of customers decide a businessâs credibility based on its website design. Users take just 0.5 seconds to form an opinion about a website. Henceforth, it is essential for technology to involve in the world of web development. Here, AI comes into the picture of web development trends 2023.
- Dall-E
- CPT-3
- ChatGPT
Applying AI in web development helps you predict customer choices using which you can shape the overall look and feel of your website. AI allows you to know,
- What are your customers planning to buy next?
- The ideal time frame during which a customer decides to buy a product.
- What kind of products allures the most to the customers?
- What are the products that are not appreciated by the customers?
- Who all are interested in buying your products?
We are living in a digital era and itâs a well-known fact that the upcoming age is going to be all about a smarter approach in every field. This means less manual operating. For example, chatbots, Augmented Reality/Virtual reality.
Sketch2Code, a web-based solution, has recently been introduced. It relies on artificial intelligence in order to transform a handwritten UI design from an image to a valid HTML markup code.
Many users arenât even surprised that AI is involved to some extent in most sites. It created a new dimension in the sphere of web development.
4. WebAssembly
The first thing that must not be neglected when developing a web application is performance. Now, JavaScript limitations make heavy calculations slow. That significantly worsen the user experience.
This is one of the main reasons for the rising popularity of WebAssembly. With this technology, the code in any programming language can be compiled into bytecode, which runs in a browser.
WebAssembly is an open standard that defines a portable binary-code format for executable programs, and a corresponding textual assembly language, as well as interfaces for facilitating interactions between such programs and their host environment.
Advantages:
- Itâs independent of programming language and platform
- Independent of hardware
- Executes code fast
- Provides a high level of security.
It all comes down to the triangleâââsmall footprint, cross-platform scripting, and speed. All three of these components are the key ones in modern web development. This is why a lionâs share of web development cases is not without WebAssembly today.
For more info check Webassembly concepts
5. Voice Search and Navigation
Hey SiriâŠ. Whatâs trending today?
We, humans, are getting lazy day by day⊠isnât it..!!?đ First, we made mobiles, then developed smartphones to reduce manual works, and now we are heading towards âvoice-oriented hands-freeâ gadgets. Command-oriented services are hot topics nowadays.
Well, voice search and navigation are going to be one of the most dominant web development trends in 2021. They are already a part of our daily routine. They are super awesome as they kind of made it easy the way we search for information, take notes, and so on.
Brands like Apple, Android, and Google implement the trend in their UI/UX design process. So, this rapidly emerging trend isnât something you can ignoreâŠ!!
Google reports that 27% of the online global population is using voice search on mobile.
Voicebot.ai reports that over half of all adults have used voice search, with 33% using voice search monthly in early 2019, jumping up from 25% in 2018.
By implementing Voice search and navigations in web development, you can make sure your service delivers an amazing user experience.
Voice user interfaces work according to the following algorithm:
- Speech recognition software converts input analog waves into a digital format
- The audio input is broken down into separate sounds, phonemes
- The software analyzes each of them and compares to words from the dictionary
- Speech is converted to on-screen text or computer commands
Advantages:
- Ease of use
- Allows freehand interaction
- High speed of task execution
- Great user experience
- Intuitiveness and convenience
People prefer to spend less time typing commands. This is why they increasingly use voice search. Therefore, web development will be closely related to the implementation of such functionality.
6. Native Apps will dominate the market
What if you are working and suddenly there is a net issue..!! Bit irritating to depend on the internet all the time. Thatâs where the Native app comes into the picture. It allows you to work offline as well.
A native mobile app is one that is installed directly on the smartphone and can work, in most cases, with no internet connectivity depending on the nature of the app.
Well, native app development is already in demand as it is, going ahead, software developers can expect this trend to dominate web development trends in 2021.
Since they are uniquely designed for specific platforms, they generally deliver a better user experience and more powerful performance comparing to hybrid apps. Thatâs the reason, more and more businesses are investing in multiple native apps for iOS and Android to enable them to provide their users with a better experience.
Advantages:
- Broad functionalities due to using the capabilities of the underlying devicE
- UI that better matches with user experiences of the OS
- Responsive and fast performance
- Push notifications
- Quality assurance through ratings in application stores.
With the increasing popularity of smartphones in the market and with the ever-increasing dominance of iOS and Android operating systems in the market, it doesnât seem like an investment in native app development will dwindle anytime soon, not in 2021 or in the foreseeable future as a matter of fact.
7. 3D Motion design UI
Credit: Credit: Vuexy By Anand Patel on Dribbble
Motion design is one of the main web design and web development trends in 2021. Minimalistic design coupled with sophisticated interactions gives an engaging and interactive look that attracts the userâs attention.
As its name strongly suggests, motion design is about designing movement. However, it goes quite beyond simply animating an element of the screen after it has been conceived.
Motion design must be contemplated already on the UI/UX design stage. The reason behind this is that just having a screen that contains animations falls a bit short of its intended aim: the movement added has to mean something and have a purpose.
Due to motion design, these elements will be implemented:
- Page transitions;
- Charts;
- Pop-ups;
- Pull-down menu;
- scrolling.
All of that will help you display your unique style and entertain the user, improving behavioral factors, and helping your web app rank higher in search results.
With the help of AMP, motion design can be implemented without loss of download speed. Therefore, if you want to hold the user on your page, then do not ignore this oneâŠ!!
Advantages:
- Define your structure and interactions
- Eases navigation
- Dissimulates slow load times
- Increases session length hence reduce the bounce rate
To increase engagement and provide better UI/UX to your web appâs users, try to upgrade it with motion UI techniques.
- Guide users through your app with animations demonstrating which step to take next;
- React to usersâ gestures with catchy animations;
- Demonstrate the relations between different components of an app, etc.
8. Serverless Architecture
Serverless architecture is a way to build and run applications and services independently to manage infrastructure. Your application still runs on servers, but all the server management is done by AWS. You no longer have to provision, scale, and maintain servers to run your applications, databases, and storage systems.
So basically, Serverless applications are event-driven cloud-based systems where application development depends solely on a group of third-party services, client-side logic, and cloud-hosted remote procedure calls. (Functions as a Service).
No doubt, Serverless is reaching new heights in its path to disrupt your server infrastructure. Serverless is already used in production by companies like Netflix, Reuters, AOL, and Telenor.
as Serverless architectures help reducing system overloading, data loss, and expensive development. Consequently, one of the solutions became cloud computing, which can replace regular servers.
Advantages:
- Easy to deploy
- Better scalability
- it reduces development and ongoing support budgets
- strengthen app architecture
- increases flexibility
The most common tasks that can be very quickly executed due to serverless technologies are downloading file backups, notification delivery, and objects export. Stated differently, serverless architecture is one more trend, which will dramatically change the approach to web development.
9. Continuous Integration and Deployment
We are living in the digital era where speed and continuity play a brutal role in any sector and business, the web development world is no different either. In fact, in the world of web development, it is the uppermost priority to deliver speedy, smooth, and updated services.
Frequency in Regular bug fixes, updates, improvements in UI/UX, etc makes your web service accountable and user favorite. Also, most modern applications require developing code in different platforms and tools, the team needs a mechanism to integrate and validate its changes. It affects your overall business. Thus, Continuous Integration And Deployment are crucial in the web world.đ§
Well, Continuous Integration is the process of testing each change done to your codebase automatically and as early as possible. Continuous Deployment follows the testing that happens during Continuous Integration and pushes changes to a staging or production system. While continuous delivery means apps get into production for thorough testing, and continuous deployment updates them automatically.
Advantages:
- Smaller code changes are simpler (more atomic)
- Fault isolation is simpler and quicker.
- The product improves rapidly through fast feature introduction
- Meantime to resolution (MTTR) is shorter due to the smaller code changes and quicker fault isolation.
- Testability improves because of the smaller, specific changes. These smaller changes permit more accurate positive and negative tests.
- Elapsed time to detect and correct production escapes is shorter with a faster rate of release.
With such advantages, no wonder more software development companies will implement this approach in their work. As it is the most crucial aspect in the world of web development.
10. Cloud technology is here to stay for a long time
Did you know that in 2020, the cloud services industry generated almost $40 billion in revenue, taking its market value to a total of $266.4 billion from the $227.8 billion in 2019, an 17% growth in just one year?
With these figures, one thing is sure; in web development services, cloud technology is the king. In 2021, it is expected that cloud vendors like Google, Microsoft, and Amazon will continue to rake in lots of cash thanks to cloud technology.
The reason behind this hot trend is, there are several companies on the cloud, and more are expected to move there. Businesses of all sizes, from a small entrepreneurial startup or a multinational corporation, to businesses across several industries, from health care to intelligence agencies and even government organizations are all going to cloud providers for data storage.
Following are some cloud services.
- AWS Lambda
- Google Cloud Functions
- Azure Functions
- IBM OpenWhisk
- Alibaba Function Compute
- Iron Functions
- Auth0 Webtask
- Oracle Fn Project
- Kubeless
Cloud technology offers great security, scalability, and flexibility when it comes to data storage, and considering the ever-present threat of hackers which could lead to a security breach, organizations will want to ensure they are taking measurable steps to safeguard their sensitive data and avoid a data breach and other activities that might compromise the privacy of data.
11. 5G Technology will be unparalleled
Credit:Â Rpc snate
5G is the fifth generation of cellular networks, bringing new capabilities that will create opportunities for people, businesses, and society. Even in the web development world, 5G is ruling. As there is a need for enhanced service, faster connectivity is a must thing.
In 2023, software developers can expect the 5G technology to return as a trend, but for all the right reasons this time around. With the use of new radio frequencies and speed reaching 100 Gbps, the 5G technology is about 100 times faster than 4G networks and experts in the software development industry predict that it will lead the standard data transmission with 1.4 billion devices around the world in the next five years.
Advantages:
- Greater speed in transmissions
- Lower latency
- Greater number of connected devices
- Network slicing
- Enhanced Capacity
- Availability and Coverage
5G technology is designed for compute-intensive apps like augmented reality, virtual reality, and 4K video streaming. Software developers interested in creating designs and features that enhance business performance will find this technology especially useful.
With the promise of better data transmission and a faster network, the 5G technology is no doubt a great contender for one of the best web development trends in 2021.
12. Mixed Reality (MR)
As per the report, the market of AR/VR i.e mixed reality will grow from $1.054 billion in 2017 to $9.982 billion in 2024, and it will see a CAGR of 73.2% during 2018â2023 period.
Mixed Reality (MR), is a combination of Augmented Reality (AR) and Virtual Reality (VR). It has a pivotal role in enterprise applications. AR combines digital content with the physical environment of users, whereas VR creates an immersive experience for users.
Organizations in many sectors like Web app development, defense, tourism, architecture, construction, gaming, healthcare, etc. are realizing key business value with the help of this technology.
How MR is turning the table:
- Businesses, government organizations, and even non-profit organizations can use AR and VR to train their employees in complex jobs.
- The ability to overlay digital information on the physical environment on a real-time basis creates many possibilities for augmented reality in business.
- Media and entertainment businesses are using AR and VR in a significant way to offer engaging content to consumers.
- Businesses can use AR and VR to let their prospective customers âtry-outâ their products virtually, and this augments their sales effort.
MR experiences on websites will keep increasing over the coming years. Think of furniture sites like IKEA that showcases what furniture would look like in your room..!!
13. Blockchain/NFT: Augmenting enterprise solutions with transparency, efficiency, and security
Bitcoins kind of turned revolutionary when it arrivedâŠ!! It sort of shook the market and opened a new gate for the web development world as well. A Cision PR Newswire report estimates that the blockchain technology market will touch $57.641 billion in 2025, by an impressive 69.4% CAGR between 2019 and 2025.
The cryptocurrencies like Bitcoin and Ether have made us notice blockchain, the technology has a wide impact on enterprise systems. Basically, blockchain is a peer-to-peer (P2P) network, and it offers decentralization, a distributed ledger, transparency, and security features.
Smart contracts running on blockchain networks are tamper-proof and transparent, therefore, they are secure and trustworthy. Besides, their execution is irreversible, which makes contract administration easier.
Blockchain Advantages:
- Decentralization
- Immutability
- Security
- Transparency.
- Securing the Internet of Things (IoT)
Examples of a few blockchain use cases:
- Improving supply chain management
- Identity management: Blockchain can improve the âIdentity and Access Managementâ (IAM) processes with its tamper-proof data and distributed ledger.
- Better analytics: Blockchain offers immutability and audit trail, thus assuring the right quality of data. This can help businesses in all sectors since they can run their analytics tools on reliable data.
- Disruption through decentralization: Blockchain platforms like Ethereum and NEO enable entrepreneurs to build âDecentralized appsâ (DApps), therefore, they can disrupt existing centralized business models.
- Securing the Internet of Things (IoT): The Internet of Things (IoT) has significant potential since it can derive insights from billions of sensors and devices. Although, IoT faces risks since the entire communication between devices takes place over the Internet. Blockchain can secure this communication with its robust security features.
14. IoT: Internet of Things
According to research, âover 20 billion IoT devices will be active and connected to the internet by the year 2020â. Thatâs pretty impressiveâŠ!!đ
We want everything smarter. Be it a smartphone or even a light-bulb..!! You see, the demand for smart gadgets is increasing day by day and it is not going to stop. And, thanks to the internet, smart life is becoming a reality. All you have to do is, commandâŠ!! Yes, thatâs the thing we love.đ
Well, It is impossible to imagine life without the internet as each and every aspect of the world is now connected to make everything convenient, simple, and smart. Thus, to keep the world even more connected, the advent of IoT (Internet Of Things) has been a blessing.
IoT refers to a broad range of internet-connected devices that are capable of communicating with other devices and networks. They can perform a variety of functions but are most often used to gather information and perform specific actions. Youâll be amazed to know that Every Second, another 127 Devices are Connected to The Internet.
Advantages:
- Improve monitoring
- New capabilities to predict and act
- Increase customer dialog
- Fine-tune services and products
- Improve control of operation processes
Nowadays, the internet is making life extremely easier but also making the world a small place now. Thanks to the growing enhancements, the internet is now part of our systems and routine to enrich us.
IoT is definitely going to rule the web development world for a long span of timeâŠ!!
15. MEAN-React-Vue-Flutter Tech Stack
Most of the listed above trends canât be implemented without a certain technological stack. But nowadays there are hundreds of frameworks and libraries. Which of them will be used most often?
MEANÂ is a free and open-source JavaScript software stack for building dynamic websites and web applications. Because all components of the MEAN stack support programs that are written in JavaScript, MEAN applications can be written in one language for both server-side and client-side execution environments
MEAN stack is one of the most popular ones out there. It includes:
- MongoDB â a database
- React.js â a web framework
- Vue.js â a front-end framework
- Angular â a front-end framework
- Flutter for web
React library plays a major role. Itâs frequently used as a replacement for Angular in the MEAN stack. It enables the faster and easier implementation of changes, so more and more developers choose it over Angular.
- React is an open-source, front-end, JavaScript library for building user interfaces or UI components. It is maintained by Facebook and a community of individual developers and companies.
Have a look at the Vuexy React Admin Template which is made using React.
You can check_ ReactJS Roadmap For Developers for a detailed overview of how to start with reactjs. Apart from this, there is an article on the best ReactJS UI Frameworks and component libraries which will be helpful.
Vue has already made its place in the global market after giants like Xiaomi and Alibaba switched to it. This is a very compact front-end solution.
- Vue.js is an open-source modelâviewâViewModel front-end JavaScript framework for building user interfaces and single-page applications.
You can have a look at the Vuexy Vuejs Admin Template which is made using the Vuejs.
Also, there is a detailed article on Trending VueJS UI Components Library and frameworks that youâll find useful.Angular
Angular is a TypeScript-based open-source web application framework led by the Angular Team at Google and by a community of individuals and corporations.
- Check out the Modern AdminâââAngular 10+ Bootstrap 4 Admin Dashboard Template and Apex Angular Admi Template which are made using Angular.
And the last popular solution is Flutter for Web. Flutter is an open-source UI software development kit created by Google. It is used to develop applications for Android, iOS, Linux, Mac, Windows, Google Fuchsia, and the web from a single codebase. It helps to provide high-quality work of web apps on any device, so it stands high in web developersâ ratings.
Conclusion
Well, as here talked about web development trends in 2022-2023, It can be hard to chase them since they change so fast. But, we must keep them in check and try them out..!!
By following the latest tendencies in web development, you can appease your users with a world-class user experience, improve your web app ranking, and open new markets for your servicesâŠ!!
By using these trends, you will be able to provide an amazing experience to your web appâs users. Also, you will increase your chances of becoming their first choice!
Generally speaking, every web development trend is worth your attention. Some of them may continue for the next decade, for example, AI Chats, IoT, Voice bots, MR, ETC. While some of them will become a norm in just a few months.
So, donât hesitate to start implementing them to your next project as soon as possible.
Do tell us your favorite one and in case we missed any here, we would love to hear it. Happy developing.đ€©
Svelte Framework Development Service in 2023
The Svelte framework is a new way to develop websites and apps. Itâs lightweight and easy to use, making it perfect for those who want to create fast and responsive web applications.
Introduction to Svelte Framework
Svelte is a component framework that compiles your components at build step (using Rollup) into highly efficient imperative code that updates the DOM. Itâs the equivalent of React or Vue, but with much smaller resulting bundles.
Website | https://svelte.dev/ |
Getting started with Svelte | https://developer.mozilla.org/en-US/docs/Learn/Tools_and_testing/Client-side_JavaScript_frameworks/Svelte_getting_started |
SvelteKit | https://kit.svelte.dev/ |
Wikipedia | https://en.wikipedia.org/wiki/Svelte |
Today, most component frameworks deal with state management by re-rendering the entire component tree on every change, even if only a single node has changed. This wastes valuable resources and can lead to Jamstack in complex applications.
Instead of virtual DOM diffing, Svelte writes code that surgically updates the DOM when the state of your app changes. This means that apps built with Svelte are fast by default, and you donât have to worry about wrapping your head around a built-in virtual DOM API. And because Svelte components have no dependencies, you can ship them as stand-alone packages, which is great for compatibility with third-party libraries and tools.
- Write less code
- No virtual DOM
- Truly reactive
What is Svelte.js?
Svelte is a component-based JavaScript framework similar to React and Vue.js. But unlike those frameworks, it embraces a brand new approach to building user interfaces.
With Svelte, you write components in a format that is very similar to writing HTML, CSS and JavaScript all together in one file. Then, when you build your app for production, your components are compiled into highly efficient vanilla JavaScript code that eliminates the need for any kind of runtime library, like React or Vue.JS.
This approach has a number of benefits. Firstly, it can give you a huge performance boost because there is no need for the browser to download and run a larger JavaScript library just to display your app. Secondly, it can make your code more maintainable because you are not relying on any external dependencies.
Svelte also provides first-class support for TypeScript, which can help you catch errors before they happen. And last but not least, Svelte comes with its own set of tools and best practices that can make development faster and easier.
Why use Svelte?
There are many reasons to develop with the Svelte framework. The main benefits are its small size, its ease of use, and its speed.
Svelte is a modern framework that uses a unique approach to development. Rather than relying on large libraries, it compiles your code at build time, so you end up with leaner, more efficient code. This also means that you donât need to spend time loading large libraries into memory, which can improve performance.
Svelte is also very easy to use. It uses a syntax that is similar to HTML, so it is easy to pick up for anyone who has experience with web development. And because it doesnât rely on large libraries, there is less code to write, which can save you time in the development process.
Finally, Svelte is fast. It compiles your code down to small bundles that load quickly and run efficiently. This can improve the performance of your applications and make them more responsive.
How to get started with Svelte?
Svelte is a new framework for building fast, reactive user interfaces. If youâre not familiar with Svelte, check out the [documentation](https://svelte.dev/docs).
To get started with Svelte, youâll need a recent version of Node.js installed on your machine. Then create a new project and install the dependencies:
```bash
npx degit sveltejs/template svelte-app
cd svelte-app
npm install
```
Once thatâs done, you can run the app in development mode with:
```bash
npm run dev
```
What are the benefits of using Svelte?
The biggest advantage of using Svelte is that it helps developers write easy-to-understand code that is free of any framework-related boilerplate. This is because Svelte handles most of the heavy lifting for them, which results in simpler and more concise code.
Svelte also offers a number of benefits over traditional frameworks, such as:
- Better performance: Svelte apps are typically faster than those built with other frameworks because they are more lightweight and only load the necessary code for each page.
- Less code: Because Svelte apps require less code, they are easier to maintain and scale.
- Enhanced developer experience: Svelte provides a variety of features that improve the developer experience, such as hot reloading and language support for TypeScript and JSX.
How is Svelte different from other frameworks?
Svelte is a component-based framework, which means that your code is organized into small, self-contained pieces. This makes it easy to create complex applications without getting bogged down in spaghetti code.
Other popular frameworks, such as React and Angular, use a virtual DOM to keep track of changes to the UI. This means that every time a piece of data changes, the entire UI is re-rendered. Svelte takes a different approach: it uses something called a DOM diff to only update the parts of the UI that have changed. This makes Svelte applications much faster and more efficient than applications built with other frameworks.
Why You donât need Svelte?
Do you already have a working website, but a new developer persuades you to rewrite everything on Svelte? How to understand whether you need to do it? I will try to explain on a real example.
We have a site written in React about 3 years ago. Frontend specialists always persuade us to switch to a new technology to solve old problems and keep the project code up to date. But when we get a cost estimate for this work, we see the need to increase resources x10 times. It is expensive for a working project with a small team of developers. At the same time, while the code is being updated to the new framework, the development of new features will stop. Our users do not get new functionality and will wait for it for a long time.
Of course, if you have an unlimited budget â this is not a problem. You can quickly increase your Svelte team by outsourcing. You will also have to replace your team or train them in new technology.
For example, for a SaaS startup that generates 10 thousand dollars a month, this solution is not acceptable. But for a rhubarb company with 50 thousand dollars or more should be enough resources to hire 2 developers.
Conclusion
After looking at the pros and cons of each framework, itâs clear that there is no right or wrong answer when choosing a front-end framework. The best solution is to choose the framework that best suits your needs.
If youâre looking for a lightweight solution that wonât require much development time, Svelte may be the right choice for you. However, if you need a more robust solution that can handle complex applications, React or Angular may be a better fit.
No matter which framework you choose, the most important thing is to pick one that youâre comfortable with and that will help you get the job done.
Javascript Developer Survey: Python reign Rust
Thanks for taking our developer survey! Weâre interested in your thoughts on various programming languages, including JavaScript, Python, Rust, and more.
Please take a few minutes to answer the following questions. Your feedback is appreciated!
âDeveloper Survey: Javascript and Python Reign, Rust Risesâ
In the world of programming languages, two clear winners have emerged in recent years: Javascript and Python. But a new challenger is rapidly rising in the ranks, according to the 2019 Stack Overflow Developer Survey.
Of the 90,000 respondents to the survey, nearly 80% said they were using Javascript, making it the most popular language among developers for the seventh year in a row. Python came in second place with about 62% of respondents saying they use the language.
But itâs Rust that is seeing the biggest surge in popularity, with nearly half of respondents (49%) saying they are interested in learning the language. Thatâs up from just 38% last year.
Whatâs driving this interest in Rust? One possibility is that it is seen as a more safe and secure alternative to other languages like C and C++. In fact, security was one of the top reasons cited by survey respondents for why they were interested in learning Rust.
Whatever the reason, itâs clear that Rust is on the rise and developers are taking notice.
âJavascript and Python: The Top Two Languages for Developersâ
In the world of programming languages, there are a few that stand out above the rest. According to the latest developer survey from Stack Overflow, Javascript and Python are the top two languages for developers.
Javascript is a versatile language that can be used for web development, server-side scripting, and even mobile app development. Python is a widely used general-purpose language that is known for its ease of use and readability.
Both Javascript and Python are popular choices for projects of all sizes. Developers who are just starting out may find Python to be a good choice, as it is relatively easy to learn. experienced developers may prefer Javascript for its flexibility.
No matter which language you choose, Rust can be a great option for your next project. Rust is a fast and safe systems programming language that provides memory safety without using garbage collection.
âRust Rises in Popularity Among Developersâ
According to the latest Stack Overflow Developer Survey, Rust has risen in popularity among developers, now ranking as the 4th most loved programming language. This is a significant jump from last year, when Rust ranked 10th.
The rise in popularity can be attributed to a number of factors, including the languageâs safety features, its growing ecosystem, and its use in high-profile projects such as Microsoftâs Azure cloud platform.
With its rising popularity, Rust is quickly becoming a language to watch in the world of programming.
âThe Top Five Languages for Developersâ
In order to find the most popular programming languages, we surveyed over 50,000 developers from 163 countries. The results are in, and weâre proud to present the Top Five Languages for Developers!
The languages are:
1. JavaScript
2. Python
3. Rust
4. Java
5. C++
âThe Top Ten Languages for Developersâ
1. JavaScript
2. Python
3. Rust
4. Java
5. C++
6. PHP
7. TypeScript
8. C#
9. C
10. Go
âThe Most Popular Languages for Developersâ
JavaScript, Python, and Rust are the most popular programming languages among developers, according to the results of the 2019 Stack Overflow Developer Survey.
More than 90,000 professional and amateur developers from over 170 countries took the survey in January 2019. The results offer insights into the latest trends in the programming industry.
JavaScript is the most popular programming language among developers, followed by Python and Rust. JavaScript is used by more than half of all developers surveyed (62.5%), while Python is used by nearly one-third (31.3%). Rust is used by 5.2% of developers surveyed.
The popularity of JavaScript is due in part to its widespread use in web development. Pythonâs popularity is due in part to its ease of use and readability, as well as its popularity in data science and machine learning. Rustâs popularity is due in part to its safety and performance benefits.
âThe Most Widely Used Languages for Developersâ
JavaScript, Python, and Rust are the most popular programming languages among developers, according to the Stack Overflow annual developer survey.
JavaScript is the most popular programming language among developers, followed by Python and Rust. Among the respondents who said they were using JavaScript, 97.7% said they were using it for web development, and 96.9% said they were using it for front-end development. Of those using Python, 89.4% said they were using it for scientific or mathematical computing, and 84.1% said they were using it for artificial intelligence or machine learning.
Rust was the most popular programming language among respondents who said they were interested in developing for mobile devices (54%), followed by Swift (41%), and Kotlin (37%).
The Kotlin community has grown from 2.4 million developers in Q1 2021 to 5 million in Q1 2022. This is largely attributed to Google making Kotlin its preferred language for Android development.
âThe Most Important Languages for Developersâ
The most important languages for developers are those that are in demand by employers and that pay the highest salaries. JavaScript and Python are two of the most popular languages, and both are in high demand by employers. Rust is a newer language that has grown in popularity among developers, but it is not yet as widely used as JavaScript or Python. Reign is a language created specifically for developing video games, and while it is not as widely used as some other languages, it has a strong following among game developers.
âThe Future of Language Use for Developersâ
The rise of popularity for certain programming languages can be directly linked to the needs of specific industries. For example, Python has become the go-to language for data science and machine learning due to its robust libraries, while JavaScript continues to be a top choice for web development.
However, as the needs of industries change, so do the preferences of developers. In order to stay ahead of the curve, itâs important to stay up-to-date on the latest trends in programming language use.
Thatâs why we conducted a survey of over 4,000 developers from around the world to find out which languages theyâre using now and which ones theyâre planning on learning in the future.
Here are some of our key findings:
-JavaScript is still the most popular programming language among developers, with nearly 80% of respondents saying they use it regularly.
-Python is the second most popular language, used by nearly 60% of respondents.
-Despite its declining popularity, Java remains in third place, used by just over 50% of respondents.
âThe Top Languages for Web Developmentâ
JavaScript, Python, and Rust are the top three most popular programming languages overall, according to data from the 2019 Stack Overflow Developer Survey. JavaScript is the most popular language for web development, followed by Python and Rust.
JavaScript is also the most popular language for front-end web development, according to the survey. Python is the most popular language for back-end web development, followed by Java and Rust.
The survey results indicate that JavaScript is the most popular programming language among developers of all experience levels, followed by Python and Rust.
7 Distinct Uses of JavaScript Array Slice
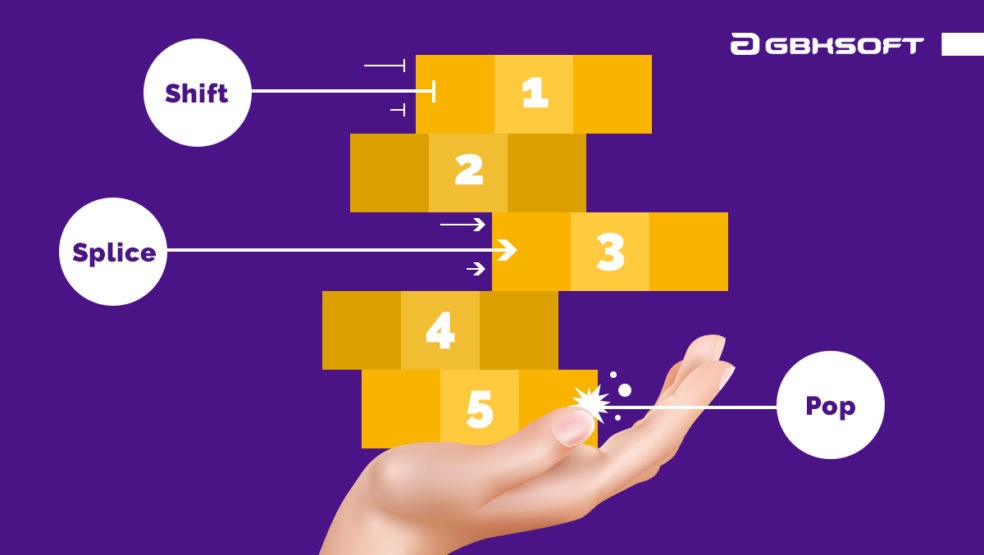
The JavaScript array slice method is one of the most powerful and commonly used built-ins in the JavaScript language.
And with the rise of React and other functionally oriented JavaScript practices, it is becoming even more important, for 2 key reasons:
- Functional programming, particularly higher level functions, works heavily with lists of data
- Functional programming requires pure functions, functions that do not cause side effects or modify their input data.
The JavaScript array slice method fits both of these criteria
The slice method provides a mechanism for creating a shallow copy of a subset of a list, without modifying the original list. Thus it provides a key building block for writing functional JavaScript.
In this post weâll master the slice method by example, exploring 8 different ways it can be used.
The slice method is not to be confused with the splice method, which modifies an array in place.
Caution
In JavaScript, an array is an ordered list of data. An array has the following special characteristics in comparison with the array of other programming languages such as Java, C/C++, etc.
JavaScript Tutorial
Slice leaves the original array intact and returns a shallow copy of selected items, splice modifies the original array.
How Javascript Array Slice Works
t, look at the basics of the slice method.
As shown in the MDN documentation, is a method on an array that takes up to 2 arguments:
arr.slice([begin[, end]])
The begin argument is a 0-based index identifying where to begin extraction, while the end argument is a 0-based index identifying where to end.
The slice method creates a copy of the array starting at begin up to but not including end.
It also accepts negative indices, which indicate counts back from the end of the array.
Basic Uses
Our first 4 uses the core functionality of slice.
Use 1: Simple copy
const arr2 = arr.slice();
Slice without any arguments performs a simple shallow copy. In modern it is more idiomatic to use the spread operator for this functionality, but if working in older codebases or without a build step that uses babel you may still want to use slice.
Use 2: Subarray starting at N
The simplest way to use the slice method is simply to grab all elements of an array starting at N.
An example use case might be you want to pop off the first element of an array and use it, returning the remaining array, but you want to do it without modifying the original array.
function useOne(arr) {
const usedItem = arr[0];
// do something with usedItem
return arr.slice(1);
}
Use 3: last N of an array
Another way that slice can be used is to grab the end of an array, taking advantage of the fact that negative indexes count back from the end.
This negative indexing makes it super simple to strip off however many elements you want. For example, if you want to grab just 3:
const last3 = arr.slice(-3)
Use 4: first n of an array
The pull off the front of an array, we need to start using the second argument to the method as well:Â end.
When both arguments are passed, the slice method returns a set starting at begin up to but not including end.
Since JavaScript arrays are zero-based (index starts at 0), this makes it super simple to pull off the first N elements:
const first4 = arr.slice(0, 4)
Use 5: segment of n, starting at m
Generalizing use 5, what if we want to use slice to pull off a segment of the array starting at any index?
To do this, we need to translate from (begin, length), to (begin, end). Luckily, the math is straightforward and we can define a simple function to do this:
function pullSegment(arr, begin, length) {
return arr.slice(begin, begin + length);
}
Working With Array-like Objects
The slice method can also be used on array-like objects. These are objects that behave mostly like arrays, but are not actually arrays. These are essentially any object that includes a length value and can be accessed via numerical indexes, but do not include Array methods.
Some examples include arguments (keyword for accessing all arguments passed to a function), NodeLists (returned from any DOM API method that returns a list of nodes), and even raw objects that use numerical indices and add a length attribute.
To use the slice method on an array-like object, you need to reference it directly from Array.prototype, like this:
Array.prototype.slice.call(arguments);
This leads to a couple valuable uses:
Use 6: Convert array-like objects into arrays
One common use for the Slice operator on array-like objects is to convert them into actual arrays. For example:
const args = Array.prototype.slice.call(arguments);
Why would you want to do this? To get access to array methods. For example, imagine a function that looks like this:
function addOne() {
return arguments.map(i => i+1);
}
Seems like it would work, but if you try to do this you get:
> addOne(1, 2, 3)
TypeError: arguments.map is not a function
at test (repl:2:18)
at repl:1:1
at ContextifyScript.Script.runInThisContext (vm.js:44:33)
at REPLServer.defaultEval (repl.js:239:29)
at bound (domain.js:301:14)
at REPLServer.runBound as eval
at REPLServer.onLine (repl.js:440:10)
at emitOne (events.js:120:20)
at REPLServer.emit (events.js:210:7)
at REPLServer.Interface._onLine (readline.js:279:10)
This is because arguments is not actually an array, but an array-like object. You can implement this function using slice as follows:
function addOne() {
return Array.prototype.slice.call(arguments).map(i => i+1);
}
and now you get what youâd expect:
> addOne(1, 2, 3)
[ 2, 3, 4 ]
No need in .slice: Array.prototype.map.call(arguments, i => i+1);
Vitaliy, Expert in JavaScript
Use 7: Coerce arbitrary length extra arguments into an array
Sometimes you want to allow for arbitrary numbers of arguments to a function.
Newer versions of JavaScript have introduced what is known as rest syntax to handle this, but if you are stuck supporting older browsers without a transpilation system, you can do this with slice:
function myFunc(a, b) {
const extraArgs = Array.prototype.slice.call(arguments, 2);
}
This allows calling myFunc with arbitrary numbers of args. e.g.:
myFunc(1, 2, 3, 4, 5, 6, 7, 8)
And inside youâll end up with a === 1, b === 2, and extraArgs === [3, 4, 5, 6, 7, 8]
Functional Array Manipulation
Another huge area of use for is to manipulate arrays in a functional/pure way, without modifying the original array.
+1 Use: Modifying a particular index in an array
A powerful and common use of slice in a functional context is to replace the value of a particular item in an array.
Imperatively this is simple, you just assign the new value, but in a functional world you canât modify the original array.
Instead, you can combine slice with the new JavaScript spread operator to return a new array that is identical but for the index you want to update:
function replaceIdx(arr, index, newVal) {
return [
âŠarr.slice( 0, index ),
newVal,
âŠarr.slice( index + 1)
],
}
To be fair, method .splice also can replace index or add elements:
Vitaliy, Expert in JavaScript
Adding new value at position [2]: arr.splice(2, 0, ânew valueâ)
Updating value [2]: arr.splice(2, 1,ânew valueâ)
Replacing [2] and [3] with new value: arr.splice(2, 2, ânew valueâ)
.splice may take more arguments, placing them at required position, with or without removing elements at this position. Really powerful method.
Mutation? Ok, copy before doing this stuff.
Partial Function Application
Another common pattern in functional programming is what is known as partial function application: pre-applying parameters to a function, and then returning a new function.
This pattern allows you to compose functions, creating greater reusability by letting you use the same core functions with different pre-applied parameters.
While more pure functional languages like Haskell support partial function application natively, in JavaScript we can implement a function to do it using slice:
var partial = function() {
const fn = arguments[0];
const args = Array.prototype.slice.call(arguments, 1);
// Return a function that calls fn
return function() {
var remainingArgs = Array.prototype.slice.call(arguments);
return fn.apply(this, args.concat(remainingArgs));
}
}
Wrapping Up
As you can see by this point, the Array slice method is an incredibly useful tool in your JavaScript , especially as you start moving towards more functional ways of programming.
Iâm confident there are many more great examples of using slice â if you have a good one, share it in the comments below! Iâll happily update the post.
Referrences
- http://www.javascripttutorial.net/javascript-array-slice/
- https://gbksoft.com/blog/javascript-array-slice-array-splice-methods/
- https://zendev.com/2018/08/29/uses-for-javascript-slice.html
Copy JS and enjoy!
How to use JavaScript in JSP
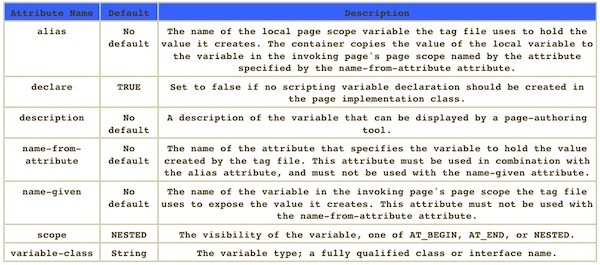
In this article, we will help all the Web Developers to get started with JavaScript and JavaServerPage.
Java Server page is often used at the development of server based applications. This server based application is no doubt very important in the modern webpage design and we also set standard security and validation process by JavaScript. So it is easy to say that JSP and JavaScript is interrelated with each other and thorough this way we can develop the page dynamically and process the pages. JavaScript is the Microsoft implementation of the ECMA 262 language specification. Java Script is a language that is full implementation with some enhancements that take advantage of capabilities of Microsoft Internet Explorer.
is an scripting language. This language us communicating with various dynamic scripting languages. is no doubt very popular to developers. We know that world is running with systems. This online based system directly interacts with sever and also checking different types of event processing which we use regularly. So at we have to know different event handling procedures of as well as the features of . As is popular language so let us check why it is more important? Now discussing
Features of JavaScript
Following are some important features of JavaScript:
- JavaScript is a Scripting Language.
- JavaScript is lightweight.
- JavaScript can be inserted into HTML pages and also call from the HTML pages.
- JavaScript inserted into HTML pages can be executed by all modern web browsers like IE, FF, and Opera etc.
- Java Script model can work easily with Java Server Page application model.
Java Server Page Alert is used to put the validation on login page for the users. The example in this Article provides to create the validation on the login form using JavaScript method in JSP (Java Server Page). The Article demonstrates an elaborative example to create alert box in a JSP page. Now we create a JSP file with name âvalidation.jspâ. The validation message surrounds the code for User Login page that include the âLoginNameâ and âPasswordâ. If we use to apply the validation we make use of JavaScript method in validation.jsp to validate the LoginName and password. Now here we set submit button in Java Server Page to call a JavaScriptâs function validlogin (). The function validlogin () is used to validate the username and password in JSP (Java Server Page). Now if the username and password field is not inserted by the user then this will display mistake message using âalert ()â. The function also ensures that the field username and password must not be blank otherwise it will display only the message âWelcome mrbool readers â.
Listing 1: Showing sample validation
<html>
<head>
<script>
function validLogin() // java script function is created
{
if(document.frm1.userName.value == "")
{
alert ( "Please enter mrbool Login Name." ); //java script message will be display
document.loginform.userName.focus();
return false;
}
if (document.frm1.pass.value == "")
{
alert ( "Please Enter your secret passwordâŠ.." );
document.userform.password.focus();
return false;
}
alert("Welcome mrbool readers" );
return true;
}
</script>
</head>
<body>
<form name="frm1" method="post" onsubmit="return validLogin();">
<table width="150px" border=0 style="background-color: H0080FF80;">
<tr><td colspan=2 align="center" style="font-weight:bold;font-size:20pt;" align="center"><b>B.C.E.I User Login Form.</b></td>
</tr>
<tr><td colspan=2> </td>
</tr>
<tr><td style="font-size:12pt;" align="center">Enter login Name:</td>
<td><input type="text" name="userName" value=""></td>
</tr>
<tr><td style="font-size:12pt;" align="center">Enter Password:</td>
<td><input type="password" name="password" value=""></td>
</tr>
<tr>
<td></td>
<td><input type="submit" name="Submit" value="Login as B.C.E.I Userâs"></td>
</tr>
</table>
</form>
</body>
</html>
We have deliberated the allocation about JSP. JSP is scripting language as we know but at this point it should be remembered that in programming we need more than JSP. Assume that we have an (Hypertext markup language) form (Html form that contains only tags in this page no JSP code is present) having username text field, and password field. As this is login id page so much more security should be present here. Before submitting the page to web server, it should be validate HTML (Hypertext markup language) field data. These types of validation can be done on client side instead of directly on server side. It should be done on client side, because it is very fast than validation process. If user data is not of specified range of standard validation program then it should be shown as an error at client browser of the user. This form will not jump to action page (server) until it is fully validated.
Listing 2: Sample showing form validation
<%@ page contentType="text/html; charset=iso-8859-1" language="java" %>
<html>
<head>
<script>
function validateForm()
{
if(document.frm.username.value=="")
{
alert("User Name should not be blank..");
document.frm.username.focus();
return false;
}
else if(document.frm.pwd.value=="")
{
alert("Password should not be blank");
document.frm.pwd.focus();
return false;
}
}
</script>
</head>
<body>
<form name="frm" method="get" action="validity.jsp" onSubmit="return validateForm()">
<table width="100%" border="0" cellspacing="0" cellpadding="0">
<tr>
<td width="22%"> </td>
<td width="78%"> </td>
</tr>
<tr>
<td>Enter UserName </td>
<td><input type="text" name="username" /></td>
</tr>
<tr>
<td>Enter Password</td>
<td><input type="text" name="pwd" /></td>
</tr>
<tr>
<td> </td>
<td><input type="submit" name="submit" value="Submit"></td>
</tr>
<tr>
<td> </td>
<td> </td>
</tr>
</table>
</form>
</body>
</html>
When we submit this form to web server, first it will check and validate the form. At the onSubmit=âreturn validateForm()â event check validateForm() function in javascript, and if any field is blank then it will throw an error alert on browser. This submit is successful only when validateForm() function returns true. Then goes to next form validateInput.jsp of JSP page.
This is an example implemented here to develop JSP code with JavaScript program model. The model program is a database related program. Here we create a database program and setup deletion operation and through this deletion operation user can delete the data. After deletion a message will be displayed using java script alert process. This way we can also print alert message for updating and insertion process.
Some point should be remembered that when we wish to print the document then this java script code helps us to develop this operation.
Listing 3: Sample showing database driven operation
<%@ page language="java" import="java.lang.*" import="java.sql.*" %>
<%
Connection con = null;
String url = "jdbc:mysql://127.0.0.1:3306/"; //my sql server IP
String db = "cei"; // this is the database name
String driver = "com.mysql.jdbc.Driver"; //this is the driver name
String userName ="subrata"; //this is mysql user name
String password="srimani"; // this is mysql password
String str=request.getParameter("r1");
String sname=request.getParameter("sname");
String roll=request.getParameter("roll");
int stuID=Integer.parseInt(code);
try {
Class.forName(driver);
con = DriverManager.getConnection(url+db,userName,password);
String sql = "delete from cei_student where roll= ?";
PreparedStatement stmt=null;
stmt=con.prepareStatement(sql);
stmt.setInt(1,stuId);
int del=stmt.executeUpdate();
if(del==0) { %>
<script language="javascript">
alert("Deletion successful"); //Java Script alert message
</script>
<%
}
if(del==1) { %>
<script language="javascript">
alert("Deletion successful");
</script>
<%
}
stmt.close();
con.close();
out.println("Data delete successfully from databaseâŠ..");
}
catch(Exception e) {
out.println(e);
}
%>
JavaScript exception solver â it is a JavaScript error online tool that can be used to detect and fix JavaScript errors on the client-side.
Conclusion
It is clear as that the Java Server Page is working on most of the systems that are running through various security level procedure and this security is totally written in the phase of JavaScript model. This JavaScript model is compatible with Server Page program. We can set email check, numeric check, alphabet check in the program segment process. So JS is The Best Way to implement based program on the JSP platform.
What is Void Document Oncontextmenu=null?
Have you ever encountered a situation where you want to copy an inspiring quote or inspect a particular element, but the right-click menu simply doesnât work? This is where void document oncontextmenu=null works.
The internet world is growing at an exceptionally exponential rate, and many websites have great content. We sometimes want to save content for future use, but as soon as you try to right-click to save the content, you will see an error message stating âSorry, this functionality has been disabled by the administrator.â
The error usually means that the site administrator or owner has disabled right-click option to protect their content from plagiarism and from users who try to steal their work. Re-writing the content is a tedious task, but what other options do we have? If you need to copy only certain parts of the content, then you can use a few workarounds to copy from right click disabled websites. One of the easiest ways that can be used is the void document oncontextmenu=null.
However, do not exploit these methods for unethical hacking purposes. Also, try to follow all the methods listed below, as what may work for one user might not work for another.
How to Enable Right Click on the Websites that have Disabled it
Webmasters often use JavaScript codes to disable right-click on their websites. You can disable the JavaScript altogether to access the right-click menu.
In Google Chrome
1. Click on the three vertical dots at the top right corner of your screen and choose the Settings option.
2. Find Privacy and Security and click on Site Settings.
3. Go to Content Settings and find JavaScript. Click on the toggle to disable it.
In Mozilla Firefox
Open a new tab, type âabout: configâ in the address bar, and press Enter. Search for JavaScript in the search preference bar and press Enter. Double click on the âjavascript.enabledâ option to turn its status to false from true.
The downside of the method is that most websites use JavaScript to function properly. Disabling it might stop some of the web page elements and, in some cases, the entire website, so you should use this function with caution. Once you disable the Javascript, reload the website and use the right-click function. Always enable the JavaScript back once you are finished with your work to make sure other websites function properly.
Is Node.js Good for E-commerce? Building Online Store in 2021
E-commerce platform is a complex system from a technical perspective. To make all the pieces work together, you need a reliable technology that will support it. Node.js is fast and scalable, but how to make sure itâs the right match for your platform?
The Beauty of Building Apps with Node.js
Node.js is a Javascript environment that lets you develop performant and scalable applications. Itâs a perfect match for applications such as real-time collaboration tools, chats, streaming apps or other applications that deal with multiple I/O operations. However, it doesnât cope well with CPU-heavy software as the long-running calculations block incoming requests, which can lead to a drop in performance.
Performance
Node.js supports multitasking by giving better outcomes with lower costs. Comparing it to â say â PHP, itâs way more convenient. As the buyerâs journey at an e-commerce store involves numerous operations, such as adding things to the basket, changing product features, choosing payments etc., itâs crucial from the performance viewpoint that the technology serve such tasks efficiently. And Node.js effectively handles different operations conducted at the same time, which makes it a good choice for e-commerce.
Scalability
Node.js enables quick scalability. In a short period, your e-commerce store can grow substantially. It is an important factor to consider when choosing the technology. Node has an inbuilt mechanism that helps to manage scalability and adjust it to your individual needs.
Big and Active Community
Many Plugins and Packages in npm
Node.js comes with a great deal of packages that can be easily implemented in your app. That way, developers donât need to write everything from scratch but can leverage reliable open-source solutions. It significantly increases the speed of development. There are great packages available for e-commerce too.
One Language on Back- and Front-end
Node.js is a JavaScript-based environment, and many popular front-end frameworks (such as React, Ember, Angular) use the very same language. Therefore, you can create applications which are isomorphic that is written in one language. It streamlines the development process, the communication between front- and back-end teams is way easier, and they can understand both sides of the codebase much better. Potentially, you might have a smaller and more efficient team that is easier to manage. Finally, with no technological diversity recruiting new people in case of scaling up wonât be a problem.
Tips and Things to Remember
After you weigh up all the options and decide to go for Node.js, there are a few things to consider about the development.
Choose the Right Solution
Depending on your needs, the number of features and the complexity of an application, you will have a bunch of options to develop your e-commerce store. There are a few ready solutions to create such an app including platforms such as Prime Fusion, Reaction Commerce and Trader.io. Naturally, you can also build an app from scratch if your project requires unique characteristics. Letâs go through all of the options.
- Prime Fusion
Prime Fusion is a product fully based on MEAN stack, a full-stack javascript framework that includes MongoDB, Express, AngularJS, Node.js as well as GraphQL, webpack, React, Gulp, Babel and Mocha. All the above mentioned databases and frameworks provide developers with a complete set of tools to build a stable e-commerce platform. Prime Fusion can be easily modified and doesnât require special knowledge about creating a store â everything comes with the framework. - Reaction Commerce
Reaction Commerce is an open-source, real-time platform based on Meteor Framework. It is a fast, flexible and scalable solution that plays nicely with npm, Docker and React. The codebase is modular, so you can tailor the solution to fit your needs. Everything can be extended, overwritten or installed as a package. It also provides extensive real-time analytics to help you make better business decisions. - Trader.io
Trader.io is also built around MEAN stack. It offers a flexible, scalable API and all basic functionalities you will need in your e-commerce store. The solution was built by a team of developers who had previously created a lot of e-commerce applications and then decided to take that existing code and make it open-source. - Own solution
The last option is to code your own solution that would be fully in line with all your needs. Building it from scratch will give you much bigger flexibility. However, it will take more time and money to create it and require more experience from developers.
Consider Technology Coherence
Node.js serves only as a backend for your e-commerce store, and you also need to think about what technologies you will use for other parts of the application. Itâs important that all the frameworks and solutions stay consistent. Thatâs why the best option is to use a ready package offered by e-commerce platforms mentioned in the previous section. That way, you will avoid many problems that may appear when developing the app.
Is It a Good Choice?
In many cases, Node.js can give you higher performance than other technologies. Itâs also proven that itâs a stable and fast solution for building e-commerce stores. It comes with a bunch of ready frameworks that make development easier and quicker. However, choosing stack is an individual case and depends on many factors.
How to Use PHP to Send Web Push Notifications for Your Web Site
Many sites need to keep their users up to date about new content even when they are not looking at the site.
Web push notifications can solve this problem by showing notification windows with short messages telling the user there is something new on the site that they authorized to be notified when new content is publishe.
Read this tutorial article to learn about how you can implement Web push notifications in your sites using PHP.
In this article you can read about the following:
- Overview
- A brief view on web push notifications
- How web push notifications works
- The subscription process
- Sending notifications
- The required key pair (VAPID)
- Implementation
- The subscription on the client side
- Check whether push notifications are available
- Obtain permission to deliver push notifications to the user
- Registration of the service-worker
- Implementation of the service-worker
- Receive and save subscriptions on the server
- Create and send notifications
- The header
- Encrypt the payload
- Send the notification via HTTP-request
- The subscription on the client side
- Appendix
- How long is a Subscription valid?
- Standardbrowser settings to display notifications
- Debugging and testing the service-workers
1. Overview
To implement web push notifications on your site page, appropriate functionality must be provided both on the user client side and on the server.
The user client must first subscribe to the notifications and then receive and display them. On the client side, JavaScript is used for this. The standard web push API is implemented in almost all popular desktop and mobile browsers.
Subscriptions must be saved and managed on the server side and the desired messages sent. In this tutorial, the server side is implemented with PHP, since this is the most used platform and therefore this could be the easiest way to integrate into an existing system.
Packets found on the Internet all have multiple dependencies on other packets (signing, encryption, asynchronous sending of HTTP requests) and therefore also a very high overhead of unused ballast. For this reason, I decided to create a package based on the available sources that has no further external dependencies.
The complete source code of the steps described below and the PHP package for sending push notifications can be found here (PNServer).
1.1. A brief view on web push notifications
Web push notifications allow messages to be sent directly to users, even if they are not currently visiting the senderâs site page.
Offers, news or other relevant information can be sent at any time and users can be redirected to a desired URL. From the userâs point of view, push notifications have the advantage that the entire subscription process is anonymous (the provider does not need names or contact details such as an email address or other information) and the service can be terminated at any time.
In order for a provider to be allowed to send push notifications to a user, the user must first explicitly take any action on the senderâs web site to confirm that he wants to receive these messages.
In addition, a unsubscribe option is automatically integrated in each delivered push message (how and where this unsubscribe option is offered depends on the users operating system and/or browser).
The push notifications are not displayed within the web site area of a browser, but either in a separate popup window or via a service provided by the operating system (this varies depending on the device, operating system and browser and some browsers allow marginally settings â see also in the appendix).
A notification usually consists of a title, a short text (optionally with an icon and/or a picture) and usually contains a direct link to the web site it relates to.
The notification system is an extremely powerful medium for interacting with users. However, the provider should always take care not to publish too much on this medium, otherwise users will deactivate all notifications.
1.2. How web push notifications works
An external push service is connected between the browser at client side and the message providerâs server. The push service is responsible for delivering messages from the server to the respective users.
When requesting information about the subscription from the web push API, the public part of a key must be passed. With the help of the private part of this key, the server in turn has to encrypt the messages before sending them.
1.2.1. The subscription process
Code for two tasks must be integrated on your site page. The first is to give the visitor the opportunity to subscribe to the web push notifications. In addition, the site page must install a service (âservice-workerâ), with which the client is registered on the server and received messages are processed. The service-worker is downloaded in the background to the client platform so that it can be executed outside of the context of the site page.
If the user subscribes to the service, the service-worker is registered (1). The service-worker in turn requests all required information through the web push API (2) and sends this via an HTTP request (3) to the server. The server stores this information in his database (4) so that notifications can be sent to the client.
1.2.2. Sending notifications
Notifications can now be sent from the server to all registered subscriptions with a HTTP request (2). In order to correctly identify yourself, a signature must be transmitted in the request header. This signature is generated from the public key used for registration together with the private part of the key (1). The actual message and possibly further information are transmitted as user data â also encrypted. If the formatting and encryption are correct and the signature validated, the push service sends the notification to the client (3).
1.2.3. The required key pair (VAPID)
A key pair containing a public and a private key is required for the whole process. These two keys are called VAPID keys (VAPID: Voluntary Application Server Identification for Web Push; RFC 8292 â https://tools.ietf.org/html/rfc8292) and have to be generated once for a web site.
There are various tools available for creating a VAPID key pair. Alternatively, online a key pair can be generated e.g. at https://tools.reactpwa.com/vapid. The private key should never be visible to the end user (e.g. in a JS script or somewhere else), but should only be used on the server for encryption when creating notifications. VAPID protection ensures that notifications can only be sent to clients from the authorized server.
Very detailed information about VAPID can be found in the following blog post:
https://blog.mozilla.org/services/2016/04/04/using-vapid-with-webpush/
2. Implementation
After the general consideration in the previous chapter, we now turn to the actual programming.
2.1. The subscription on the client side
Since the client side runs in the web browser, everything on the client is implemented in JavaScript. Note that the integration of the functions within the UI of the web site is not part of this tutorial!
Some functions in connection with the web push API are processed asynchronously, which is why the promise pattern is used several times in the following code. Numerous articles on this topic can be found on the internet â at https://web.dev/promises/ beginners can find a very good explanation.
2.1.1. Check whether push notifications are available
First of all, it must be checked whether all requirements are met in order to be able to receive push notifications on the current browser. To do this, the browser must support the web push API and the Web site must run in a secure context (HTTPS).
For more info about the API and the availability in the current browsers see https://www.w3.org/TR/push-api/ and https://caniuse.com/#feat=push-api.function pnAvailable() {
var bAvailable = false;
if (window.isSecureContext) {
// running in secure context â check for available Push-API
bAvailable = ((âserviceWorkerâ in navigator) &&
(âPushManagerâ in window) &&
(âNotificationâ in window));
} else {
console.log(âsite have to run in secure context!â);
}
return bAvailable;
}
2.1.2. Obtain permission to deliver push notifications to the user
Due to the misuse of push notifications in the past, consent to display notifications should only be requested after the user has deliberately acted on it (e.g. by clicking a button â not automatically when the page loads!).
The following function should therefore best be integrated on your own Web site using a link or button in a separate area with corresponding explanations for the push notifications. This should be seen as a rule and not just as âbest practiceâ.
As a provider, it should be borne in mind that many (⊠most) users are more likely to reject an early request without detailed explanations. And once the request has been rejected, it is difficult to get the user back on board later.
If the user has already rejected the display of notifications, he should no longer be bothered with further information regarding the subscription to the push notifications, since he must first deactivate the blocking of the notifications via the respective browser function! If necessary, this can be explained in more detail at a suitable point (e.g. under FAQâs).async function pnSubscribe() { if (pnAvailable()) { // if not granted or denied so far⊠if (window.Notification.permission === âdefaultâ) { await window.Notification.requestPermission(); } if (Notification.permission === âgrantedâ) { // register service worker await pnRegisterSW(); } } }
The browser remembers the userâs last selection. This can be determined at any time via the notification.permission property. If the user has not yet made a decision, this property is set to âdefaultâ, otherwise to âdeniedâ or âgrantedâ. With most browsers, the decision can be reset by the user in the title bar or in the page settings.
2.1.3. Registration of the service-worker
In order to receive and display push notifications, even if the user is not on that site page, a service must be registered running in the background outside the context of the website and is therefore always ready to respond to notifications.
The so called service-worker is a separate javascript file that the browser copies from the origin location on the web to the local computer and executed there.async function pnRegisterSW() { navigator.serviceWorker.register(âPNServiceWorker.jsâ) .then((swReg) => { // registration worked console.log(âRegistration succeeded. Scope is â + swReg.scope); }).catch((e) => { // registration failed console.log(âRegistration failed with â + e); }); }
It is not necessary to check whether the service-worker has already been registered. The browser (⊠the web push API) takes care of it. After registration, everything within the context of the website is done. All further steps are carried out within the service-worker.
All required functions and some helpers while testing included in PNClient.js.
2.1.4. Implementation of the service-worker
In the context of our site page, we have registered the service-worker so far and are now dedicated to his tasks. When registering, the specified javascript file was downloaded and executed. The registration succeeds only if the script could be executed without errors.
The only code in the service worker that is executed directly is to register listeners for several events:// add event listener to subscribe and send subscription to server self.addEventListener(âactivateâ, pnSubscribe); // and listen to incomming push notifications self.addEventListener(âpushâ, pnPopupNotification); // ⊠and listen to the click self.addEventListener(ânotificationclickâ, pnNotificationClick);
2.1.4.1. Subscribe to push notifications and send subscription to the server
In the listener of the âactivateâ event, the notification is subscribed using the web push API. The public VAPID key (see 1.2.3.) is required for this. In addition, the function requires the boolean value âuserVisibleOnlyâ as parameter, which must always be set to true.
Comment on this parameter
When designing the web push API, there was a consideration if this parameter can be used to control whether a message generally has to be displayed to the user or whether certain actions can only be carried out in the background.
However, there were concerns that this would create the possibility for developers to perform unwanted actions without the userâs knowledge. This parameter can therefore be regarded as a âsilent agreementâ that the user always get a message when a push notification arrives.async function pnSubscribe(event) { console.log(âServiceworker: activate eventâ); try { var appPublicKey = encodeToUint8Array(strAppPublicKey); var opt = { applicationServerKey: appPublicKey, userVisibleOnly: true }; self.registration.pushManager.subscribe(opt) .then((sub) => { // subscription succeeded â send to server pnSaveSubscription(sub) .then((response) => { console.log(response); }).catch ((e) => { // registration failed console.log(âSaveSubscription failed with: â + e); }); }, ).catch ((e) => { // registration failed console.log(âSubscription failed with: â + e); }); } catch (e) { console.log(âError subscribing notifications: â + e); } }
The public VAPID key must be transferred to the push manager as a UInt8 array. If successful, the push manager returns a subscription object. This object contains all information the server needs in addition to its own VAPID keys to be able to encrypt and send push notifications to this client. For this purpose, the information received must be sent to the server.
The data is sent to the server as JSON-formatted text in the body of a POST HTTP request. For transmission, we use the fetch() method of the javascript Fetch API. This method allows resources easily to be accessed or sent asynchronously over the network.async function pnSaveSubscription(sub) { // stringify object to post as body with HTTP-request var fetchdata = { method: âpostâ, headers: { âContent-Typeâ: âapplication/jsonâ }, body: JSON.stringify(sub), }; // weâre using fetch() to post the data to the server var response = await fetch(strSubscriberURL, fetchdata); return response.json(); }
The target âstrSubscriberURLâ is a service that has to be provided on your server. It accepts the transmitted data and stores it in a database. The implementation of this service is described in section 2.2.
If additional specific information is required in addition to the current subscription (e.g. login data of the user, a reference to a specific order or reservation, âŠ), this should also be transferred here, since this is the only direct link between client and server.
2.1.4.2. Displaying the received PUSH notifications
In contrast to the server side, on the client side the web push API (and the push services) takes over all tasks regarding verification and decryption, which enables us to concentrate on the display of the notification.
When a push notification arrives, a corresponding âpushâ event is triggered to the service worker. So the first thing to do is to set up a listener to this event. All relevant information is passed to the listener in the âeventâ parameter.
In addition to some internal properties, this object primarily contains the data sent by the server. The format in which the data is transmitted is the sole responsibility of the sender. At this point, pure text is assumed â this may also can be sent for test purposes from some tools or from some browsers developer tools. (See appendix).
After we have implemented the sending of the notifications in chapter 2.3. we will switch to an object encoded as a JSON string. Through this object we are able to control most of the properties of the notification to be displayed. First of all, itâs just about displaying a simple text message.function pnPushNotification(event) { console.log(âpush event: â + event); var strTitle = âNotificationâ; var strText = âempty Notification received!â; if (event.data) { strText = event.data.text(); } var promise = self.registration.showNotification(strTitle, opt); event.waitUntil(promise); }
To display the message the showNotification() function have to be used, which is passed the title and an option object. This option object can contain properties to control the content, format and behavior of the notification.
A more detailed description follows in Chapter 2.3 when notifications are sent from the server. The final call of waitUntil() ensures that the (asynchronously generated) notification was actually displayed before the function exits and the browser terminates the service-worker.
2.1.4.3. Respond to user actions
In order to be able to react to user actions, a listener for the ânotificationclickâ event must be set up. With the âeventâ parameter, this function receives all data for the notification in the âevent.notificationâ property. User-specific data can be passed within âevent.notification.dataâ. This data for example can contain an URL to be opened when the user clicks on the notification.function pnNotificationClick(event) { console.log(ânotificationclick event: â + event); if (event.notification.data && event.notification.data.url) { const promise = clients.openWindow(event.notification.data.url); event.waitUntil(promise); } }
The function clients.openWindow() is available for opening a URL in the browser. Here, too, the waitUntil() must be used to wait for the call to end correctly before the service-worker can be terminated.
Further possible actions inside of the ânotificationclickâ event are discussed in chapter 2.3 when messages are sent from the server.
2.2. Receive and save subscriptions on the server
To receive and save the subscriptions, a service is set up on the server that receives the data posted by the HTTP request from the client and stores it in a database. It must therefore first be checked whether it is a POST request. In addition, it must be checked whether the content of the request has actually been identified as JSON data.
If the request is correct, the data will be saved. For the sake of simplicity, we use a SQLite data provider here, since it creates its own data file and can be used without further configuration. By using the same data provider, the subscriptions will be accessed later to send the notifications.Â
To integrate the package into your own system, you can use the MySQL data provider or your own data provider that implements the PNDataProvider interface.
// only serve POST request containing valid json data if (strtolower($_SERVER[âREQUEST_METHODâ]) == âpostâ) { if (isset($_SERVER[âCONTENT_TYPEâ]) && trim(strtolower($_SERVER[âCONTENT_TYPEâ]) == âapplication/jsonâ)) { // get posted json data if (($strJSON = trim(file_get_contents(âphp://inputâ))) === false) { $result[âmsgâ] = âinvalid JSON data!â; } else { $oDP = new PNDataProviderSQLite(); if ($oDP->saveSubscription($strJSON) !== false) { $result[âmsgâ] = âsubscription saved on server!â; } else { $result[âmsgâ] = âerror saving subscription!â; } } } else { $result[âmsgâ] = âinvalid content type!â; } } else { $result[âmsgâ] = âno post request!â; } // let the service-worker know the result echo json_encode($result);
2.3. Create and send notifications
To send push notifications we have to follow the definitions of the web push protocol (see https://tools.ietf.org/html/draft-ietf-webpush-protocol-12). Basically, two steps are necessary when creating the push notification.
In order to identify yourself with the push service, a signature must be transferred using the VAPID key in the header of the request. The notification itself is transmitted in encrypted form and corresponding information is also passed in the header so that the browser can decrypt the received data. If the notification was decrypted correctly, the browser triggers the âpushâ event to the service-worker.
2.3.1. The VAPID header
In order to identify with the push service, the server has to sign some information in JSON format with its private VAPID key and pass it in the header. The push service verifies this and, if successful, forwards the notification to the user.
The signature is given in the form of a JSON Web Token (JWT). A signed JWT is nothing more than a string, which consists of three components separated by dots:
JWTInfo . JWTData . Signature
The first two strings are JSON formatted data, which have to be âURL safe base64â encoded, the third part contains the encrypted signature.
JWT Info
This contains information about the JWT itself and the encryption algorithm used.
JWT Data
Contains information about the sender, the recipient (not the final recipient, but the push service!) and how long the message is valid.
Signature
The signature is generated from the first two unsigned parts. To do this, they are encrypted with the ES256 algorithm (short for:Â ECDSA using the P-256 curve and the SHA-256 hash algorithm) using the VAPID key.
The push service now validate the JWT by decrypting the signature using the public VAPID key and comparing it with the first two parts.
The complete JWT (i.e. all three parts separated by a dot) is passed as authorization in the header. In addition, the public VAPID key âURL safe base64â coded must be transferred in the crypto-key value.
The required VAPID headers are generated with the PNVapid class. The VAPID keys are passed once in the constructor since they do not change. The end point (i.e. the recipient) is passed on again for each notification to be generated.
// info $aJwtInfo = array(âtypâ => âJWTâ, âalgâ => âES256â); $strJwtInfo = self::encodeBase64URL(json_encode($aJwtInfo)); // data // â origin from endpoint // â timeout 12h from now // â subject (e-mail or URL to invoker of VAPID-keys) $aJwtData = array( âaudâ => PNSubscription::getOrigin($strEndpoint), âexpâ => time() + 43200, âsubâ => $this->strSubject ); $strJwtData = self::encodeBase64URL(json_encode($aJwtData)); // signature // ECDSA encrypting âJwtInfo.JwtDataâ using the P-256 curve // and the SHA-256 hash algorithm $strData = $strJwtInfo . â.â . $strJwtData; $pem = self::getP256PEM($this->strPublicKey, $this->strPrivateKey); if (\openssl_sign($strData, $strSignature, $pem, âsha256â)) { if (($sig = self::signatureFromDER($strSignature)) !== false) { $strSignature = self::encodeBase64URL($sig); $aHeaders = array( âAuthorizationâ => âWebPush â . $strJwtInfo . â.â . $strJwtData . â.â . $strSignature, âCrypto-Keyâ => âp256ecdsa=â . self::encodeBase64URL($this->strPublicKey) ); } }
2.3.2. Encrypt the payload
Since the push notifications are sent by various push service providers, the actual user data is transmitted in encrypted form. The push service is unable to decrypt and read this data.
This is defined in the âMessage Encryption for Web Pushâ (see https://tools.ietf.org/html/draft-ietf-webpush-encryption-09).
The techniques that are used during encryption are beyond the scope of this tutorial and are therefore not explained in detail. You will find a good explanation in the web push book by Matt Gaunt (https://web-push-book.gauntface.com) in chapter 4.2.
All required functions are provided by the PNEncryption class. This class also provides the additional request headers that are required so that the notification can be decrypted. In the constructor, this class requires the public key and the authentication code that was generated by the browser when subscribing, and of course the user data to be encrypted.
2.3.3. The payload
At this point we are now going to take a closer look at the user data that we want to send with the notification. As mentioned in section 2.1.4, the possible options that can be passed to the showNotification() function in the service-worker are explained in more detail now.
Since the format and content of the payload can be freely defined (as long as the length of the user data does not exceed approx. 4000 characters), I have decided to include all information for displaying the notification on the server side together in an object. In addition to the title and the target URL to which we want to direct the user, this object also contains the complete options for the showNotification() function.
Everything together is then JSON-encoded and sent as payload. This gives us the greatest flexibility to determine the display and behavior of the notification from PHP without having to make changes to the service worker.
2.3.3.1. The options of showNotification()
In order to address the user with a clear notification, this should consist at least of a short, meaningful title, a symbol with recognition value (-> preferably a company or product logo) and a short, precise text.
The title is passed directly as a parameter, the other two values are part of the option object. A clear recommendation regarding the format of the symbol cannot be made. In any case, a square format should be chosen, since most browsers or platforms crop other formats accordingly.
A size of 64dp (px * device pixel ratio â this gives 192px for a value of 3) has proven itself. The text should not be longer than about 200 characters. Here, too, the browsers and platforms differ in behaviour when a longer text is provided. Some limit the text to a certain number of characters, others to a certain number of lines. It should also be keep in mind here that a text that is too long usually does not receive the necessary attention from the user.
With the âtagâ option, notifications can be grouped for the user. This ensures that only the most recently received notifications with the same indicator are displayed to the user so he will not be âfloodedâ with a sequence of several messages of the same type. If the ârenotifyâ option is also set, the user will be notified, and the notifications will still be grouped in the display list. If not set, no notification will be displayed.
The support of the following properties, which can be defined to format the notification or its behaviour, varies widely between the several browsers/platforms and should therefore be used with caution.
Image
URL to a larger image, which is usually displayed below the text. Again, it is difficult to give a rule about size or format.
Badge
URL to a (often monochrome) badge. The badge is used to better classify the sender of the message. So far, this is only supported by a few browsers â most of them display their own icon.
Additional actions
Some browsers allow certain actions to be displayed within the notification so the user can select one of it. The respective javascript code must be defined in the service worker in the ânotificationclickâ event. If this functionality is used, an alternative display and handling should always be provided if the browser or the target system does not support this function.
An action is defined by:
â action:Â Â Â internal ID used in ânotificationclickâ event.
â title:Â Â Â Â Â Â text to be displayed.
â icon:Â Â Â Â Â [optional] URL to an icon assigned to the action.
The count of actions that can be displayed within a notification vary as well. An interesting article on this topic can be found at https://developers.google.com/web/updates/2016/01/notification-actions.
Timestamp
This allows you to set the time when the message was generated. If this option is not set, the time at which the message arrived at the user is set.
Require Interaction
This property specifies that user interaction is required for the notification. The popup is usually displayed immediately and disappears after a certain time. If this option is activated, the popup remains until the user answers. This property should be used carefully (for very important or security issues only) as the user may find it annoying and may block the notifications permanently.
Silent
No sound is played or vibration is triggered.
Vibrate
A vibration pattern to run with the display of the notification. A vibration pattern must be an array with at least one member. The values are times in milliseconds where the even indices (0, 2, 4, etc.) indicate how long to vibrate and the odd indices indicate how long to pause. For example, [300, 100, 400] would vibrate 300ms, pause 100ms, then vibrate 400ms.
Sound
URL to a sound file. So far I have not found a browser that supports this.
2.3.3.2. Extend the âpushâ event listener in the service-worker
To generate the notification, the PNPayload class provides all methods to define the properties described and create the Object.
Since we initially assumed pure text as user data when creating the service-worker in section 2.1.4, the event listener must now be expanded for the data contained in the notification. All that needs to be done is to decode the received JSON-formatted data and pass it on when calling the showNotification() function.
function pnPushNotification(event) { console.log(âpush event: â + event); var strTitle = strDefTitle; var oPayload = null; var opt = { icon: strDefIcon }; if (event.data) { // PushMessageData Object containing the pushed payload try { // try to parse payload JSON-string oPayload = JSON.parse(event.data.text()); } catch (e) { // if no valid JSON Data take text as it is⊠// ⊠comes maybe while testing directly from DevTools opt = { icon: strDefIcon, body: event.data.text(), }; } if (oPayload) { if (oPayload.title != undefined && oPayload.title != â) { strTitle = oPayload.title; } opt = oPayload.opt; if (oPayload.opt.icon == undefined || oPayload.opt.icon == null || oPayload.icon == â) { // if no icon defined, use default opt.icon = strDefIcon; } } } var promise = self.registration.showNotification(strTitle, opt); event.waitUntil(promise); }
2.3.4. Send the notification via Http-request
The last step is to send the notification(s) to the respective push services via HTTP request. In order to be as independent as possible, this is done directly using cURL.
To have as little idle time as possible even with a large number of notifications to be sent, all pending messages are first generated completely, encrypted and then sent using a cURL Multirequest.
Since PHP does not support multithreading per se, this is the most elegant solution without complex external PHP extensions. After all notifications have been sent, the response codes of all requests are read in order to filter out any subscriptions that are no longer valid and, if so configured, to delete them from the database.
The complete process to send notifications
- create the VAPID header signature
- generate the notification payload
- encrypt the payload
- send via HTTP request
- If necessary, delete expired / no longer valid subscriptions
is implemented in PNServer by using the respective classes.
3. Appendix
3.1. How long is a Subscription valid?
In principle, the information provided by the browser for a subscription also contains a time stamp when it expires. Almost no browser assigns a valid value to this data field (a correct value only was set by MS Edge).
According to the specification for subscriptions that have an expiration date, the push service sends a âpushsubscriptionchangeâ event to the corresponding service-worker before the expiration. In this case, the service-worker should re-subscribe the notifications.
If a user quit an existing subscription (generally by blocking the notifications for the page in the browser), this is forwarded by the browser to the corresponding push service. If the server then tries to send a notification to this endpoint it is not forwarded to the browser but the push service send a response code of 410 back to the server instead.
For those cases, the Notification Server has the option of removing subscriptions that are no longer valid from its database in order to avoid unnecessary data traffic.
However, if a browser is no longer in use, uninstalled or the system is no longer used for another reason (reinstallation, outdated, defective), the existing subscriptions that do not have an expiry date are retainedin the database.
The W3C and standard browser providers are considering getting this problem under control. Unfortunately, the notification server itself doesnât have a reliable way to detect inactive subscriptions.
3.2. Standardbrowser settings to display notifications
Most (desktop) standard browsers offer the option of setting whether a service provided by the operating system or an own implementation should be used to display the notifications.
3.2.1. Firefox
Type âabout:configâ in the navigation field for the Internet URL and search for âalertsâ. The value âalerts.useSystemBackendâ controls the behaviour. If set to true, notifications are displayed by the operating system, otherwise the browsers internal implementation is used to display the notifications.
3.2.2. Google Chrome
Enter âchrome://flagsâ in the navigation field for the Internet URL and then search for ânotificationsâ. The setting âEnable native notificationsâ controls the output.
3.2.3. Microsoft Edge
Since the Edge Browser is very much integrated into the Windows operating system, it basically uses the Control Center to display the notifications.
3.3. Debugging and testing the service-workers
There are various options for debugging and testing the service-worker in the developer tools of the standard browsers.
3.3.1. Firefox
Type âabout:debugging#/runtime/this-firefoxâ in the navigation field for the Internet URL. All registered service-workers are displayed below the list of the extensions.
The service-worker can be started or logged off here. Once the service worker is started, an (emptyâŠ) test message can be pushed, or the console and debugger of the service-worker can be opened.
3.3.2. Google Chrome
Open the developer tools when the page from which the notifications are subscribed is open. The registered service-worker is displayed under the menu item âApplicationâ. Here you can start, stop, update or unregister the service-worker. A test message can also be sent and you can switch to the source code / debugger.
3.3.3. Microsoft Edge
Similar to Chrome, MS Edge has a item in the main menu of the developer tools named âServiceworkerâ.
4. Conclusion
Web push notifications are a great means to keep users coming to a site that publishes content that they like.
Implementing Web push notifications using PHP and JavaScript it is not hard. It requires some work but the package PHP Web Push Notifications Server was created to simplify this jobs.
You can download or install this package using PHP Composer tool by going to this download page to get the package code.
Good Luck!
Migrate to typescript â the advance guide
About a year ago I wrote a guide on how to migrate to typescript from javascript on node.js and it got more than 7k views. I did not have much knowledge on javascript nor typescript at the time and might have been focusing too much on certain tools instead of the big picture. And the biggest problem is that I didnât provide a solution to migrating large projects where you obviously not going to rewrite everything in a short time, thus I feel the urge to share the greatest and latest of what I learned on how to migrate to typescript.
The entire process of migrating your mighty thousand-file mono-repo project to typescript is easier than you think. Hereâs 3 main steps on how to do it.
NOTE: This article assumes you know the basics of typescript and use Visual Studio Code
, if not, some details might not apply.
Relevant code for this guide:Â https://github.com/llldar/migrate-to-typescript-the-advance-guide
Typing Begins
After 10 hours of debugging using console.log
, you finally fixed that Cannot read property 'x' of undefined
 error and turns out itâs due to calling some method that might be undefined
: what a surprise! You swear to yourself that you are going to migrate the entire project to typescript. But when looking at the lib
, util
 and components
 folder and those tens of thousands of javascript files in them, you say to yourself: âMaybe later, maybe when I have timeâ. Of course that day never come since you always have âcool new featuresâ to add to the app and customers are not going to pay more for typescript anyway.
Now what if I told you that you can migrate to typescript incrementally and start benefiting from it immediately?
Add the magic d.ts
d.ts
 files are type declaration files from typescript, all they do is declaring various types of objects and functions used in your code and does not contain any actual logic.
Now considering you are writing a messaging app:
Assuming you have a constant named user
 and some arrays of it inside user.js
const user = {
id: 1234,
firstname: 'Bruce',
lastname: 'Wayne',
status: 'online',
};
const users = [user];
const onlineUsers = users.filter((u) => u.status === 'online');
console.log(
onlineUsers.map((ou) => `${ou.firstname} ${ou.lastname} is ${ou.status}`)
);
Corresponding user.d.ts
 would be
export interface User {
id: number;
firstname: string;
lastname: string;
status: 'online' | 'offline';
}
Then you have this function named sendMessage
 inside message.js
function sendMessage(from, to, message)
The corresponding interface in message.d.ts
 should look like:
type sendMessage = (from: string, to: string, message: string) => boolean
However, our sendMessage
 might not be that simple, maybe we could have used some more complex types as parameter, or it could be an async function
For complex types you can use import
 to help things out, keep types clean and avoid duplicates.
import { User } from './models/user';
type Message = {
content: string;
createAt: Date;
likes: number;
}
interface MessageResult {
ok: boolean;
statusCode: number;
json: () => Promise<any>;
text: () => Promise<string>;
}
type sendMessage = (from: User, to: User, message: Message) => Promise<MessageResult>
NOTE: I used both type
 and interface
 here to show you how to use them, you should stick to one of them in your project.
Connecting the types
Now that you have the types, how does them work with your js
 files?
There are generally 2 approaches:
Jsdoc typedef import
assuming user.d.ts
 are in the same folder, you add the following comments in your user.js
:
/**
* @typedef {import('./user').User} User
*/
/**
* @type {User}
*/
const user = {
id: 1234,
firstname: 'Bruce',
lastname: 'Wayne',
status: 'online',
};
/**
* @type {User[]}
*/
const users = [];
// onlineUser would automatically infer its type to be User[]
const onlineUsers = users.filter((u) => u.status === 'online');
console.log(
onlineUsers.map((ou) => `${ou.firstname} ${ou.lastname} is ${ou.status}`)
);
To use this approach correctly, you need to keep the import
 and export
 inside your d.ts
 files. Otherwise you would end up getting any
 type, which is definitely not what you want.
Triple slash directive
Triple slash directive is the âgood olâwayâ of import
 in typescript when you are not able to use import
 in certain situations.
NOTE: you might need to add the following to your eslint config file
 when deal with triple slash directive
 to avoid eslint errors.
{
"rules": {
"spaced-comment": [
"error",
"always",
{
"line": {
"markers": ["/"]
}
}
]
}
}
For message function, add the following to your message.js
 file, assuming message.js
 and message.d.ts
 are in the same folder
/// <reference path="./models/user.d.ts" /> (add this only if you use user type)
/// <reference path="./message.d.ts" />
and them add jsDoc
 comment above sendMessage
 function
/**
* @type {sendMessage}
*/
function sendMessage(from, to, message)
You would then find out that sendMessage
 is now correctly typed and you can get auto completion from your IDE when using from
 , to
 and message
 as well as the function return type.
Alternative, you can write them as follows
/**
* @param {User} from
* @param {User} to
* @param {Message} message
* @returns {MessageResult}
*/
function sendMessage(from, to, message)
Itâs a more of a convention to writing jsDoc
 function signatures. But definitely more verbose.
When using triple slash directive
 , you should remove import
 and export
 from your d.ts
 files, otherwise triple slash directive
 will not work , if you must import something from another file use it like:
type sendMessage = (
from: import("./models/user").User,
to: import("./models/user").User,
message: Message
) => Promise<MessageResult>;
The reason behind all these is that typescript treat d.ts
 files as ambient module declarations if they donât have any imports or exports. If they do have import
 or export
, they will be treated as a normal module file, not the global one, so using them in triple slash directive
 or augmenting module definitions
 will not work.
NOTE: In your actual project, stick to one of import and export
 or triple slash directive
 , do not use them both.
Automatically generate d.ts
If you already had a lot of jsDoc
 comments in your javascript code, well you are in luck, with a simple line of
npx typescript src/**/*.js --declaration --allowJs --emitDeclarationOnly --outDir types
Assuming all your js files are inside src
 folder, your output d.ts
 files would be in types
 folder
Babel configuration(optional)
If you have babel setup in your project, you might need to add this to your babelrc
{
"exclude": ["**/*.d.ts"]
}
To avoid compiling the *.d.ts
 files into *.d.js
 , which doesnât make any sense.
Now you should be able to benefit from typescript (autocompletion) with zero configuration and zero logic change in your js code.
The type check
After at least more than 70% of your code base is covered by the aforementioned steps, you now might begin considering switch on the type check, which helps your further eliminate minor errors and bugs inside your code base. Donât worry, you are still going to use javascript for a while, which means no changes in build process nor in library.
The main thing you need to do is add jsconfig.json
 to your project.
Basically itâs a file that define the scope of your project and defines the lib and the tools you are going to work with.
Example jsonconfig.json
 file:
{
"compilerOptions": {
"module": "commonjs",
"target": "es5",
"checkJs": true,
"lib": ["es2015", "dom"]
},
"baseUrl": ".",
"include": ["src/**/*"],
"exclude": ["node_modules"]
}
The main point here is that we need checkJs
 to be true, this way we enable type check for all our js
 files.
Once itâs enabled, expect a large amount of errors, be sure fix them one by one.
Incremental typecheck
// @ts-nocheck
In a file, if you have some js
 file you would rather fix later , you can // @ts-nocheck
 at the head of the page and typescript complier would just ignore this file.
// @ts-ignore
What if you just want you ignore 1 line instead of the entire file? Use // @ts-ignore
. It will just ignore the line below it.
These two tags combined should allow you fix type check errors in your codebase in a steady manner.
External libraries
Well maintained library
If you are using a popular library, chances are there are already typing for it at DefinitelyTyped
 , in this case, just run:
yarn add @types/your_lib_name --dev
or
npm i @types/your_lib_name --save-dev
NOTE: if you are installing a type declaration for an organisational library whose name contains @
 and /
 like @babel/core
 you should change its name to add __
 in the middle and remove the @
 and /
, resulting in something like babel__core
.
Pure Js Library
What if you used a js
 library that the author archived 10 years ago and did not provide any typescript typing? Itâs very likely to happen since the majority of the npm models still use javascript. Adding @ts-ignroe
 doesnât seem like a good idea since you want your type safety as much as possible.
Now you need to augmenting module definitions
 by creating a d.ts
 file, preferably in types
 folder, and add your own type definitions to it. Then you can enjoy the safe type check for your code.
declare module 'some-js-lib' {
export const sendMessage: (
from: number,
to: number,
message: string
) => Promise<MessageResult>;
}
After all these you should a have pretty good way to type check your codebase and avoid minor bugs.
The type check rises
Now after you fixed more than 95% of the type check errors and is sure that every library have corresponding type definitions. You may process to the final move: Officially changing your code base to typescript.
NOTE: I will not cover the details here since they were already covered in my earlier post
Change all files into .ts
 files
Now itâs time to merge the d.ts
 files with you js files. With almost all type check errors fixed and type cover for all your modules. What you do is essentially changing require
 syntax to import
 and putting everything into one ts
 file. The process should be rather easy with all the work youâve done prior.
Change jsconfig to tsconfig
Now you need a tsconfig.json
 instead of jsconfig.json
Example tsconfig.json
Frontend projects
{
"compilerOptions": {
"target": "es2015",
"allowJs": false,
"esModuleInterop": true,
"allowSyntheticDefaultImports": true,
"noImplicitThis": true,
"strict": true,
"forceConsistentCasingInFileNames": true,
"module": "esnext",
"moduleResolution": "node",
"resolveJsonModule": true,
"isolatedModules": true,
"noEmit": true,
"jsx": "preserve",
"lib": ["es2020", "dom"],
"skipLibCheck": true,
"typeRoots": ["node_modules/@types", "src/types"],
"baseUrl": ".",
},
"include": ["src"],
"exclude": ["node_modules"]
}
Backend projects
{
"compilerOptions": {
"sourceMap": false,
"esModuleInterop": true,
"allowJs": false,
"noImplicitAny": true,
"skipLibCheck": true,
"allowSyntheticDefaultImports": true,
"preserveConstEnums": true,
"strictNullChecks": true,
"resolveJsonModule": true,
"moduleResolution": "node",
"lib": ["es2018"],
"module": "commonjs",
"target": "es2018",
"baseUrl": ".",
"paths": {
"*": ["node_modules/*", "src/types/*"]
},
"typeRoots": ["node_modules/@types", "src/types"],
"outDir": "./built",
},
"include": ["src/**/*"],
"exclude": ["node_modules"]
}
Fix any addition type check errors after this change since the type check got even stricter.
Change CI/CD pipeline and build process
Your code now requires a build process to generate to runnable code, usually adding this to your package.json
 is enough:
{
"scripts":{
"build": "tsc"
}
}
However, for frontend projects you often would need babel and you would setup your project like this:
{
"scripts": {
"build": "rimraf dist && tsc --emitDeclarationOnly && babel src --out-dir dist --extensions .ts,.tsx && copyfiles package.json LICENSE.md README.md ./dist"
}
}
Now make sure your change your entry point in your file like this:
{
"main": "dist/index.js",
"module": "dist/index.js",
"types": "dist/index.d.ts",
}
Then you are all set.
NOTE: change dist
 to the folder you actually use.
The End
Congratulations, your codebase is now written in typescript and strictly type checked. Now you can enjoy all typescriptâs benefits like autocomplete, static typing, esnext grammar, great scalability. DX is going sky high while the maintenance cost is minimum. Working on the project is no longer a painful process and you never had that Cannot read property 'x' of undefined
 error ever again.
Alternative method:
If you want to migrate to typescript with a more âall inâ approach, hereâs a cool guide for that by airbnb team
Ionic vs. PhoneGap
Anyone, who has ever been engaged in creating apps for different gadgets and platforms, knows how hard such task is. Until recently, there was no universal approach to the development of mobile applications. But after HTML5 platform evolved, coders got a much wider range of opportunities.
Speaking of tools, which oneâs better? Letâs take a look at two major tools â Ionic and PhoneGap â andcomparetheir pros and cons todecide what framework will suit your needs best.
Ionic and PhoneGap: which oneâs better
Weâll create Ionic vs. PhoneGap comparison list based on popularity, main advantages and disadvantages, and ease of use.
Definition
Ionic is an open-source SDK for cross-platform app development that runs on top of Angular JS. Working with Ionic, developers get access to HTML5,CSS, and SaaS for creating hybrid applications.
PhoneGap (also known as Apache Cordova) offers great support of JavaScript, HTML5, as well as CSS3. Together with Foreign Function Interfaces, PhoneGap becomes a versatile tool for developing cross-platform apps.
Popularity
If you compare PhoneGap and Ionic, the popularity of the first platform is growing a bit faster. For instance, in 2012, it only accounted for about 30% primary use.Now itâs 61%. The main factors that determine the platformâs popularity arefast development,cross-platform support, and liberal prices.
Ionic owes its popularity mostly to its simplicity. Being a free, open source platform, it has also gained appreciation from both entrepreneurs and coders due to its functionality. The platformâs community is growing steadily, and according to the results of the Ionic Developer Survey, around 80% of developers working with the framework consider themselves experienced Ionic users.
Reasons to use
PhoneGap versus Ionic: why you should try them both.
Ionic:
â Is totally free and open source. To begin working with Ionic, all you need is a PC and internet connection.
â Is Angular-based. You can say that Ionic extends Angularâsfunctionality, making the process of developing apps easy and comfortable.
â Has a great and customizabledefault UI. This platformpacksa lot of default JavaScript and CSS components a developer might need to build an app.
â Offers other convenient services and tools. Ionic has dozens ofdifferent services and tools that ensure pleasant and user-friendly experience.
PhoneGap
â Is open source. Thatâs the main difference between PhoneGap and Ionic. This framework offers much of its functionality for free. Besides, thanks to Open Source License, PhoneGapâs community provides programmers with new modules and codes for free.
â Is easy to master. The framework doesnât require knowledge of newlanguages to work with, as it uses standard HTML, CSS, and JS.
â Is suitable for multiple devices. The platform utilizes the standard technologies compatible with a wide range of devices. This makes the development process faster.
Pros
Ionic
â a completely free platform;
â Single source for all supported platforms;
â Most of the development is based on CSS,HTML, and JS most developers are familiar with;
â Access to the number of useful plugins;
â Variety of UI patterns, including header,tabs, lists,cards, and bars;
â Use of CSS provides an interesting experience.
PhoneGap
â JavaScript, HTML5, and CSS3 make the framework much easier to master;
â PhoneGap-based apps can be installed just like native apps;
â A plug-in architecture thatallows for extending native device APIâs in modular ways;
â Most of its functionality is free;
â A variety of libraries that help enhance the platformâs functionality.
Cons
PhoneGap vs. Ionic framework: main advantages.
Ionic
â As Angular.JS isnât easy to master, the platform doesnât for beginners;
â Unstable user experience, asthe platform is relatively new. Standards are still changing, with libraries being totally rewritten from time to time;
â Security issues. When developing financial apps, Ionic isnât the best choice.
â Doesnât suit for creating high-end apps and graphic games.
PhoneGap
â The abundance of graphic elements causes performance issues;
â Not enough info or user guidelines for enhancing the performance and quality;
â No steady support of native APIs;
â With no proper control over hardware, render updates make PhoneGap-based apps slower;
â No cache/memory management that may lead to memory leakage.
Ease of use
Standard tools with a single code base allow for rapid app development using Ionic, although TypeScript components make tasks a bit slower compared to using native API. Besides, when it comes to creating high-end apps and graphic games, Ionic isnât easy to use. But the frameworkâs structure allows for overcoming performance issues.
PhoneGapoffersgreat coding UIwhich makes navigation easier and allows for soothing graphics effects and seamless scrolling. Also, the frameworkâs apps are fairly easy to install.
Performance
As for PhoneGap vs. Ionic performance, both frameworks work with hybrid apps and are powered by Cordova, so there are no major differences between them.
When to use
Ionic
This platform suits best for individual developers, who prefer working with free, open source products but are experienced enough and know the way around Angular.JS.
PhoneGap
PhoneGap better suits for businesses that can take advantage of paid license or for developers, who arenât familiar with HTML5, CSS3, and JavaScript.
Ionic vs. PhoneGap: what to choose?
So, PhoneGap vs. Ionic: which is better? Letâs consider major differences and perks both platforms offer to developers.
PhoneGap | Ionic |
â Easy to work with but requires a license to use all the features; â Plug-in architecture allows for extending native device APIâs in modular ways, but the development process takes more time;- Availability of libraries but no control over hardware. | â Is completely free but hard to master; â Doesnât suit for creating financial apps but allows for faster development; â Customizable UI but unstable user experience. |
Both platforms donât suit for native apps and graphic games development. However, they show almost equal performance when creating cross-platform apps.
Sum up
The choice of the proper framework for cross-platform app development completely depends on the developer. Just pick the one that suits you best. Both Ionic and PhoneGap have their own advantages and disadvantages, as well as a unique set of features. PhoneGap is perfect for creatinglight apps that donât rely on the deviceâs native features.Ionic allows for the rapid and application development at zero costs. The major difference between Ionic and PhoneGap is pricing.