Tech
External Hard Drive Read-Only on Mac
Inserting a Mac-compatible external hard drive into your Mac machine, you can easily read and write to it as long as this drive is successfully mounted. But in some circumstances, you can only open this external hard drive to access the stored data with no write permission on it, stopping you from editing, deleting, copying, and moving the data on the drive, to name a few.
Usually, an incompatible file system, faulty settings, or unexpected errors can cause your external hard drive attached to the Mac to be read-only. If you are looking for a feasible solution to deal with such a problem, congratulations, you’ve come to the right place. In this post, we will develop solutions for different situations to help you fix the external hard drive read-only on Mac issue.
Why Is Your Inserted External Hard Drive Read-Only on Mac?
The external hard drive rendered read-only on Mac can be caused by one of the following reasons:
1. The external hard drive is an NTFS formatted drive that is incompatible with your Mac computer.
2. The second reason will be the settings. The permission settings sometimes become a hindrance on your Mac or any external hard drive to perform any other activity. In other words, the external hard drive you are using is given read-only disk permission, which makes the drive readable but not writable.
3. The external hard drive contains unknown errors and becomes corrupted.
Determine the Problem
The determination of a problem is mandatory to find the best solution to it. To check the main reason for the read-only problem, try to check file system info in the Finder.
Step 1 Click the Finder icon from Mac Dock and select the disk from the Finder window.
Step 2 Right-click on the selected disk and choose the “Get info” option.
Step 3 Check File system in the pop-up window. If it shows Windows NT File System (NTFS), then that is the problem you need to fix.

But if the file system is of any other type like FAT32, APFS, or any other, then you need to check the permission settings. To check the permission settings, you need to look into the “Get info” pop-up window. Under the Sharing&Permissions option, check the accessibility that you have. If it shows “Read-only” beside the target name, then there is a problem that needs to be fixed.

If your disk is not NTFS formatted and has been set as Read & Write, you need to consider if disk corruption leads to a non-writable external hard drive. In this instance, you are advised to perform disk repair with the help of Disk Utility.
Three Quick Ways to Make Your External Hard Drive Readable and Writable on Mac
Fix 1 Use iBoysoft NTFS for Mac to Enable Full Read and Write Access to the NTFS External Hard Drive on Mac
If you are regularly using the NTFS external hard drive to transfer files to your Mac or vice versa, then the only option you are left with is to format the drive to exFAT or FAT32. But for sure this is not a favorable option to do because all your stored data on the drive will be wiped out during disk erasure. To avoid data loss, the best choice is to use a secure and professional NTFS for Mac tool like iBoysoft NTFS for Mac.
Microsoft NTFS for Mac by iBoysoft is a good solution to help you fix the external hard drive read-only on Mac problem without erasing your important data. With this utility installed on your Mac, you can easily read and write to your NTFS disk, including opening, deleting, editing, renaming, copying, or moving the files from this drive. Acting as a disk management tool, this NTFS for Mac application also permits you to manage NTFS disks and non-NTFS disks with a few clicks. If you’d like to erase an NTFS drive for disk cleanup, check and repair an NTFS drive, and format a non-NTFS drive to NTFS, you can get assistance from this software.

Procedures to fix the read-only issue on Mac by using iBoysoft NTFS for Mac
· Visit the official website to get the free downloading link of iBoysoft NTFS for Mac and install it on your Mac computer.
· Connect your NTFS external hard drive to your Mac machine.
· Launch this software to read and write to your read-only NTFS drive on Mac.
Apart from iBoysoft NTFS for Mac, there are also free NTFS for Mac dedicated to offering read-write support for your NTFS drives on Mac, including Mounty for Mac, SL-NTFS, NTFS-3G macOS, FUSE for macOS, and more. If you don’t need more functions and just want to save money, you can take one of them into consideration.
Fix 2: Change the Permission Settings If the External Hard Drive Has a Read-Only Disk Permission
Mac users can set file permissions to grant others read and write permission on a file, a program, and a disk. Hence, you will fail to write the external hard drive on Mac if the disk privilege is read-only. If this is the main cause resulting in a read-only drive, follow the instructions to solve this problem.
Step 1 Open Finder from Mac Dock to locate the read-only external hard drive inserted into your Mac.
Step 2 Right-click on the drive and select the “Get Info” option.
Step 3 Scroll down to the Sharing & Permissions option available at the bottom of the Get Info pop-up and click on the arrow beside it to extend this column to see the permissions.

Step 4 Move to the Lock icon and then click it to type your admin username and the right password.
Step 5 Select the privilege menu and change Read only to the Read & Write option.

Step 6 Click the Lock icon and close the Get info pop-up window.
But if you are not the admin user then you have to padlock for opening the permission settings. Finally, restart the computer or any Mac device.
Fix 3 Run First Aid in Disk Utility to Repair the External Hard Drive If It Contains Unknown Errors
In case your external hard drive is not working for some unknown errors, you have to try with the First Aid program in Disk Utility to repair the drive. The following mentioned steps are for using the Disk Utility option.
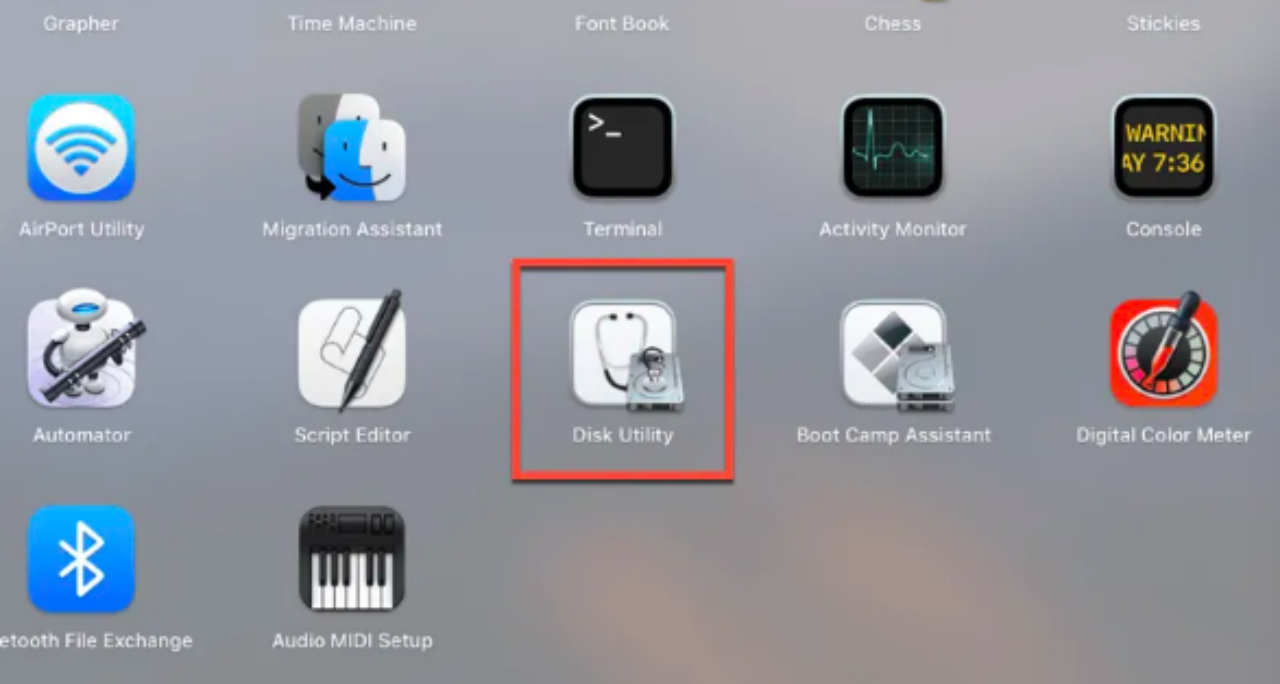
Step 1 Go to Launchpad > Other > Disk Utility to find and select the inserted drive that goes corrupt from the sidebar.
Step 2 Click on the First Aid menu from the top toolbar.

Step 3 Click the Run option to confirm the repairing of the disk when a dialogue box pops up and finally hit Done when First Aid finishes repairing the drive.

Step 4 Verify if the read-only drive is writable now.
That’s all for solutions to fix the read-only external hard drive on Mac. Hope the above-given information is helpful.


The Average Size of Home Office: A Perfect Workspace
Top 10 Best Fake ID Websites [OnlyFake?]

How Much Does a Hosting Server Cost Per User for an App?
How Gaming Technologies are Transforming the Entertainment Industry

Things to consider before starting a Retail Software Development

What is my Instagram URL? How to Find & Copy Address [Guide on Desktop or Mobile]

Applob.com Download APK – Tweak your device Safe

About Apple Employee and Friends&Family Discount in 2024
How to Translate more 5,000 characters limit by Google

How to Unlist your Phone Number from GetContact
-
 Cyber Risk Management2 days ago
How Much Does a Hosting Server Cost Per User for an App?
-

 Outsourcing Development2 days ago
All you need to know about Offshore Staff Augmentation
-
 Software Development2 days ago
Things to consider before starting a Retail Software Development
-
 Grow Your Business1 day ago
The Average Size of Home Office: A Perfect Workspace
-
Solution Review1 day ago
Top 10 Best Fake ID Websites [OnlyFake?]
-
Business Imprint2 days ago
How Gaming Technologies are Transforming the Entertainment Industry