Web Development
Easy Web Augmented Reality with AR Quick Look
In this tutorial, I’ll teach you how to build an Augmented Reality quick look for your web based app.
Augmented reality is awesome and has an unrivaled potential to enrich customer experience in many verticals. However, it has a friction point in most cases: you need to persuade a potential customer to install an app first. AR Quick Look solves this problem for iOS. This is a native feature of ARKit which launches a model viewer right from the browser — that’s why we call it native Web AR. It utilises .reality or .USDZ files, the latter is a file format developed by Pixar, and allows showing objects in incredible detail, adding animations and sounds, locking their scale to 1:1 so models show the real size of an object.
Online shopping is one of the best industries that can take advantage of AR, as it can give users the possibility to see the products in 3D and in their own environments. From previewing furniture in your home with apps like IKEA Place, to experiencing newly launched cars like this Lamborghini Huracán, this technology can improve our experience as buyers. But of course, the applications of web AR extend beyond retail as well.
AR Quick Look
Built-in apps, such as Safari, Messages, Mail, News, and Notes, use Quick Look to display USDZ files of virtual objects in 3D or AR on iPhone and iPad. You can embed Quick Look views in your apps and websites to let users see incredibly detailed object renderings in a real-world surrounding with support for audio playback.
There are many advantages of using AR Quick Look: it gives you interactions like placing, moving and scaling the object, people occlusion and sharing of the model available “out of the box”. It supports vertical and horizontal planes for placing your content and even viewing face accessories. You can view a gallery of Apple’s AR Quick Look examples here, all you need to do is open the models on an iPhone or iPad to view them in AR.
For web based AR Quick Look experiences we can use USDZ, the distribution format for USD (Universal Scene Description),which is a 3D file format developed by Pixar that focuses on speed, scalability and collaboration.
In this tutorial, we will build a simple webpage that shows a sneaker in AR. Let’s start with basic things first and see how we can launch a ready-made 3D model in AR.
Preparing the 3D model
I will be using a model from Sketchfab.com but feel free to use whatever model you wish in USDZ file format. Sketchfab offers the option to download the model directly in this file format.
Adidas Originals Stan Smith by VRModelFactory
For more examples, have a look at the Quick Look Gallery.
Converting your 3D models to USDZ Files/Changing the base unit of the model
In case you already have your models in other 3D formats, you can check out this article on how you can easily convert them to USDZ using Apple’s Reality Converter. In this article you can also see in the Properties section how to edit the base unit for example from meters to centimetres. I had to do this as well for the sneaker model so that it has a real life size when viewing it in AR.
Getting started
In order to test what we are building right away on real devices, for simplicity, we will be using codepen.io:
- Sign up or login on Codepen
- Create a new pen and name it as you wish
- Click save, this will create a link that you can open on your device for testing. Here is how my link looks like: https://codepen.io/roxanajula/pen/poydGKx, you should have something similar.
Showing the model in AR
For basic AR Quick Look functionality, all we need to do is add the following code in the HTML file:
<div>
    <a rel="ar" href="https://roxanajula.com/wp-content/uploads/2020/09/Adidas_Originals_Stan_Smith.usdz">
        <img src="https://roxanajula.com/wp-content/uploads/2020/09/Adidas_Originals_Stan_Smith.jpg">
    </a>
</div>
The code above is pretty straightforward, we have the AR model inside a hyperlink tag and an image to be displayed for the model. By adding the rel="ar" attribute we tell the browser that this is an AR model so it will automatically add the AR badge in the right corner of the image and will start the AR experience directly instead of navigating to another page.

I uploaded the image and model on my personal website as you can only host assets directly on Codepen with a paid account. When you will be developing your project you can also link to your project files, like this for example: href="/assets/models/model.usdz".
Additionally, I added the following to the CSS file to fit the image nicer on the screen:
img {
  width: 100%;
}
And that’s it! You can now save it and reload the Codepen link from your device. When we tap on the image on iOS, we will be taken to the AR Quick Look view. If we tap on the image on macOS, the model will be downloaded on your machine.

Banners
Available for devices running iOS 13.3 or later
In the previous section we looked at the most basic AR Quick Look experience, but you can also add banners with Apple Pay or Custom Actions to your AR experience.
Check out this very useful webpage made by Apple for more information on integrating those features. You can enter all the customisation details you need for your banner and this webpage will generate the code for you, pretty cool!
In this section we will have a look at different styles of banners you can add but it will be up to you to define the actions your website takes in response to tapping on the banner. For more information, see this article from Apple.
The flow of your experience will look like this:
Image Source: Apple
Here are some examples of custom banners for our sneaker webpage:
Apple Pay banner with title, subtitle, price and a “Buy with Pay” button:
- Button types:
plain(default),book,buy,check-out,donate,payandsubscribe - The
priceis optional on Apple Pay banners only from iOS 14.
<div>
  <a rel="ar" id="ar-link" href="https://roxanajula.com/wp-content/uploads/2020/09/Adidas_Originals_Stan_Smith.usdz#applePayButtonType=buy&checkoutTitle=Adidas%20Stan%20Smith&checkoutSubtitle=Classic%20trainers&price=$80">
      <img src="https://roxanajula.com/wp-content/uploads/2020/09/Adidas_Originals_Stan_Smith.jpg">
</div>

Find out more about how to support Apple Pay on your website here.
Custom action banner with title, subtitle, price and a “Preorder” button:
<div>
  <a rel="ar" id="ApplePay" href="https://roxanajula.com/wp-content/uploads/2020/09/Adidas_Originals_Stan_Smith.usdz#callToAction=Preorder&checkoutTitle=Adidas%20Stan%20Smith&checkoutSubtitle=Classic%20trainers&price=$100">
      <img src="https://roxanajula.com/wp-content/uploads/2020/09/Adidas_Originals_Stan_Smith.jpg">
  </a>
</div>

Custom large sized banner with own html:
- You can pick between 3 height sizes:
small(81 points),medium(121 points) andlarge(161 points). Small will be set by default ifcustomHeightis omitted. - The custom HTML file must be sent over HTTPS.
- I am hosting the custom html file on my website
<div>
  <a rel="ar" id="ApplePay" href="https://roxanajula.com/wp-content/uploads/2020/09/Adidas_Originals_Stan_Smith.usdz#custom=https://roxanajula.com/wp-content/uploads/2020/09/sneaker_custom.html&customHeight=large">
    <img src="https://roxanajula.com/wp-content/uploads/2020/09/Adidas_Originals_Stan_Smith.jpg">
</div>

Content scaling
Content scaling is enabled by default but you can disable it with the following URL parameter: allowsContentScaling=0.
Share link
The share functionality will link to the model by default, but you can also specify another link with the following URL parameter: canonicalWebPageURL=https://example.com.
Detect support for AR
It is good practice to only show the AR model to the users if it’s supported, here is how you can detect if AR is supported:
const a = document.createElement("a");
if (a.relList.supports("ar")) {
  // AR is available.
}
Code Source: Viewing Augmented Reality Assets in Safari for iOS
Online shopping and AR Quick Look
Native Web AR allows adding an Apple Pay button. You can also set an action like “Add to cart” instead of offering a user to pay for an item right away. Other options include redirecting them to a messenger or displaying a completely custom banner.
This feature allows to create a seamless buying experience and increase the conversion to purchase. Surprisingly, it’s not widely adopted yet — so you have a chance to be an early adopter of a promising technology.
Essentially, it helps to make a purchase as close to retail experience as possible. With the help of AR Quick Look, you can unite possibilities of e-commerce and retail in one point of sale.

If you have an iPhone or iPad, click the link below and pick one of 3D models to see them in augmented reality right from the browser.
Bonus: Nested models
You can have a look at the Making the nested USDZ file section in this article for a step by step tutorial on how to nest together more models into one USDZ file.
Keep in mind that USDZ is still a fairly new format so you might need to check that your web server understands the model/vnd.usdz+zip MIME-type. Refer to your web server documentation on how to configure this if not already supported.
Resources
- Sneaker shop with AR Quick Look Codepen
- Adding an Apple Pay Button or a Custom Action in AR Quick Look
- Viewing Augmented Reality Assets in Safari for iOS
- Previewing a Model with AR Quick Look
- WWDC20: Shop online with AR Quick Look
- https://engineering.monstar-lab.com/2020/09/07/Easy-web-augmented-reality-with-ar-quick-look
- https://hackernoon.com/introduction-to-ar-quick-look-for-ios-devices-v02i34yy


The Average Size of Home Office: A Perfect Workspace
Top 10 Best Fake ID Websites [OnlyFake?]

How Much Does a Hosting Server Cost Per User for an App?
How Gaming Technologies are Transforming the Entertainment Industry

Things to consider before starting a Retail Software Development
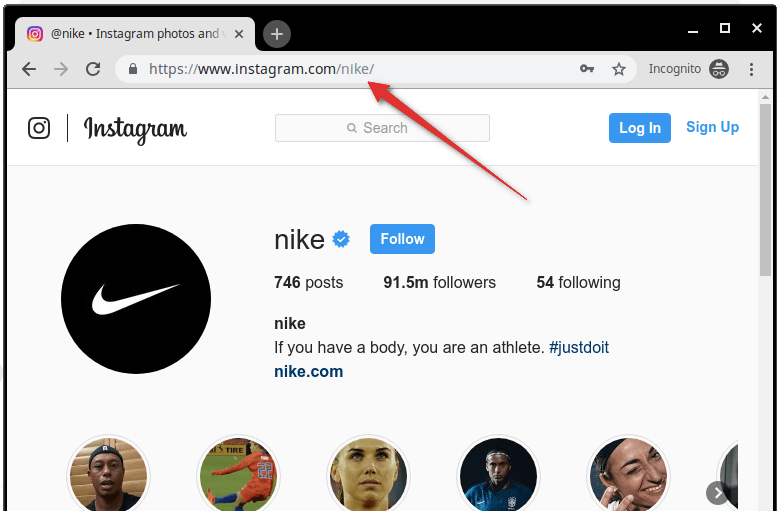
What is my Instagram URL? How to Find & Copy Address [Guide on Desktop or Mobile]

Applob.com Download APK – Tweak your device Safe

About Apple Employee and Friends&Family Discount in 2024
How to Translate more 5,000 characters limit by Google

How to Unlist your Phone Number from GetContact
-
Marketing Tips6 days ago
What is my Instagram URL? How to Find & Copy Address [Guide on Desktop or Mobile]
-
 Cyber Risk Management1 day ago
How Much Does a Hosting Server Cost Per User for an App?
-
 Grow Your Business6 days ago
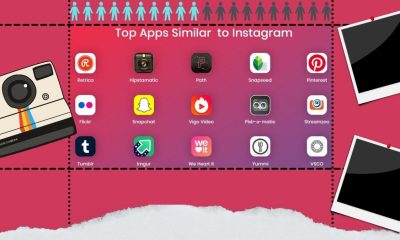
Best Instagram-like Apps and their Features
-

 Outsourcing Development2 days ago
All you need to know about Offshore Staff Augmentation
-
 Software Development2 days ago
Things to consider before starting a Retail Software Development
-
Marketing Tips6 days ago
B2B Instagram Statistics in 2024
-
 Grow Your Business1 day ago
The Average Size of Home Office: A Perfect Workspace
-
Solution Review1 day ago
Top 10 Best Fake ID Websites [OnlyFake?]